
TekMatix Help Articles

Afilliates / Appointment
How To Configure The Buttons on Your Website
In this tutorial, we’ll explain how to configure the buttons for your website. This allows you to determine the action(s) that occur when someone clicks a button on your page, and can be fully customized. For instructions on specifically configuring the buttons for your navigation menu, skip to Step 3.
Step 1: Getting Started With Button Configuration
Navigate to the page page you'd like to edit.
Select the button to configure.

Navigate to the left side of the screen to "Button Menu”.
Scroll all the way down to "Button Actions" > Select from the list.
Step 2: Choose Your Button Actions
From the “Link To” list, you can choose any of the following options:

Once you’ve chosen your option for the Button Action from the dropdown, you will need to fill out the remainder of the information needed for that particular action.
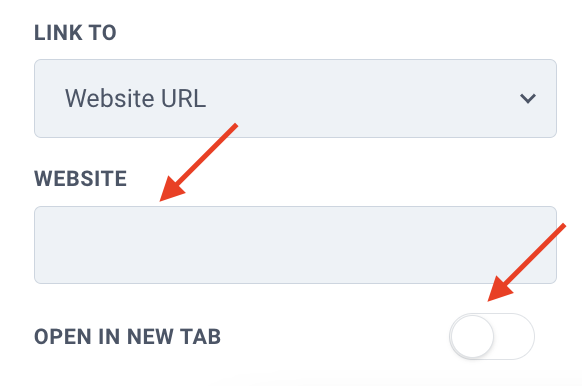
For example, if you choose “Website URL” you will need to enter the specific URL, and toggle on or off the “Open in New Tab” feature:
If you choose “Scroll to element” you will need to select an element:

NOTE: If you choose “Website URL” you can choose a link from a hosted file in your Media Library.
Step 3: (Optional) Navigation Menu Configuration
Select the page you'd like to edit.
NOTE: When editing the buttons on a navigation menu, you will need to configure the buttons on each website page.
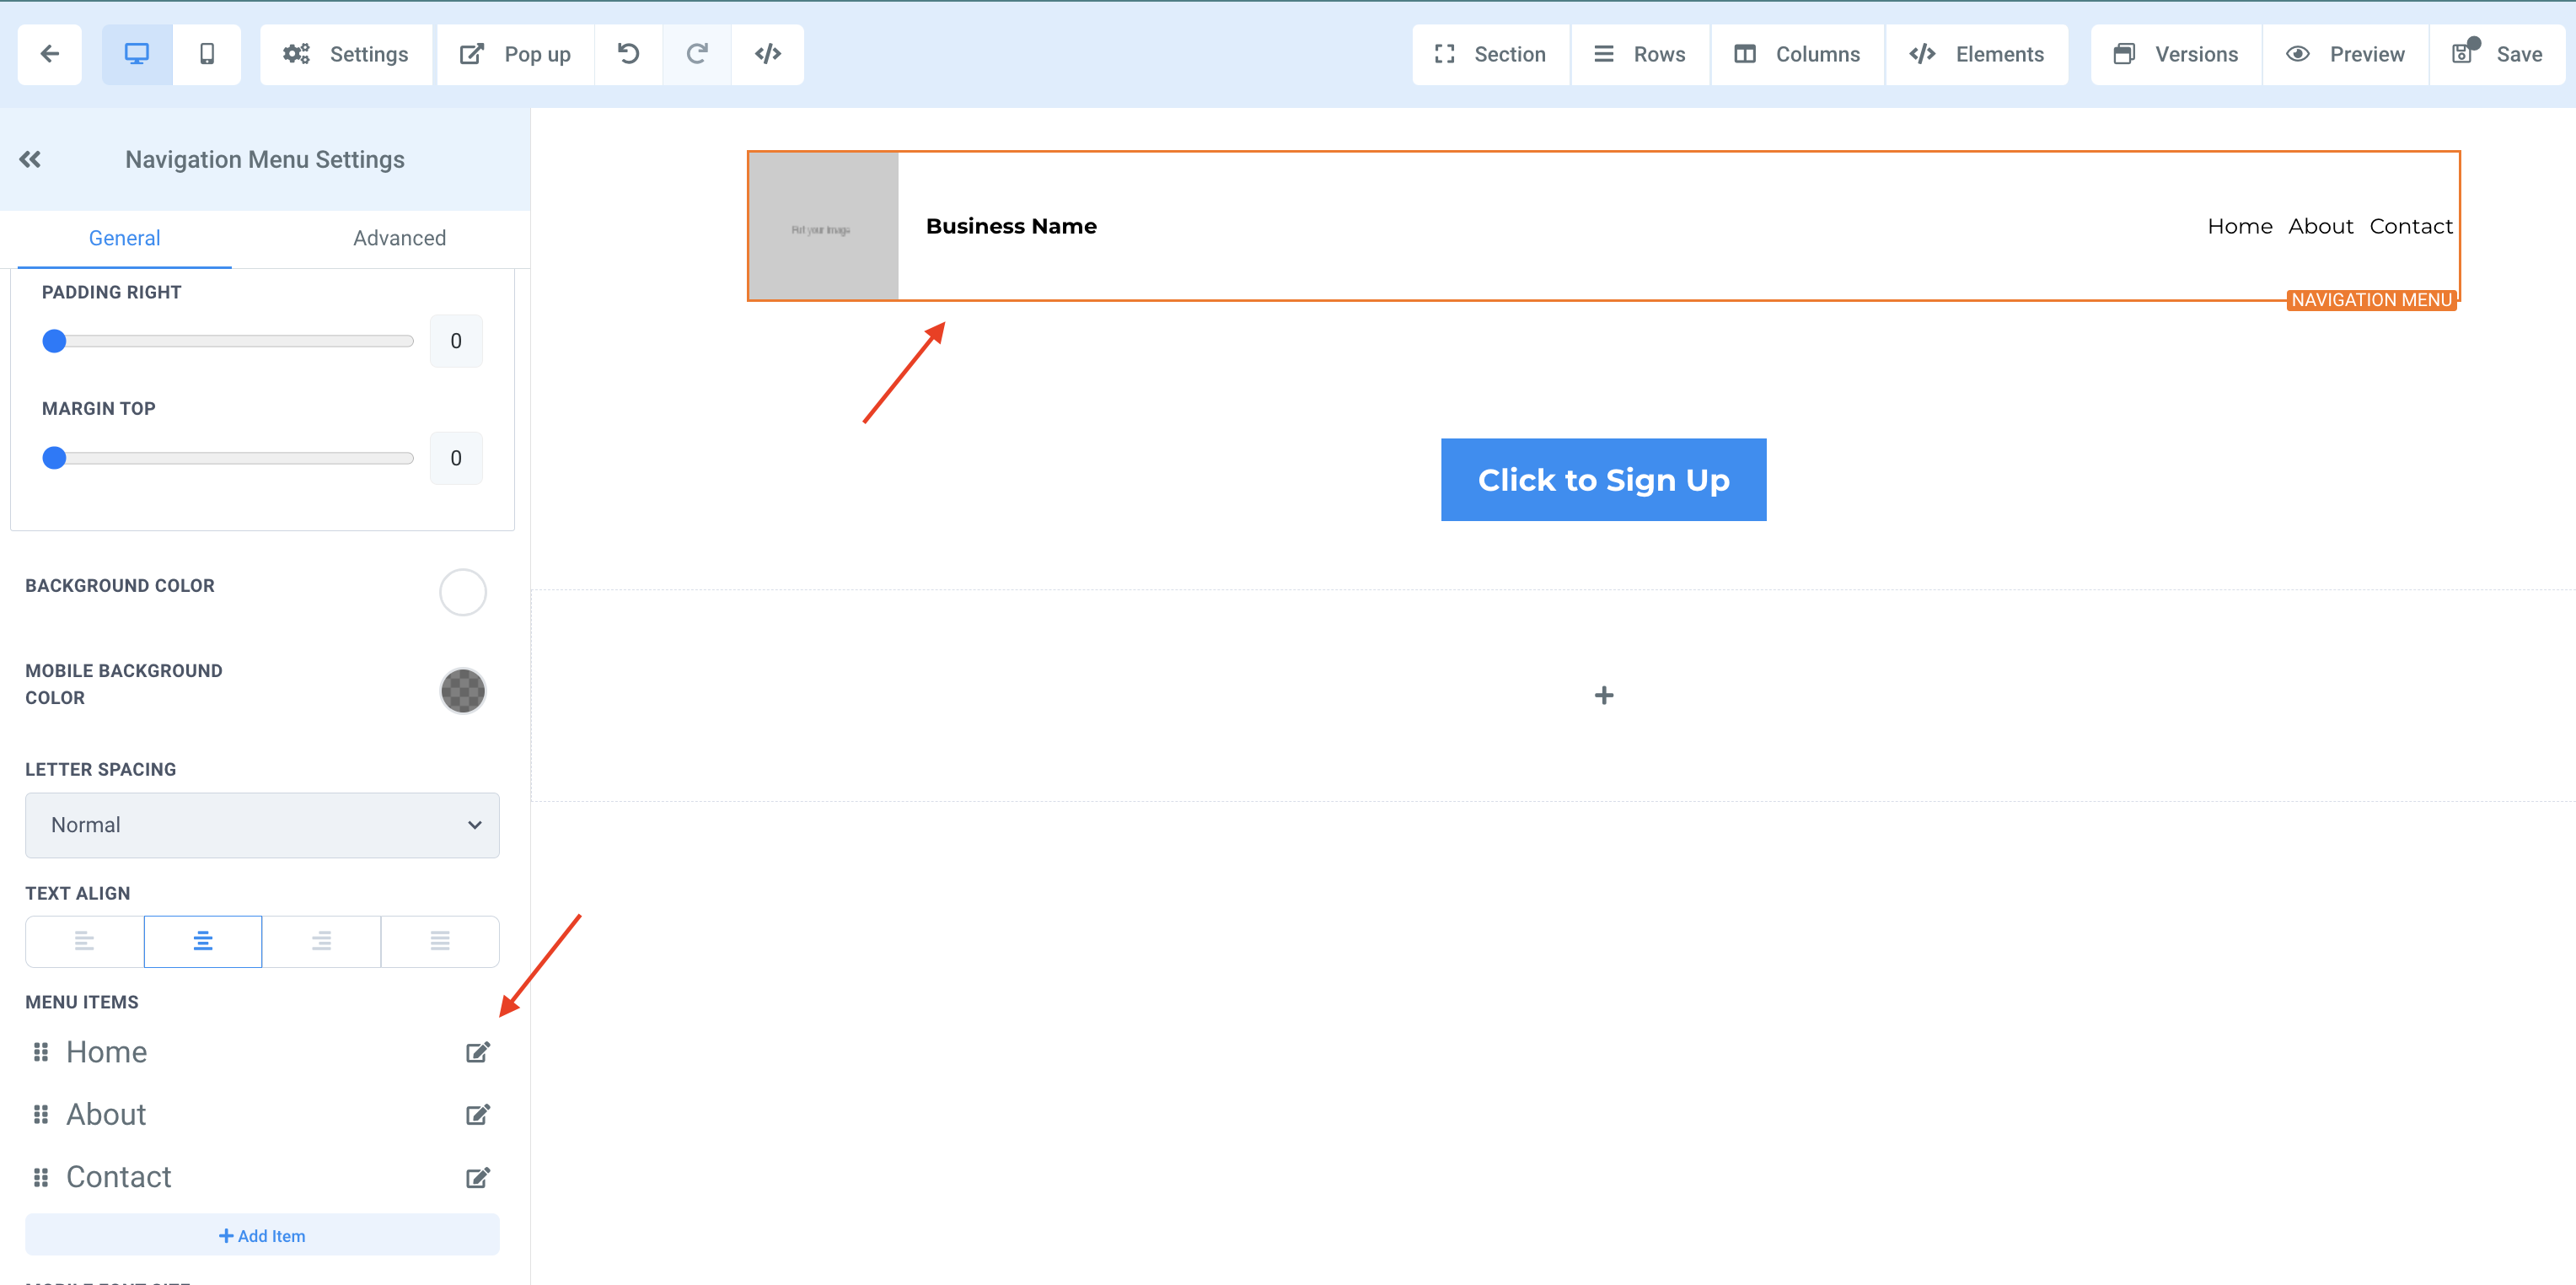
Select Navigation Menu.
Navigate to "Navigation Menu Settings" on the left-hand side.
Scroll down to "Menu Items" > Select "Edit" on the button you'd like to configure.
In the popup, enter the website URL or the page you'd like to assign the button to > Click "Submit".

Repeat this step for each button.
Once ALL of the navigation menu buttons have been configured, click "Save" to confirm your updates/changes.
Repeat steps 1-3 for the remaining pages.

Blogs / Calendars / Campaign
How To Configure The Buttons on Your Website
In this tutorial, we’ll explain how to configure the buttons for your website. This allows you to determine the action(s) that occur when someone clicks a button on your page, and can be fully customized. For instructions on specifically configuring the buttons for your navigation menu, skip to Step 3.
Step 1: Getting Started With Button Configuration
Navigate to the page page you'd like to edit.
Select the button to configure.
Navigate to the left side of the screen to "Button Menu”.
Scroll all the way down to "Button Actions" > Select from the list.
Step 2: Choose Your Button Actions
From the “Link To” list, you can choose any of the following options:
Once you’ve chosen your option for the Button Action from the dropdown, you will need to fill out the remainder of the information needed for that particular action.
For example, if you choose “Website URL” you will need to enter the specific URL, and toggle on or off the “Open in New Tab” feature:
If you choose “Scroll to element” you will need to select an element:
NOTE: If you choose “Website URL” you can choose a link from a hosted file in your Media Library.
Step 3: (Optional) Navigation Menu Configuration
Select the page you'd like to edit.
NOTE: When editing the buttons on a navigation menu, you will need to configure the buttons on each website page.
Select Navigation Menu.
Navigate to "Navigation Menu Settings" on the left-hand side.
Scroll down to "Menu Items" > Select "Edit" on the button you'd like to configure.
In the popup, enter the website URL or the page you'd like to assign the button to > Click "Submit".
Repeat this step for each button.
Once ALL of the navigation menu buttons have been configured, click "Save" to confirm your updates/changes.
Repeat steps 1-3 for the remaining pages.
Course / CRM / Chat Widget
How To Configure The Buttons on Your Website
In this tutorial, we’ll explain how to configure the buttons for your website. This allows you to determine the action(s) that occur when someone clicks a button on your page, and can be fully customized. For instructions on specifically configuring the buttons for your navigation menu, skip to Step 3.
Step 1: Getting Started With Button Configuration
Navigate to the page page you'd like to edit.
Select the button to configure.
Navigate to the left side of the screen to "Button Menu”.
Scroll all the way down to "Button Actions" > Select from the list.
Step 2: Choose Your Button Actions
From the “Link To” list, you can choose any of the following options:
Once you’ve chosen your option for the Button Action from the dropdown, you will need to fill out the remainder of the information needed for that particular action.
For example, if you choose “Website URL” you will need to enter the specific URL, and toggle on or off the “Open in New Tab” feature:
If you choose “Scroll to element” you will need to select an element:
NOTE: If you choose “Website URL” you can choose a link from a hosted file in your Media Library.
Step 3: (Optional) Navigation Menu Configuration
Select the page you'd like to edit.
NOTE: When editing the buttons on a navigation menu, you will need to configure the buttons on each website page.
Select Navigation Menu.
Navigate to "Navigation Menu Settings" on the left-hand side.
Scroll down to "Menu Items" > Select "Edit" on the button you'd like to configure.
In the popup, enter the website URL or the page you'd like to assign the button to > Click "Submit".
Repeat this step for each button.
Once ALL of the navigation menu buttons have been configured, click "Save" to confirm your updates/changes.
Repeat steps 1-3 for the remaining pages.
Compliance / Custom Fields
How To Configure The Buttons on Your Website
In this tutorial, we’ll explain how to configure the buttons for your website. This allows you to determine the action(s) that occur when someone clicks a button on your page, and can be fully customized. For instructions on specifically configuring the buttons for your navigation menu, skip to Step 3.
Step 1: Getting Started With Button Configuration
Navigate to the page page you'd like to edit.
Select the button to configure.
Navigate to the left side of the screen to "Button Menu”.
Scroll all the way down to "Button Actions" > Select from the list.
Step 2: Choose Your Button Actions
From the “Link To” list, you can choose any of the following options:
Once you’ve chosen your option for the Button Action from the dropdown, you will need to fill out the remainder of the information needed for that particular action.
For example, if you choose “Website URL” you will need to enter the specific URL, and toggle on or off the “Open in New Tab” feature:
If you choose “Scroll to element” you will need to select an element:
NOTE: If you choose “Website URL” you can choose a link from a hosted file in your Media Library.
Step 3: (Optional) Navigation Menu Configuration
Select the page you'd like to edit.
NOTE: When editing the buttons on a navigation menu, you will need to configure the buttons on each website page.
Select Navigation Menu.
Navigate to "Navigation Menu Settings" on the left-hand side.
Scroll down to "Menu Items" > Select "Edit" on the button you'd like to configure.
In the popup, enter the website URL or the page you'd like to assign the button to > Click "Submit".
Repeat this step for each button.
Once ALL of the navigation menu buttons have been configured, click "Save" to confirm your updates/changes.
Repeat steps 1-3 for the remaining pages.
Dashboard / Domain
How To Configure The Buttons on Your Website
In this tutorial, we’ll explain how to configure the buttons for your website. This allows you to determine the action(s) that occur when someone clicks a button on your page, and can be fully customized. For instructions on specifically configuring the buttons for your navigation menu, skip to Step 3.
Step 1: Getting Started With Button Configuration
Navigate to the page page you'd like to edit.
Select the button to configure.
Navigate to the left side of the screen to "Button Menu”.
Scroll all the way down to "Button Actions" > Select from the list.
Step 2: Choose Your Button Actions
From the “Link To” list, you can choose any of the following options:
Once you’ve chosen your option for the Button Action from the dropdown, you will need to fill out the remainder of the information needed for that particular action.
For example, if you choose “Website URL” you will need to enter the specific URL, and toggle on or off the “Open in New Tab” feature:
If you choose “Scroll to element” you will need to select an element:
NOTE: If you choose “Website URL” you can choose a link from a hosted file in your Media Library.
Step 3: (Optional) Navigation Menu Configuration
Select the page you'd like to edit.
NOTE: When editing the buttons on a navigation menu, you will need to configure the buttons on each website page.
Select Navigation Menu.
Navigate to "Navigation Menu Settings" on the left-hand side.
Scroll down to "Menu Items" > Select "Edit" on the button you'd like to configure.
In the popup, enter the website URL or the page you'd like to assign the button to > Click "Submit".
Repeat this step for each button.
Once ALL of the navigation menu buttons have been configured, click "Save" to confirm your updates/changes.
Repeat steps 1-3 for the remaining pages.
Email Builder / Email Deliverability
How To Configure The Buttons on Your Website
In this tutorial, we’ll explain how to configure the buttons for your website. This allows you to determine the action(s) that occur when someone clicks a button on your page, and can be fully customized. For instructions on specifically configuring the buttons for your navigation menu, skip to Step 3.
Step 1: Getting Started With Button Configuration
Navigate to the page page you'd like to edit.
Select the button to configure.
Navigate to the left side of the screen to "Button Menu”.
Scroll all the way down to "Button Actions" > Select from the list.
Step 2: Choose Your Button Actions
From the “Link To” list, you can choose any of the following options:
Once you’ve chosen your option for the Button Action from the dropdown, you will need to fill out the remainder of the information needed for that particular action.
For example, if you choose “Website URL” you will need to enter the specific URL, and toggle on or off the “Open in New Tab” feature:
If you choose “Scroll to element” you will need to select an element:
NOTE: If you choose “Website URL” you can choose a link from a hosted file in your Media Library.
Step 3: (Optional) Navigation Menu Configuration
Select the page you'd like to edit.
NOTE: When editing the buttons on a navigation menu, you will need to configure the buttons on each website page.
Select Navigation Menu.
Navigate to "Navigation Menu Settings" on the left-hand side.
Scroll down to "Menu Items" > Select "Edit" on the button you'd like to configure.
In the popup, enter the website URL or the page you'd like to assign the button to > Click "Submit".
Repeat this step for each button.
Once ALL of the navigation menu buttons have been configured, click "Save" to confirm your updates/changes.
Repeat steps 1-3 for the remaining pages.
Form / Funnels
How To Configure The Buttons on Your Website
In this tutorial, we’ll explain how to configure the buttons for your website. This allows you to determine the action(s) that occur when someone clicks a button on your page, and can be fully customized. For instructions on specifically configuring the buttons for your navigation menu, skip to Step 3.
Step 1: Getting Started With Button Configuration
Navigate to the page page you'd like to edit.
Select the button to configure.
Navigate to the left side of the screen to "Button Menu”.
Scroll all the way down to "Button Actions" > Select from the list.
Step 2: Choose Your Button Actions
From the “Link To” list, you can choose any of the following options:
Once you’ve chosen your option for the Button Action from the dropdown, you will need to fill out the remainder of the information needed for that particular action.
For example, if you choose “Website URL” you will need to enter the specific URL, and toggle on or off the “Open in New Tab” feature:
If you choose “Scroll to element” you will need to select an element:
NOTE: If you choose “Website URL” you can choose a link from a hosted file in your Media Library.
Step 3: (Optional) Navigation Menu Configuration
Select the page you'd like to edit.
NOTE: When editing the buttons on a navigation menu, you will need to configure the buttons on each website page.
Select Navigation Menu.
Navigate to "Navigation Menu Settings" on the left-hand side.
Scroll down to "Menu Items" > Select "Edit" on the button you'd like to configure.
In the popup, enter the website URL or the page you'd like to assign the button to > Click "Submit".
Repeat this step for each button.
Once ALL of the navigation menu buttons have been configured, click "Save" to confirm your updates/changes.
Repeat steps 1-3 for the remaining pages.
Google My Business / Integrations
How To Configure The Buttons on Your Website
In this tutorial, we’ll explain how to configure the buttons for your website. This allows you to determine the action(s) that occur when someone clicks a button on your page, and can be fully customized. For instructions on specifically configuring the buttons for your navigation menu, skip to Step 3.
Step 1: Getting Started With Button Configuration
Navigate to the page page you'd like to edit.
Select the button to configure.
Navigate to the left side of the screen to "Button Menu”.
Scroll all the way down to "Button Actions" > Select from the list.
Step 2: Choose Your Button Actions
From the “Link To” list, you can choose any of the following options:
Once you’ve chosen your option for the Button Action from the dropdown, you will need to fill out the remainder of the information needed for that particular action.
For example, if you choose “Website URL” you will need to enter the specific URL, and toggle on or off the “Open in New Tab” feature:
If you choose “Scroll to element” you will need to select an element:
NOTE: If you choose “Website URL” you can choose a link from a hosted file in your Media Library.
Step 3: (Optional) Navigation Menu Configuration
Select the page you'd like to edit.
NOTE: When editing the buttons on a navigation menu, you will need to configure the buttons on each website page.
Select Navigation Menu.
Navigate to "Navigation Menu Settings" on the left-hand side.
Scroll down to "Menu Items" > Select "Edit" on the button you'd like to configure.
In the popup, enter the website URL or the page you'd like to assign the button to > Click "Submit".
Repeat this step for each button.
Once ALL of the navigation menu buttons have been configured, click "Save" to confirm your updates/changes.
Repeat steps 1-3 for the remaining pages.
Invoices / LC Email / LC Phone
How To Configure The Buttons on Your Website
In this tutorial, we’ll explain how to configure the buttons for your website. This allows you to determine the action(s) that occur when someone clicks a button on your page, and can be fully customized. For instructions on specifically configuring the buttons for your navigation menu, skip to Step 3.
Step 1: Getting Started With Button Configuration
Navigate to the page page you'd like to edit.
Select the button to configure.
Navigate to the left side of the screen to "Button Menu”.
Scroll all the way down to "Button Actions" > Select from the list.
Step 2: Choose Your Button Actions
From the “Link To” list, you can choose any of the following options:
Once you’ve chosen your option for the Button Action from the dropdown, you will need to fill out the remainder of the information needed for that particular action.
For example, if you choose “Website URL” you will need to enter the specific URL, and toggle on or off the “Open in New Tab” feature:
If you choose “Scroll to element” you will need to select an element:
NOTE: If you choose “Website URL” you can choose a link from a hosted file in your Media Library.
Step 3: (Optional) Navigation Menu Configuration
Select the page you'd like to edit.
NOTE: When editing the buttons on a navigation menu, you will need to configure the buttons on each website page.
Select Navigation Menu.
Navigate to "Navigation Menu Settings" on the left-hand side.
Scroll down to "Menu Items" > Select "Edit" on the button you'd like to configure.
In the popup, enter the website URL or the page you'd like to assign the button to > Click "Submit".
Repeat this step for each button.
Once ALL of the navigation menu buttons have been configured, click "Save" to confirm your updates/changes.
Repeat steps 1-3 for the remaining pages.
Memberships Area
How To Configure The Buttons on Your Website
In this tutorial, we’ll explain how to configure the buttons for your website. This allows you to determine the action(s) that occur when someone clicks a button on your page, and can be fully customized. For instructions on specifically configuring the buttons for your navigation menu, skip to Step 3.
Step 1: Getting Started With Button Configuration
Navigate to the page page you'd like to edit.
Select the button to configure.
Navigate to the left side of the screen to "Button Menu”.
Scroll all the way down to "Button Actions" > Select from the list.
Step 2: Choose Your Button Actions
From the “Link To” list, you can choose any of the following options:
Once you’ve chosen your option for the Button Action from the dropdown, you will need to fill out the remainder of the information needed for that particular action.
For example, if you choose “Website URL” you will need to enter the specific URL, and toggle on or off the “Open in New Tab” feature:
If you choose “Scroll to element” you will need to select an element:
NOTE: If you choose “Website URL” you can choose a link from a hosted file in your Media Library.
Step 3: (Optional) Navigation Menu Configuration
Select the page you'd like to edit.
NOTE: When editing the buttons on a navigation menu, you will need to configure the buttons on each website page.
Select Navigation Menu.
Navigate to "Navigation Menu Settings" on the left-hand side.
Scroll down to "Menu Items" > Select "Edit" on the button you'd like to configure.
In the popup, enter the website URL or the page you'd like to assign the button to > Click "Submit".
Repeat this step for each button.
Once ALL of the navigation menu buttons have been configured, click "Save" to confirm your updates/changes.
Repeat steps 1-3 for the remaining pages.
Opportunities & Pipeline / Payment
How To Configure The Buttons on Your Website
In this tutorial, we’ll explain how to configure the buttons for your website. This allows you to determine the action(s) that occur when someone clicks a button on your page, and can be fully customized. For instructions on specifically configuring the buttons for your navigation menu, skip to Step 3.
Step 1: Getting Started With Button Configuration
Navigate to the page page you'd like to edit.
Select the button to configure.
Navigate to the left side of the screen to "Button Menu”.
Scroll all the way down to "Button Actions" > Select from the list.
Step 2: Choose Your Button Actions
From the “Link To” list, you can choose any of the following options:
Once you’ve chosen your option for the Button Action from the dropdown, you will need to fill out the remainder of the information needed for that particular action.
For example, if you choose “Website URL” you will need to enter the specific URL, and toggle on or off the “Open in New Tab” feature:
If you choose “Scroll to element” you will need to select an element:
NOTE: If you choose “Website URL” you can choose a link from a hosted file in your Media Library.
Step 3: (Optional) Navigation Menu Configuration
Select the page you'd like to edit.
NOTE: When editing the buttons on a navigation menu, you will need to configure the buttons on each website page.
Select Navigation Menu.
Navigate to "Navigation Menu Settings" on the left-hand side.
Scroll down to "Menu Items" > Select "Edit" on the button you'd like to configure.
In the popup, enter the website URL or the page you'd like to assign the button to > Click "Submit".
Repeat this step for each button.
Once ALL of the navigation menu buttons have been configured, click "Save" to confirm your updates/changes.
Repeat steps 1-3 for the remaining pages.
Reputation Management / Review Request
How To Configure The Buttons on Your Website
In this tutorial, we’ll explain how to configure the buttons for your website. This allows you to determine the action(s) that occur when someone clicks a button on your page, and can be fully customized. For instructions on specifically configuring the buttons for your navigation menu, skip to Step 3.
Step 1: Getting Started With Button Configuration
Navigate to the page page you'd like to edit.
Select the button to configure.
Navigate to the left side of the screen to "Button Menu”.
Scroll all the way down to "Button Actions" > Select from the list.
Step 2: Choose Your Button Actions
From the “Link To” list, you can choose any of the following options:
Once you’ve chosen your option for the Button Action from the dropdown, you will need to fill out the remainder of the information needed for that particular action.
For example, if you choose “Website URL” you will need to enter the specific URL, and toggle on or off the “Open in New Tab” feature:
If you choose “Scroll to element” you will need to select an element:
NOTE: If you choose “Website URL” you can choose a link from a hosted file in your Media Library.
Step 3: (Optional) Navigation Menu Configuration
Select the page you'd like to edit.
NOTE: When editing the buttons on a navigation menu, you will need to configure the buttons on each website page.
Select Navigation Menu.
Navigate to "Navigation Menu Settings" on the left-hand side.
Scroll down to "Menu Items" > Select "Edit" on the button you'd like to configure.
In the popup, enter the website URL or the page you'd like to assign the button to > Click "Submit".
Repeat this step for each button.
Once ALL of the navigation menu buttons have been configured, click "Save" to confirm your updates/changes.
Repeat steps 1-3 for the remaining pages.
Settings / SMS / SMTP Providers
How To Configure The Buttons on Your Website
In this tutorial, we’ll explain how to configure the buttons for your website. This allows you to determine the action(s) that occur when someone clicks a button on your page, and can be fully customized. For instructions on specifically configuring the buttons for your navigation menu, skip to Step 3.
Step 1: Getting Started With Button Configuration
Navigate to the page page you'd like to edit.
Select the button to configure.
Navigate to the left side of the screen to "Button Menu”.
Scroll all the way down to "Button Actions" > Select from the list.
Step 2: Choose Your Button Actions
From the “Link To” list, you can choose any of the following options:
Once you’ve chosen your option for the Button Action from the dropdown, you will need to fill out the remainder of the information needed for that particular action.
For example, if you choose “Website URL” you will need to enter the specific URL, and toggle on or off the “Open in New Tab” feature:
If you choose “Scroll to element” you will need to select an element:
NOTE: If you choose “Website URL” you can choose a link from a hosted file in your Media Library.
Step 3: (Optional) Navigation Menu Configuration
Select the page you'd like to edit.
NOTE: When editing the buttons on a navigation menu, you will need to configure the buttons on each website page.
Select Navigation Menu.
Navigate to "Navigation Menu Settings" on the left-hand side.
Scroll down to "Menu Items" > Select "Edit" on the button you'd like to configure.
In the popup, enter the website URL or the page you'd like to assign the button to > Click "Submit".
Repeat this step for each button.
Once ALL of the navigation menu buttons have been configured, click "Save" to confirm your updates/changes.
Repeat steps 1-3 for the remaining pages.
Website / WordPress / Workflow
How To Configure The Buttons on Your Website
In this tutorial, we’ll explain how to configure the buttons for your website. This allows you to determine the action(s) that occur when someone clicks a button on your page, and can be fully customized. For instructions on specifically configuring the buttons for your navigation menu, skip to Step 3.
Step 1: Getting Started With Button Configuration
Navigate to the page page you'd like to edit.
Select the button to configure.
Navigate to the left side of the screen to "Button Menu”.
Scroll all the way down to "Button Actions" > Select from the list.
Step 2: Choose Your Button Actions
From the “Link To” list, you can choose any of the following options:
Once you’ve chosen your option for the Button Action from the dropdown, you will need to fill out the remainder of the information needed for that particular action.
For example, if you choose “Website URL” you will need to enter the specific URL, and toggle on or off the “Open in New Tab” feature:
If you choose “Scroll to element” you will need to select an element:
NOTE: If you choose “Website URL” you can choose a link from a hosted file in your Media Library.
Step 3: (Optional) Navigation Menu Configuration
Select the page you'd like to edit.
NOTE: When editing the buttons on a navigation menu, you will need to configure the buttons on each website page.
Select Navigation Menu.
Navigate to "Navigation Menu Settings" on the left-hand side.
Scroll down to "Menu Items" > Select "Edit" on the button you'd like to configure.
In the popup, enter the website URL or the page you'd like to assign the button to > Click "Submit".
Repeat this step for each button.
Once ALL of the navigation menu buttons have been configured, click "Save" to confirm your updates/changes.
Repeat steps 1-3 for the remaining pages.
Copyright © 2022 TekMatix. All rights reserved | [email protected]