TEKMATIX AFFILIATE MANAGER
Step-by-Step Guide to Using The Tekmatix Affiliate Manager

CONTENTS
1. Affiliate Manager
All articles that contain Affiliate Manager information will be found in this folder!
2. Affiliate Manager Overview
The Affiliate Manager system provides an affiliate management tool for business owners to manage their affiliate/referral network within their CRM.
Affiliate marketing is a type of advertising in which you compensate others for promoting or referring to your product or service. Referrals, when utilized effectively, can be incredibly rewarding and potent, much like layups in basketball. An affiliate promotes a campaign by sharing its unique affiliate link with potential customers interested in your product or service. The affiliate receives payment upon making a sale, and you earn when they do.
Within the Affiliate Manager, you will see three sections: Campaign, Affiliate, and Payout. An affiliate marketing campaign typically comprises one or more configurations that dictate its progression from inception to completion. These configurations can vary from a straightforward setup, such as a single link, to an intricate multi-step funnel with numerous components.
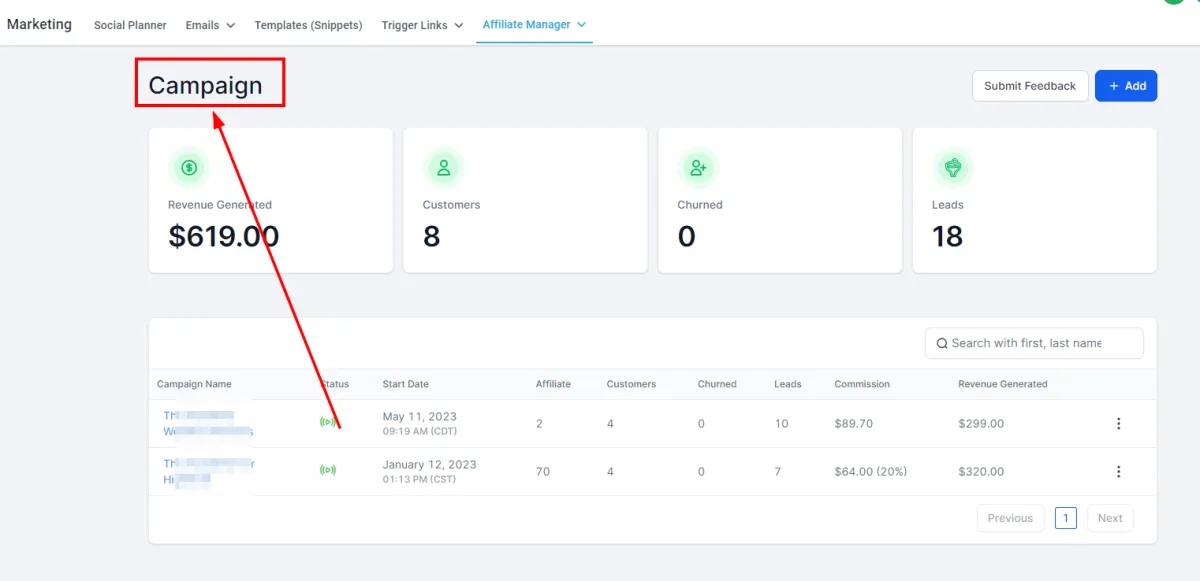
Campaign
The secret to a prosperous affiliate marketing campaign lies in having the appropriate configuration tailored to your business and its objectives. By establishing the right configuration, you can customize the campaign for your target audience, ensure effective communication with your affiliates, and optimize your returns.
The intricacy and particular configuration of an affiliate marketing campaign will hinge on your business's goals and requirements. While some businesses might necessitate a more complex campaign structure, others may thrive with a simpler strategy. Regardless of the situation, adopting the right configuration will aid in attaining the desired outcomes.
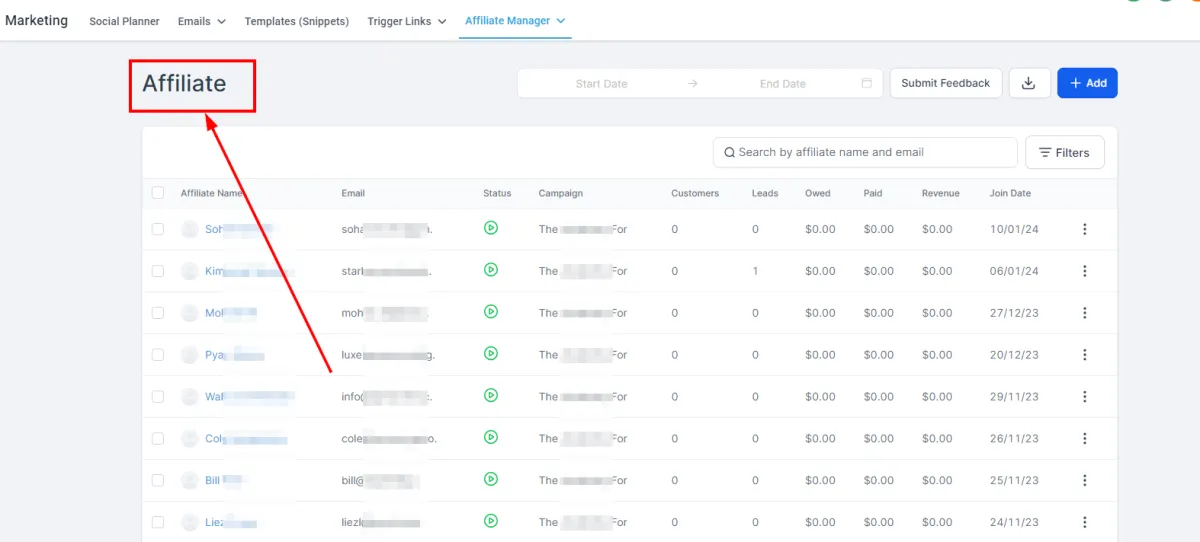
Affiliate
Within the realm of affiliate marketing, an affiliate refers to an individual who promotes a campaign by sending their exclusive affiliate link to potential customers interested in your product or service. The affiliate receives a commission upon making a sale, and you also earn a commission in the process.
In the Affiliate section, you can create, edit, and manage your affiliates. You can bulk upload multiple affiliates at once, saving you time! View the affiliate dashboard to get insights on how many customers have come from each affiliate, as well as the amount of revenue generated, and the amount of commissions owed to each affiliate.
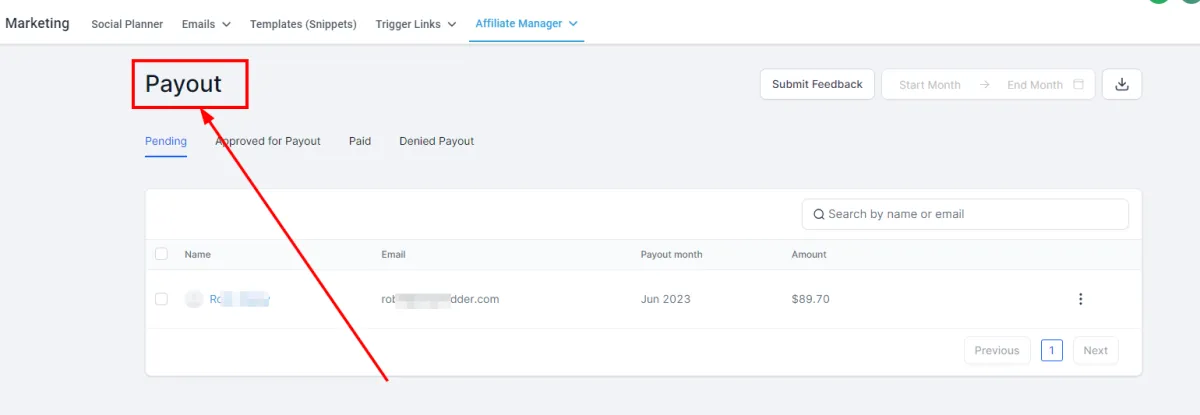
Payout
In this section, the affiliate owner can view a comprehensive list of all created payouts and decide whether to approve or reject them for payment. When a customer registers via an affiliate link, the payout and commission are documented and shown on the Payout - Pending tab on the first day of the subsequent month, or as configured earlier.
Upon approval, the affiliate owner must export the payout information and manually process the payment through their payment gateway using the supplied CSV. After transferring the funds, the status in the Affiliate Manager should be updated to Paid to guarantee accurate reporting for both the affiliate and the overall campaign.
3. Affiliates Overview
Within affiliate marketing, an affiliate refers to an individual who actively promotes a campaign by sharing their exclusive affiliate link with potential customers interested in your product or service. When a sale is successfully made through their efforts, the affiliate receives a commission as compensation. Simultaneously, you also benefit by earning a commission from the sale, creating a mutually advantageous partnership.
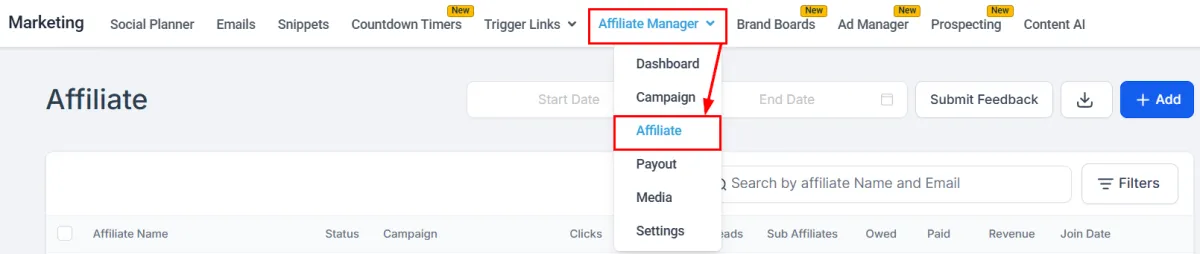
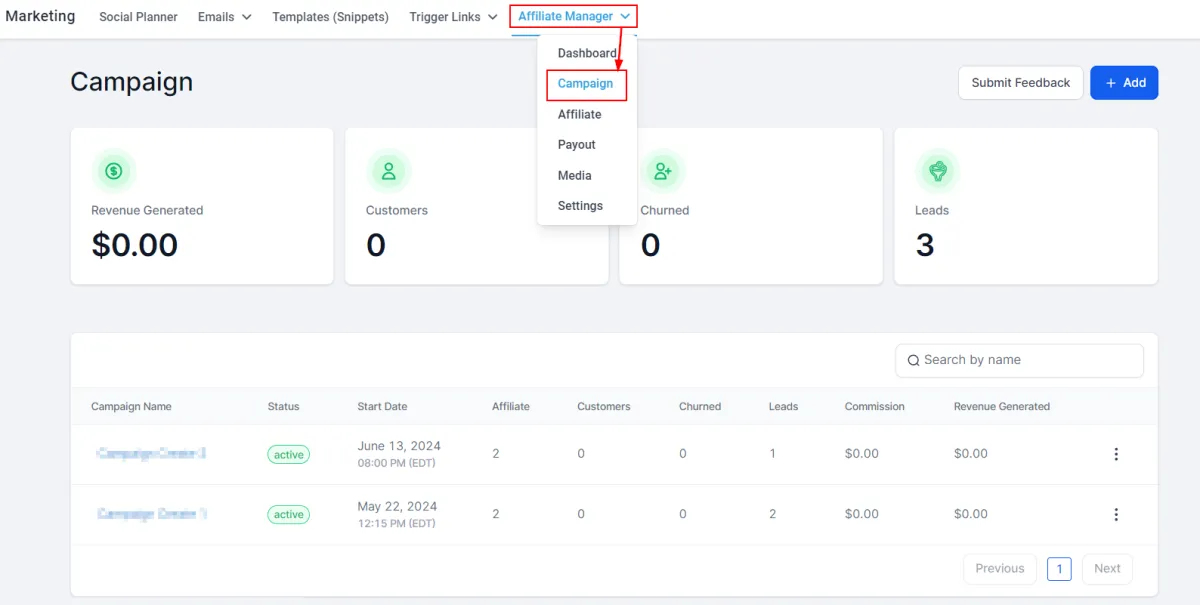
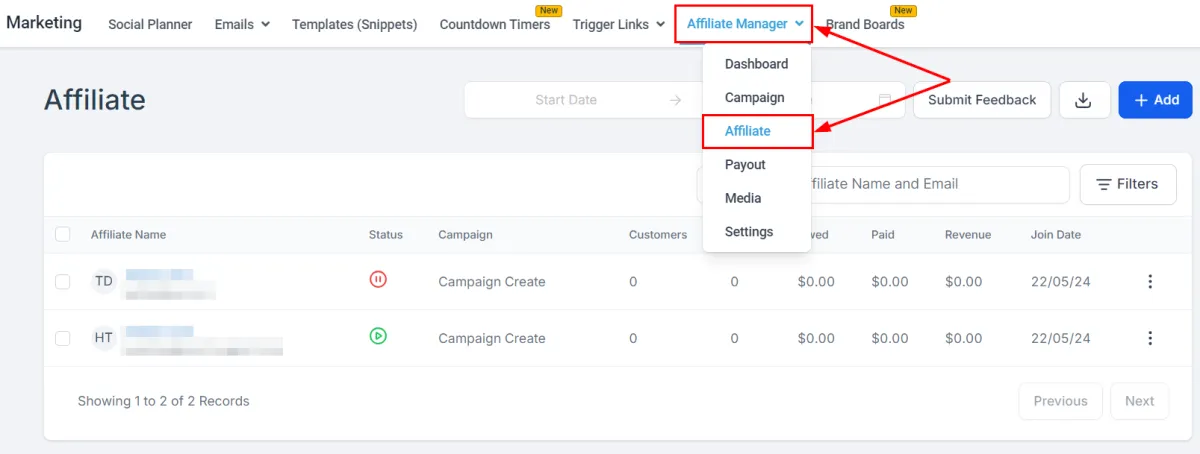
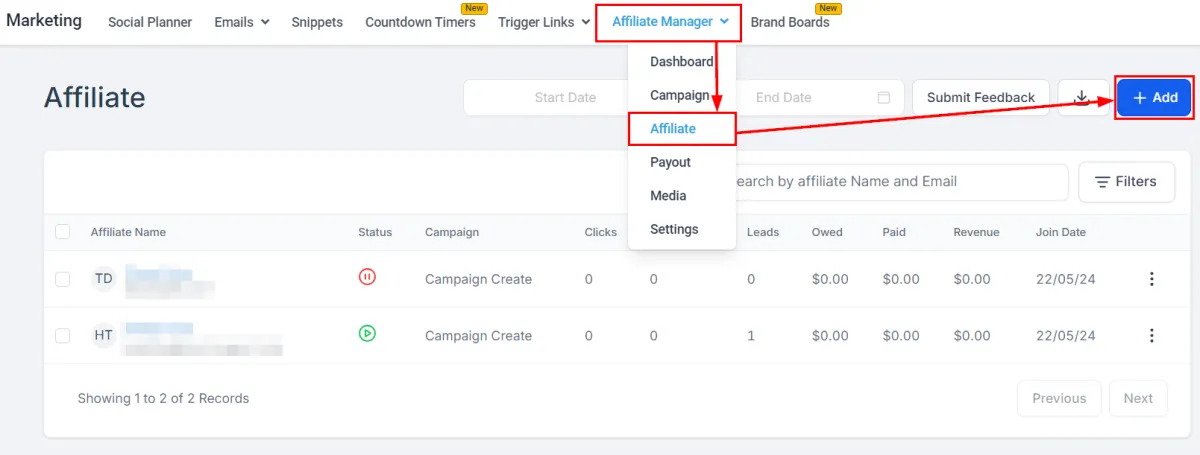
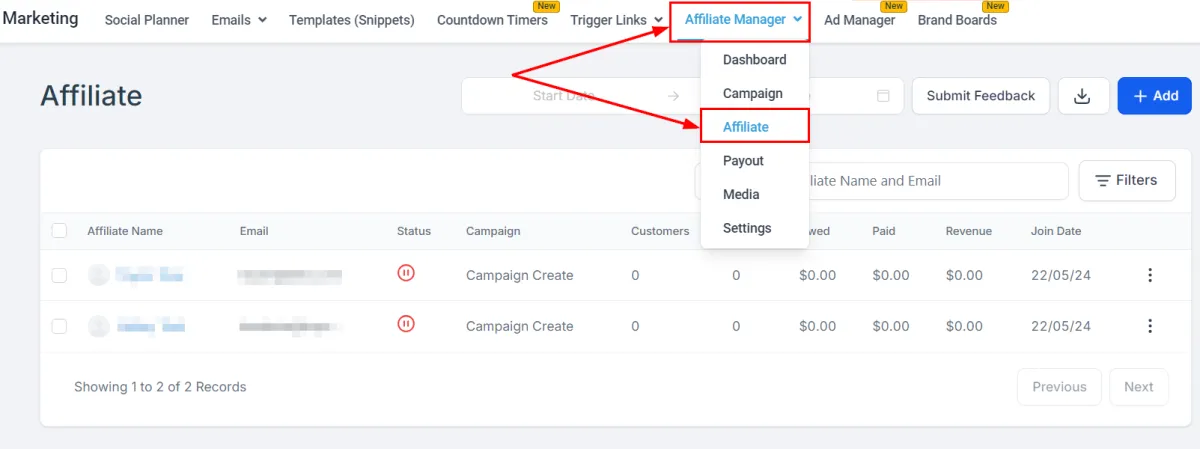
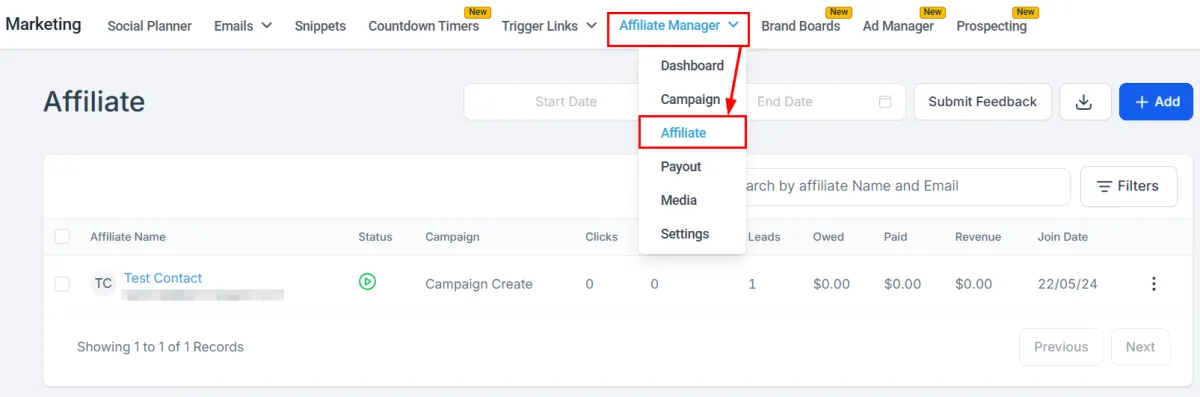
To begin adding affiliates, navigate to the Marketing section, then access the Affiliates tab from the Affiliate Manager dropdown.
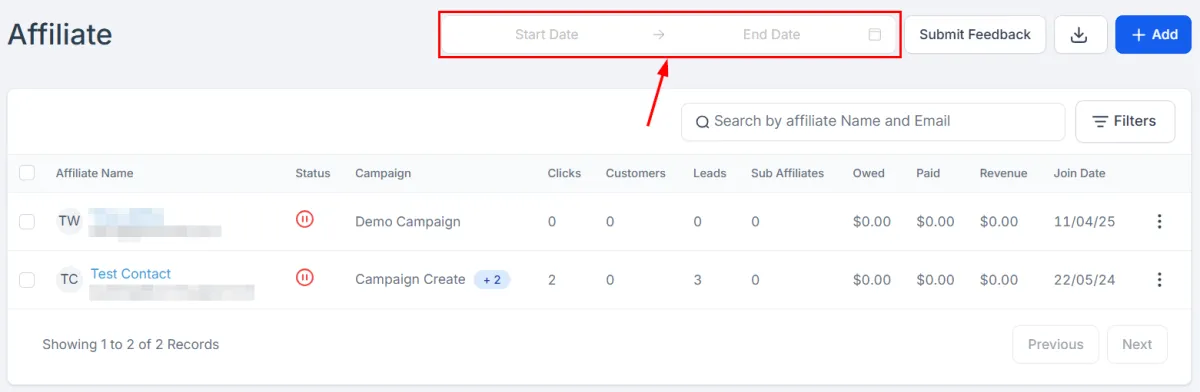
Date Range
Affiliates can be filtered by the date they joined using the date filter. Filtering by the date an affiliate joined a campaign is crucial for tracking campaign progress and performance over specific timeframes. This helps in evaluating the effectiveness of recruitment strategies and tailoring targeted communications or incentives based on the affiliate's tenure.
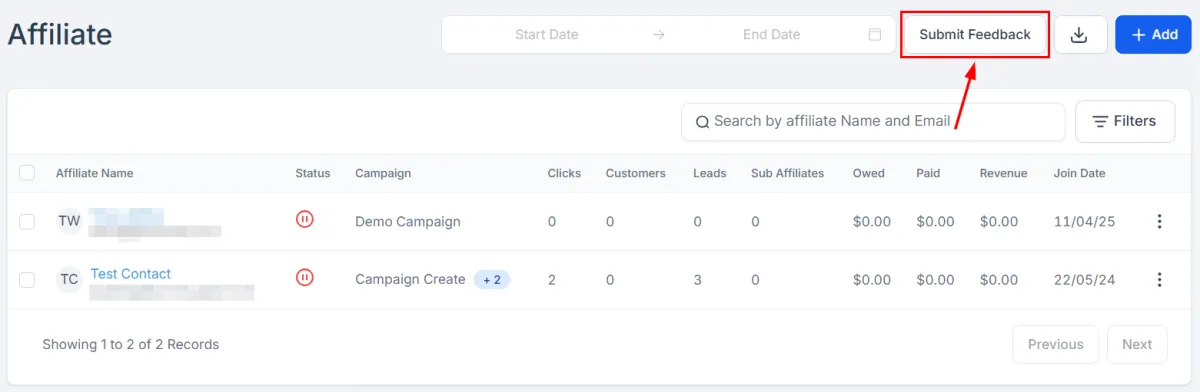
Submit Feedback
Offer suggestions, report issues, or share insights that could help improve the system. By submitting feedback, users contribute to the ongoing enhancement of features, usability, and functionality.
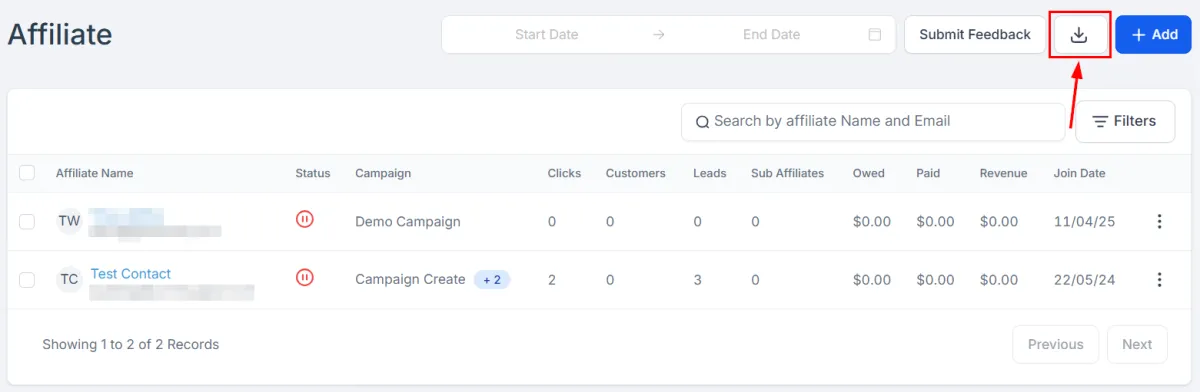
Export
Download your affiliate list for offline access using the Export button.
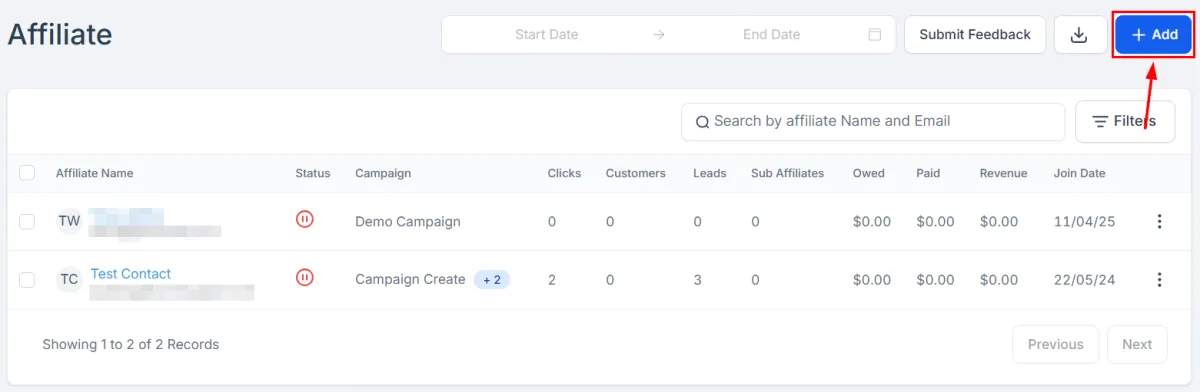
Add
Manually add new affiliates to your affiliate program. This feature allows you to invite individuals or businesses to join your affiliate network, enabling them to promote your products or services in exchange for commissions.
Search
To streamline your search process, simply input the desired name into the search field. This will filter the results, allowing you to quickly and efficiently locate the specific entry you want.
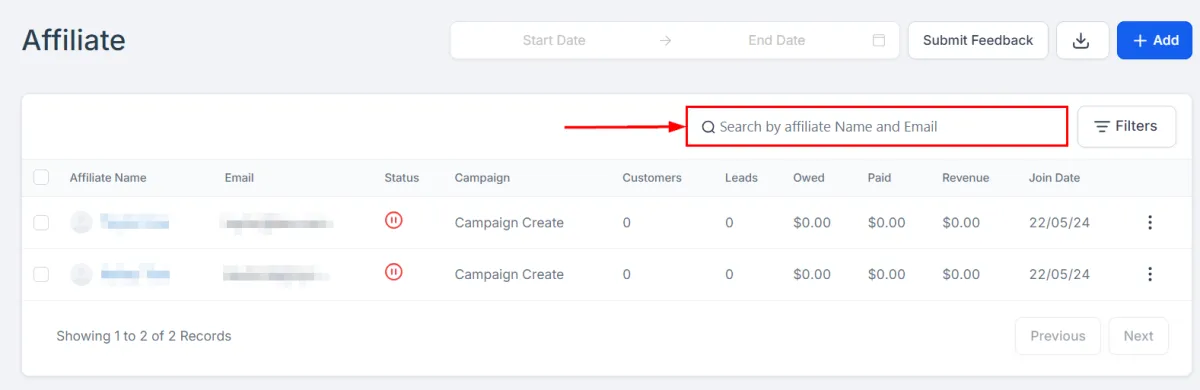
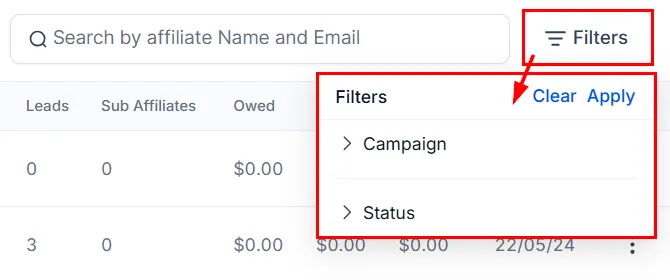
Filters
Display affiliates based on the campaigns they joined or their current status using the filters option. Ensure that you click “Apply” after making your selections.
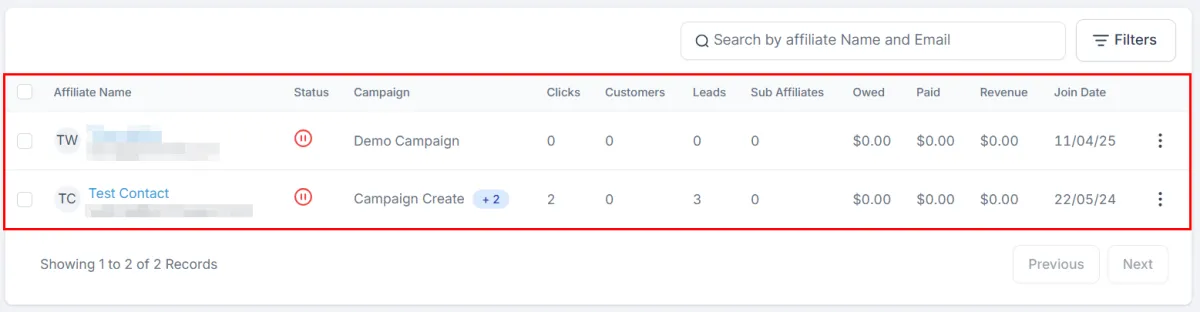
Affiliate Table
The Affiliate table provides an overview of all the affiliates - whether they were created manually or via automation. Here, you can see their name and status, the campaigns they are enrolled in, and other metrics including the number of customers, leads, and sub-affiliates attributed to them, as well as the revenue garnered.
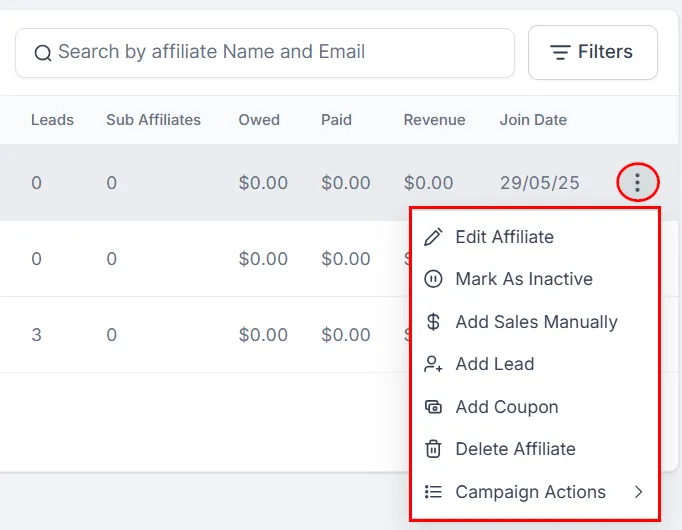
Affiliate Actions
Select affiliates from the list to mark them as inactive or to add them to a workflow in bulk. You may choose individuals manually or select all at once by using the checkbox at the top of the list.
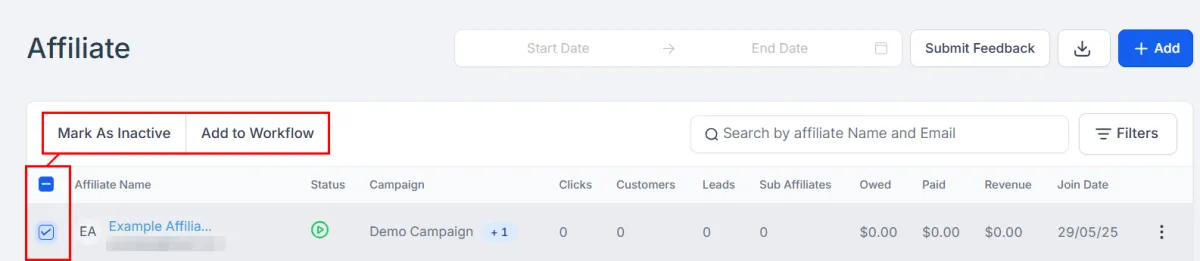
Additionally, click the three dots associated with a particular affiliate to edit their details, mark them as inactive, add sales manually, and more.
With these tools at your fingertips, managing your affiliate program becomes a seamless process, from recruiting and organizing affiliates to tracking performance and optimizing campaigns. Leverage the features within the Affiliate Manager to build stronger partnerships, boost sales, and scale your marketing efforts effectively. Check out the Affiliate Highlights article to gain insights on what you see after you click an affiliate from the list.
4. Affiliate Campaign
In the Overview section of the affiliate marketing campaign, you can quickly get a view of your affiliate campaign activities. The dashboard provides essential information on revenue generated and the number of customers invited through your affiliate links.
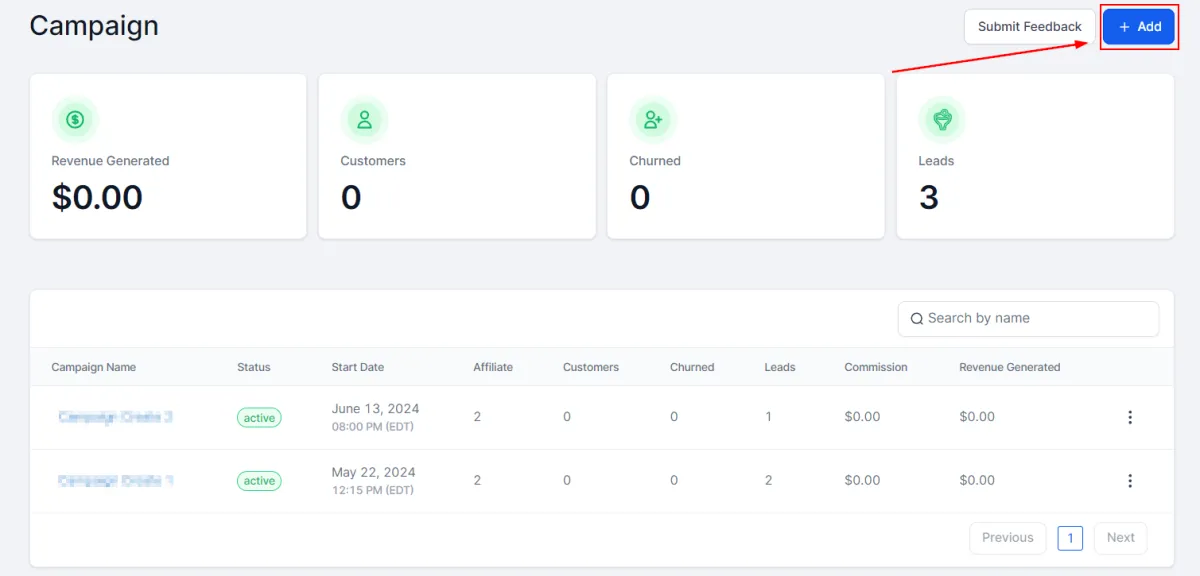
Add New Campaign
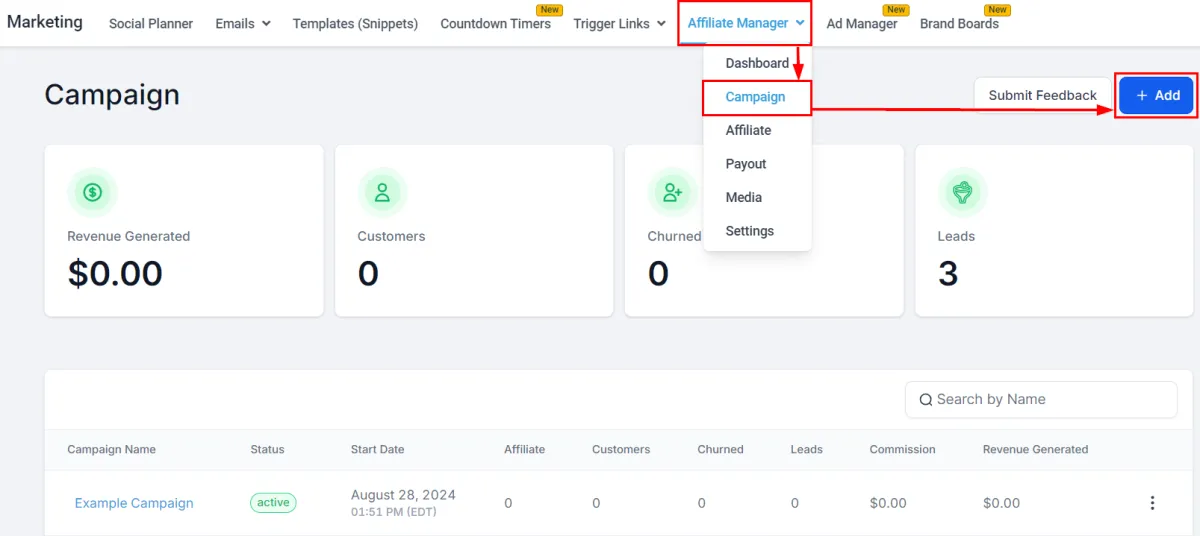
To create a new Affiliate Campaign, click on the '+Add' button. This directs you to the campaign editor's page.
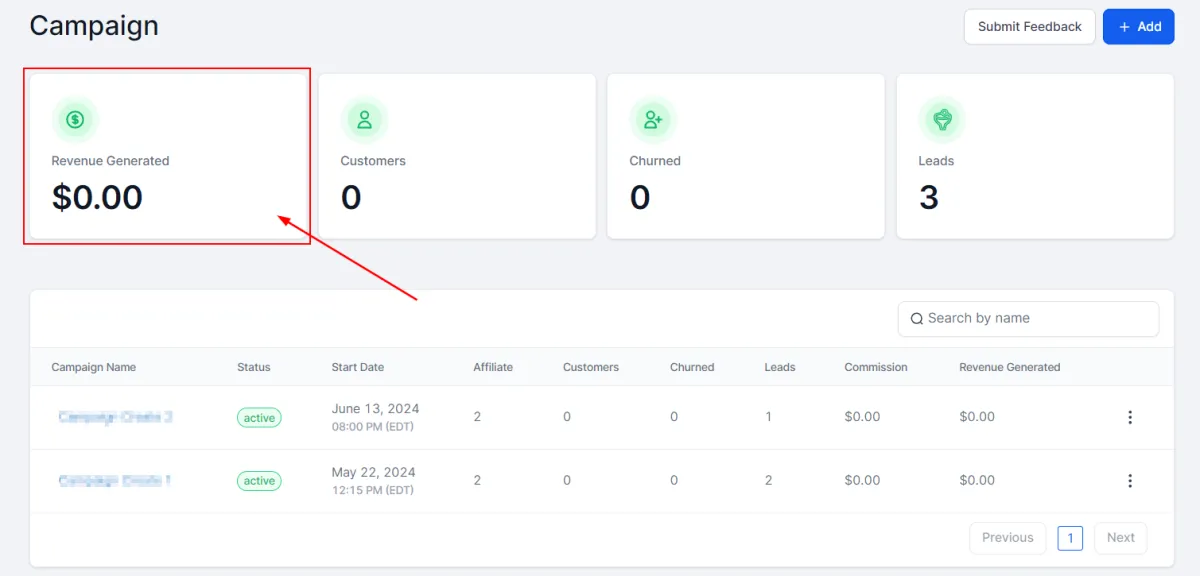
Revenue Generated
The Revenue Generated tab allows you to view the total revenue generated across all campaigns, giving you an insight into the overall performance of your campaign.
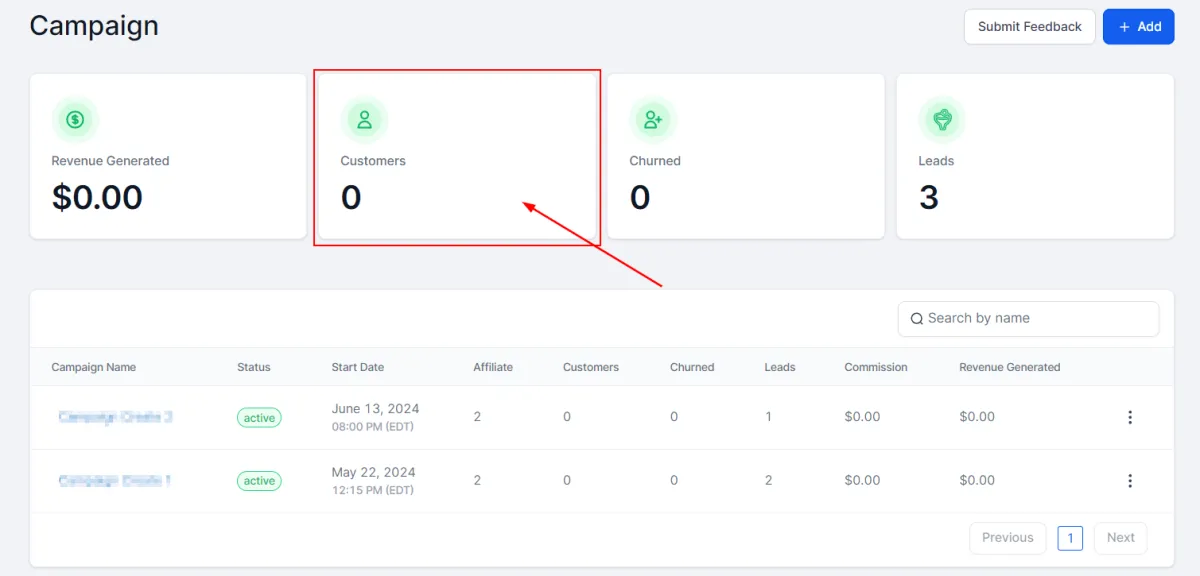
Customers
The Customers tab displays the number of customers invited through the links of your affiliates. This includes recurring or one-time-based customers.
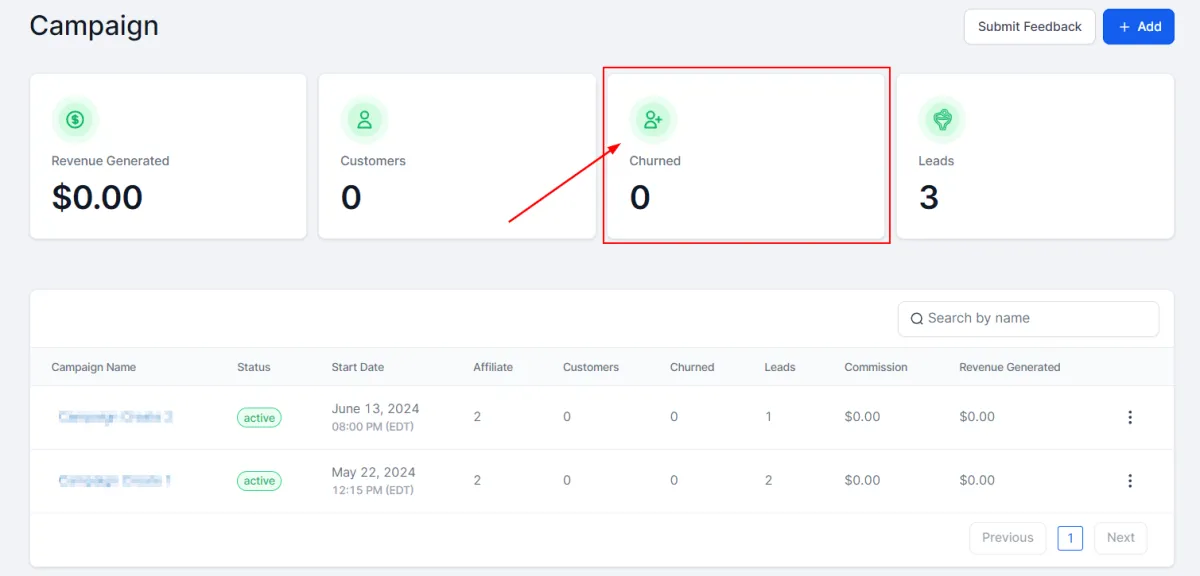
Churned
When a lead cancels their subscription, they move into the Churned category. These leads can be reactivated by initiating another checkout or enrolling them again in Stripe. Note that only recurring customers who have canceled are included in the Churned category; one-time customers are not reflected in this category.
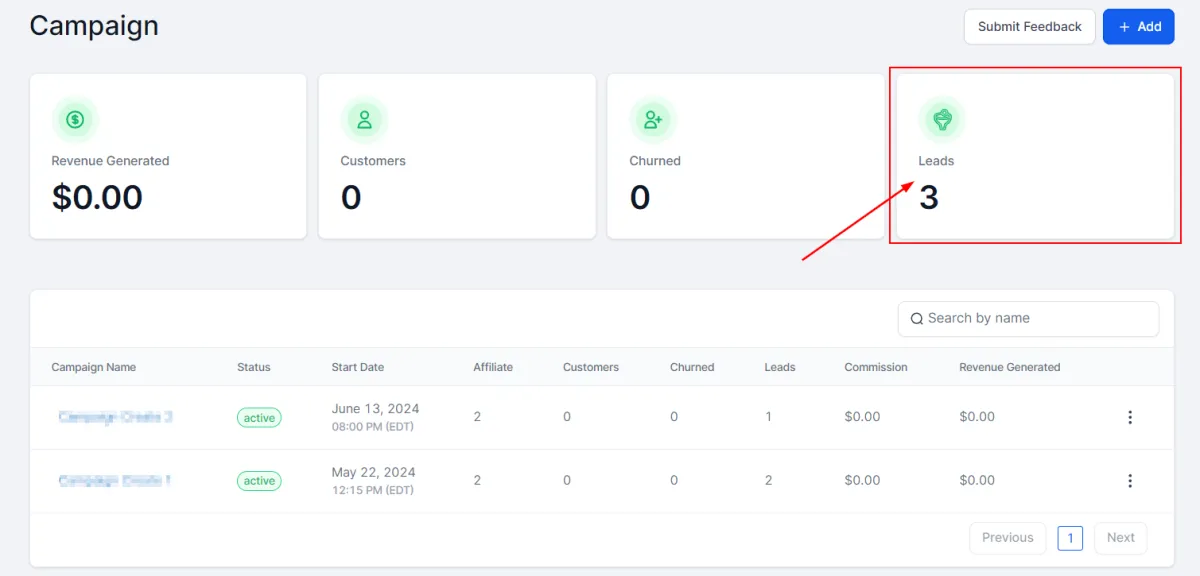
Leads
The Leads tab displays potential customers who have already filled out the Two-Step Order Form but did not complete the purchase. This feature provides valuable insights into the performance of your affiliate marketing campaign and supports the effective management of your customer base.
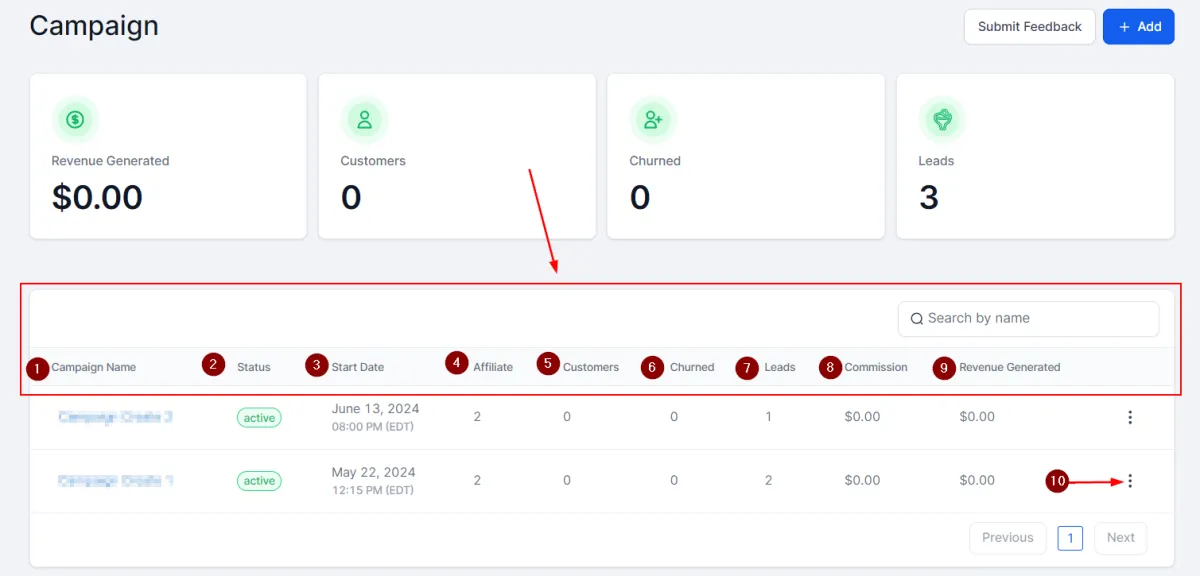
Campaign Table
The Campaign Table provides an overview of all your campaigns, making it easy to manage and monitor their performance. Here's a breakdown of the information displayed in the table.
1. Campaign Name: Here you will see the unique name to identify each campaign.
2. Status: You will see the status of your campaign here. The green indicates that the campaign is 'Live' and the yellow indicates that the campaign is 'Paused'.
3. Start Date: The date each campaign went live will be displayed here.
4. Affiliates: Here you will see the number of affiliates associated with each campaign.
5. Customers: You will see the number of customers invited via the affiliate links here.
6. Churned: This section displays the number of recurring customers who canceled their subscriptions.
7. Leads: This section displays the number of customers who have already filled out the Two-way Order form but haven’t paid yet.
8. Commission: You will see the % commission assigned to each campaign in this section. It will be distributed to every sale that an affiliate makes.
9. Revenue Generated: Here you will see the total revenue generated from each campaign.
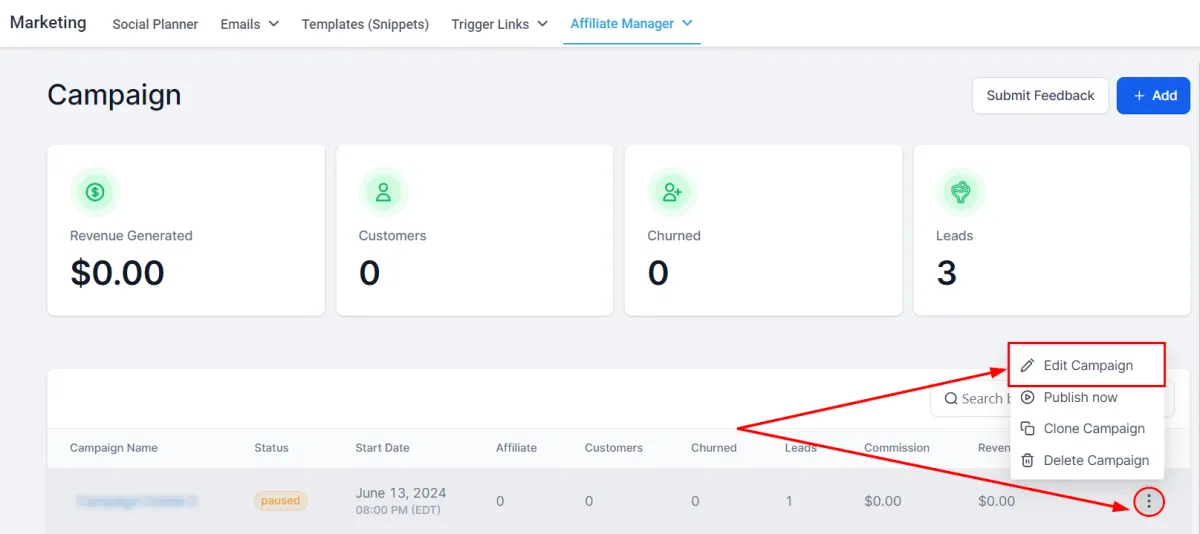
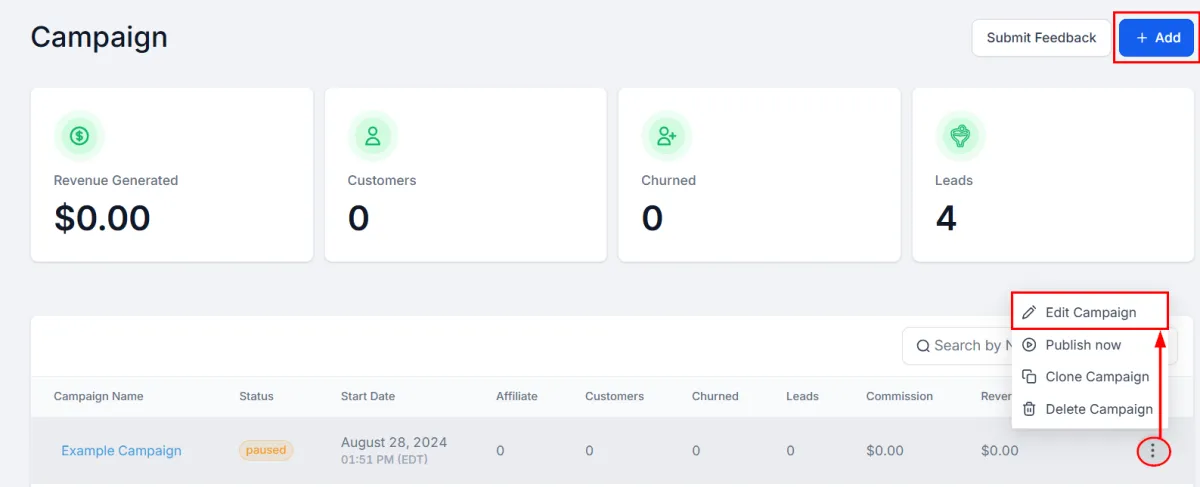
10. More Actions: Here you can edit or delete any of the campaigns you created.
Edit Campaign
Easily modify your campaign by selecting this option from the actions dropdown.
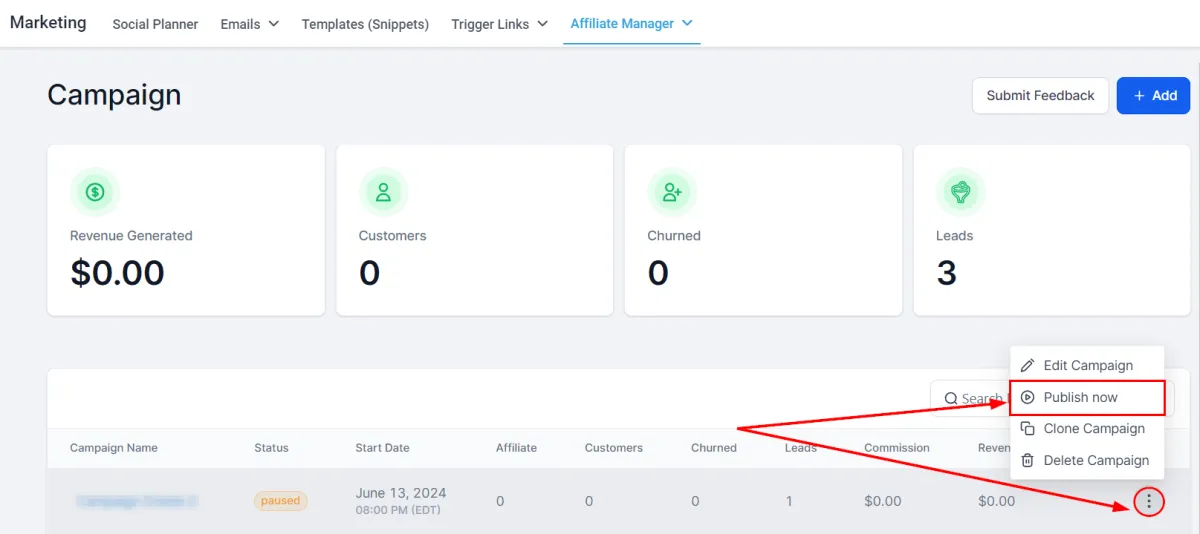
Publish or Draft
Update the campaign status to either "Active" or "Paused" by selecting the “Publish now” or “Save in Draft” option.
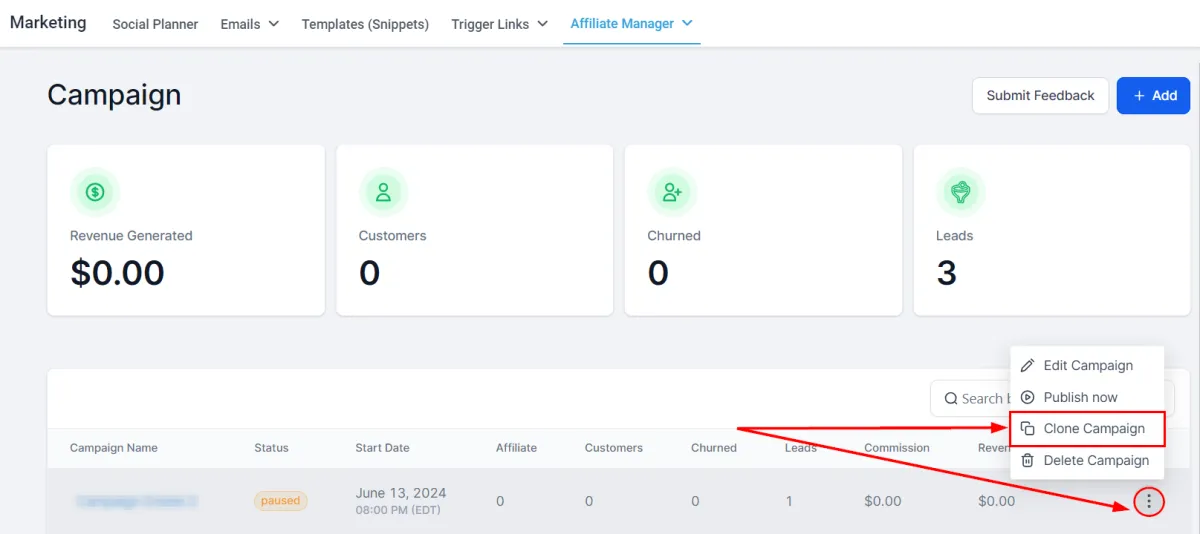
Clone Campaign
Create a duplicate of an existing campaign, facilitating quick adjustments or testing without altering the original.
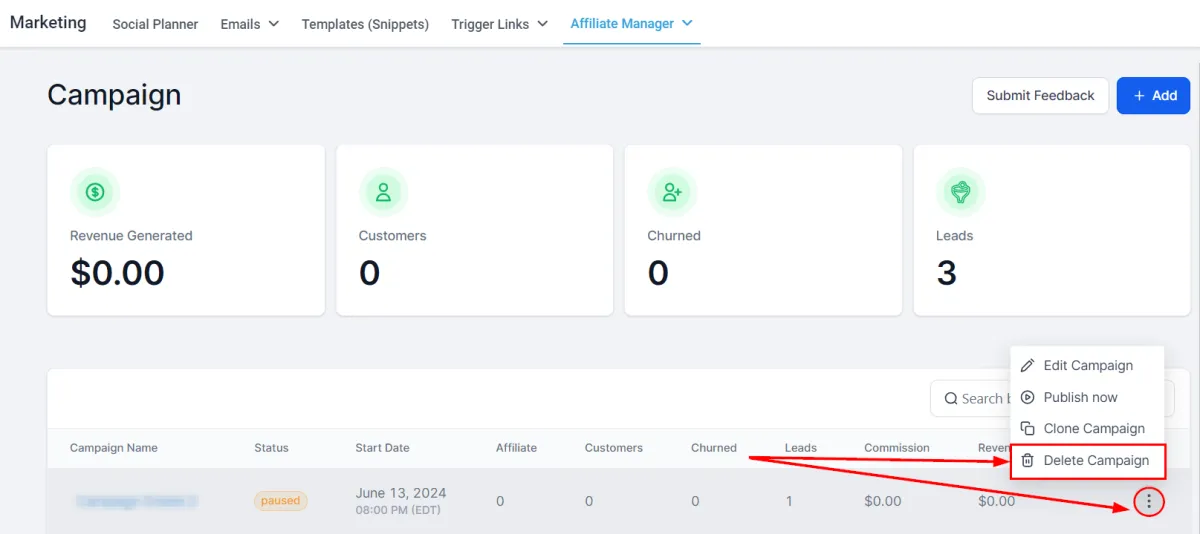
Delete Campaign
Permanently remove a campaign from your account by selecting this option.
These features collectively support the efficient management and optimization of your affiliate marketing campaigns, ensuring you can effectively track, modify, and enhance your marketing strategies.
5. How to Setup Multi-Tier Commissions for your Affiliate Campaigns
Multi-tier commissions are a widely used structure in affiliate marketing programs, offering affiliates the opportunity to earn commissions not only on their sales but also on the sales generated by their sub-affiliates. This approach allows you to set fixed rates for each tier or establish percentages based on the total sale value, ensuring fair compensation for affiliates while maintaining profitability. Our platform supports up to seven tiers, empowering parent affiliates to earn from the sales of their entire network. This model incentivizes affiliates to expand their networks, enhance their reach, and generate passive income through the efforts of their sub-affiliates.
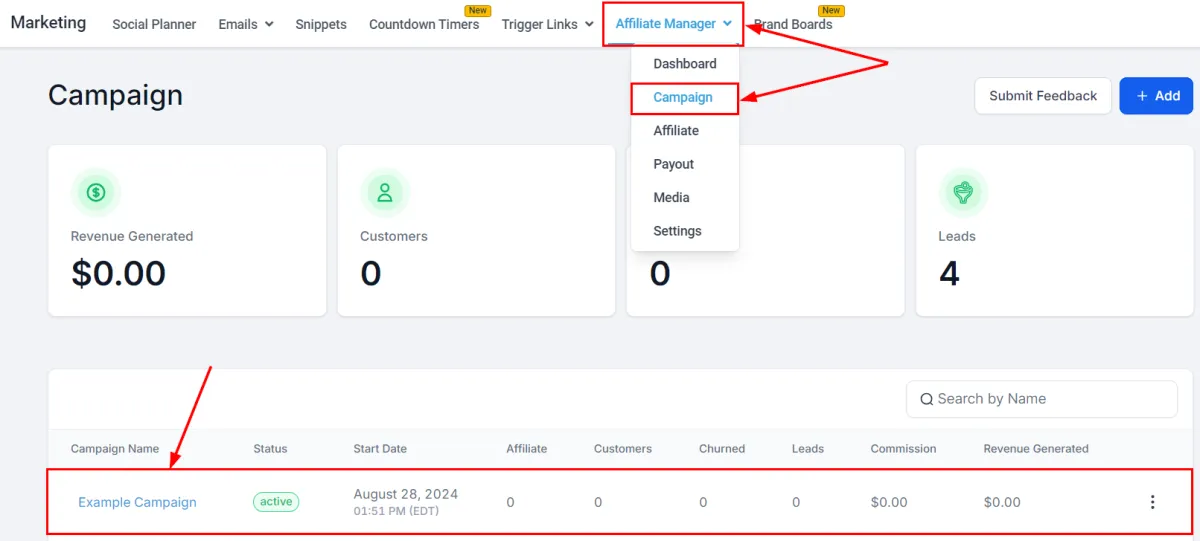
To set up Multi-Tier Commissions for your Affiliate Campaigns, open an existing campaign, or create a new campaign by clicking the “Add” button from the Affiliate Campaign view.
Enable Multi-Tier Commissions
In Step 2 of the process, activate the Pay Per Lead option for Forms, Surveys, or Calendar sources, or set a Default Commission for Funnel, Website, or Store sources. After configuring these settings, click on the "Advanced Commissions" option to enable multi-tier commissions for your affiliate program.
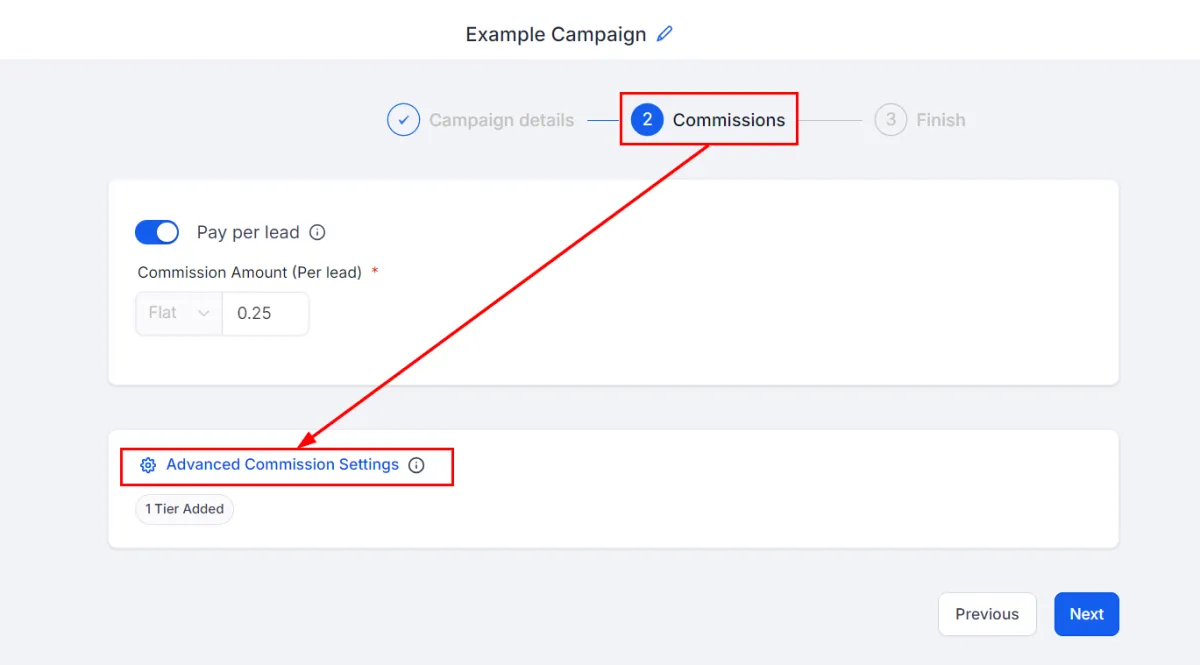
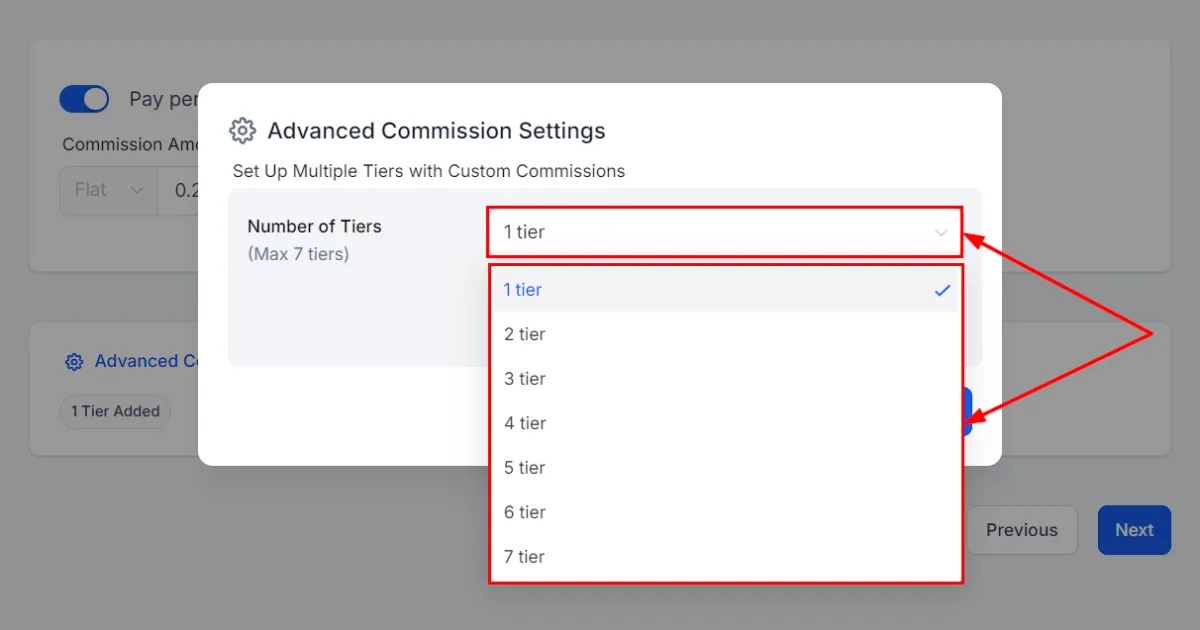
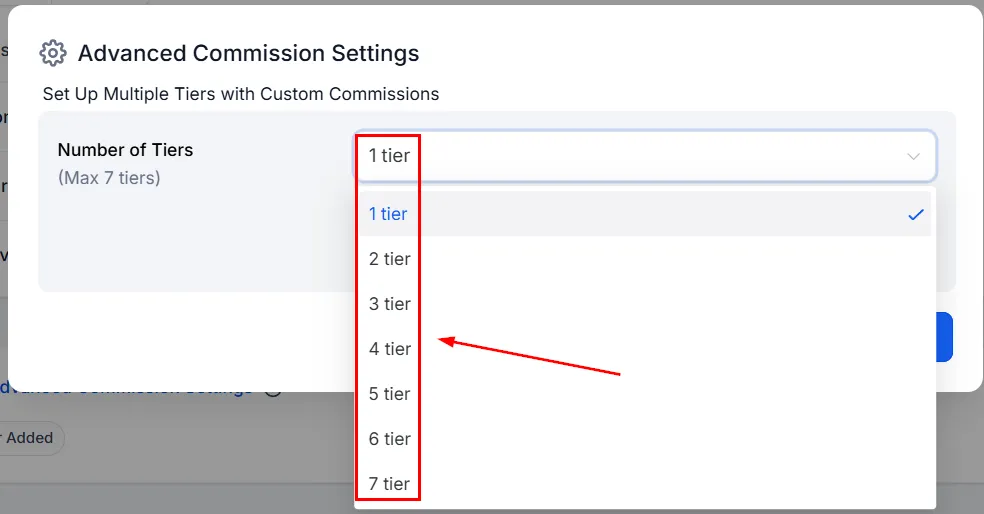
Choose the number of tiers you want from the dropdown menu.
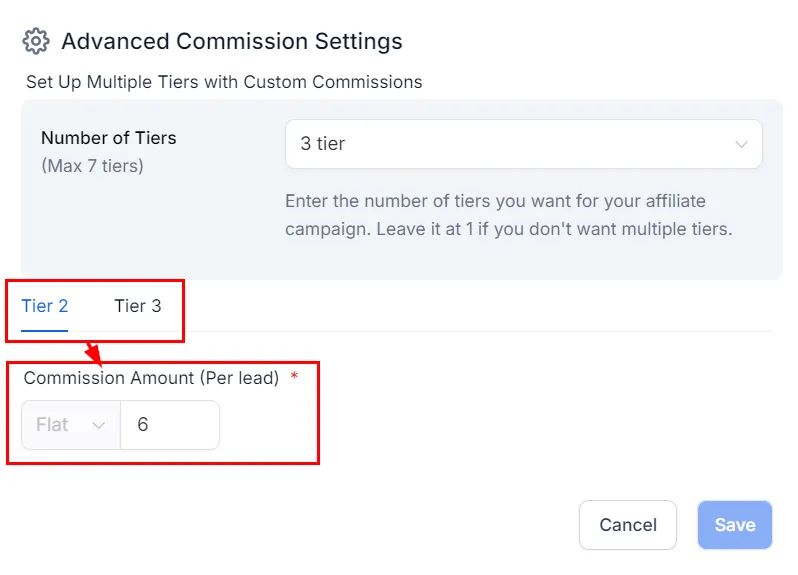
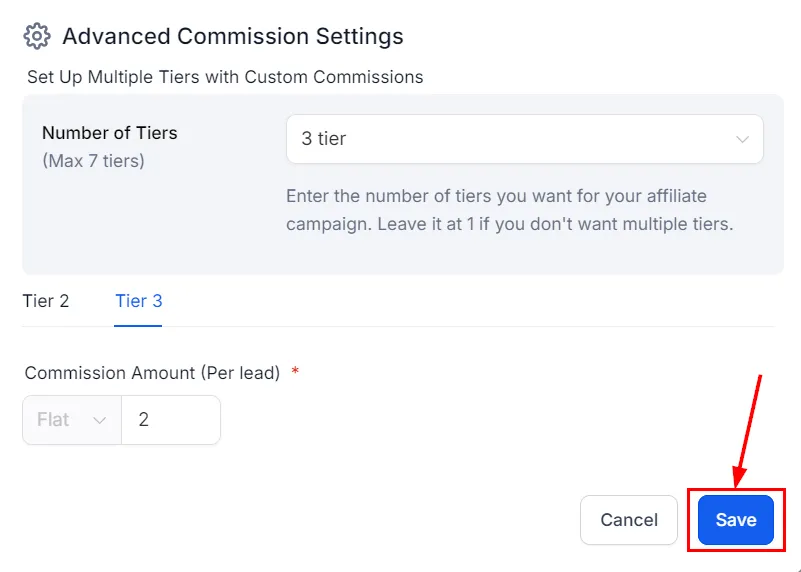
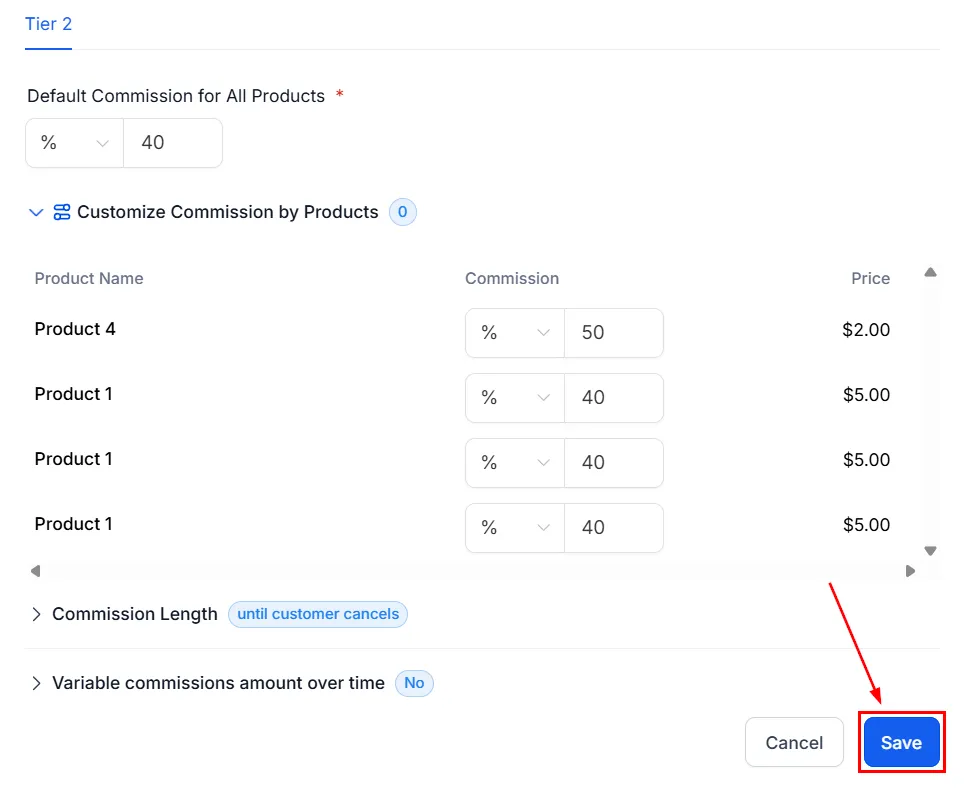
Configure Tier-Specific Commissions
Set default, per-lead, or product-based commissions for each tier to incentivize affiliates at different tiers. The options presented will differ based on the source type chosen.
Review and Confirm Additional Settings
Click on the save button once you're satisfied with the Advanced Commission settings.
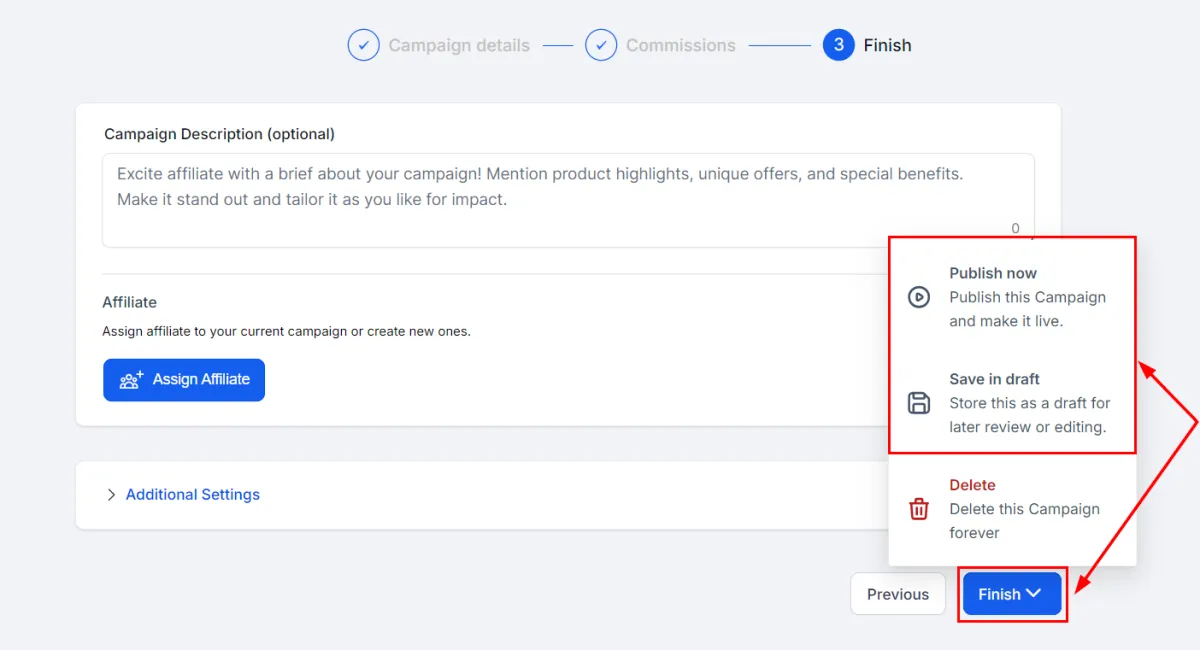
Proceed to the final step and input the relevant information in each field.
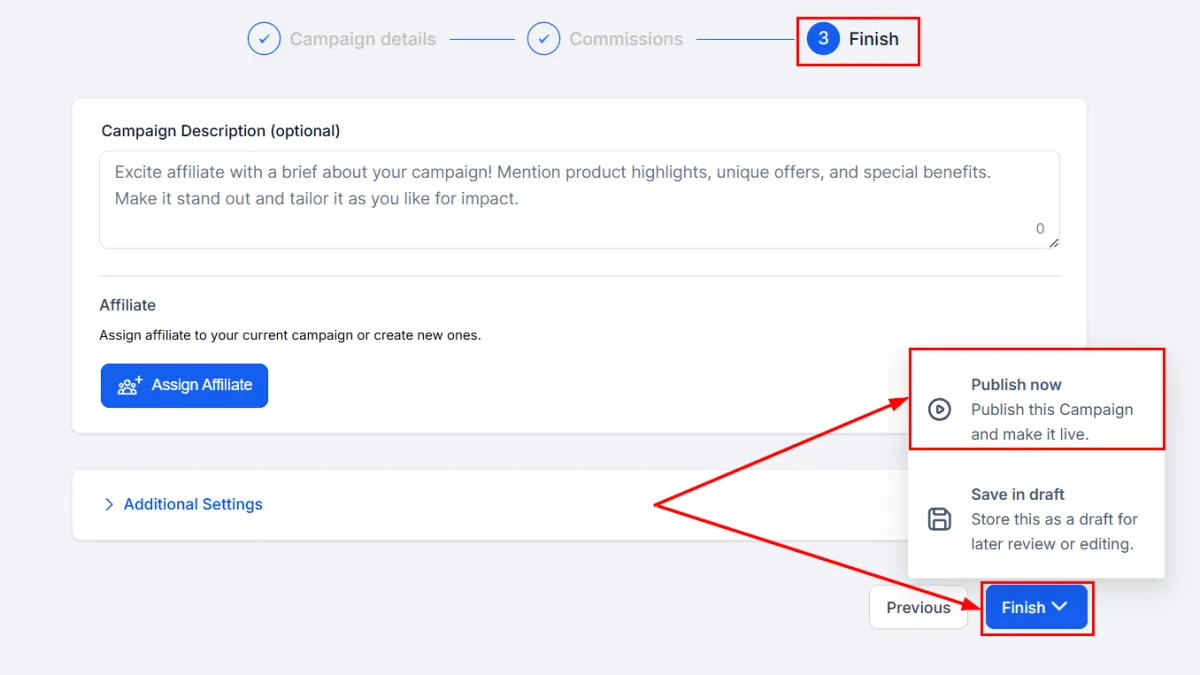
Publish
Once you are satisfied with the settings, click on the Finish button to publish. You click on the Publish Now option or Save as draft.
6. How to Add a Sub-Affiliate Under an Existing Affiliate
In a multi-tiered affiliate campaign structure, the ability to add sub-affiliates enhances flexibility by attributing their sales to the parent affiliate. This ensures that both the primary affiliate and their sub-affiliates benefit from the commission structure. In this guide, we will walk you through the process of adding a sub-affiliate under an existing affiliate to optimize your marketing efforts.
Note: This feature is only available to affiliate campaigns with 2 or more commission tiers.
Start by navigating to the affiliate page. This can be found under the 'Affiliate Manager' section within the 'Marketing' tab of your CRM dashboard.
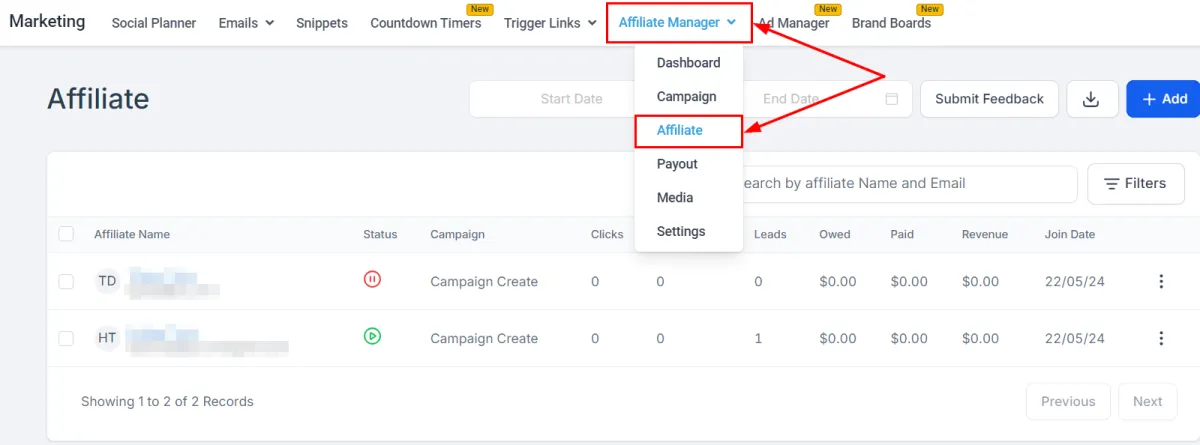
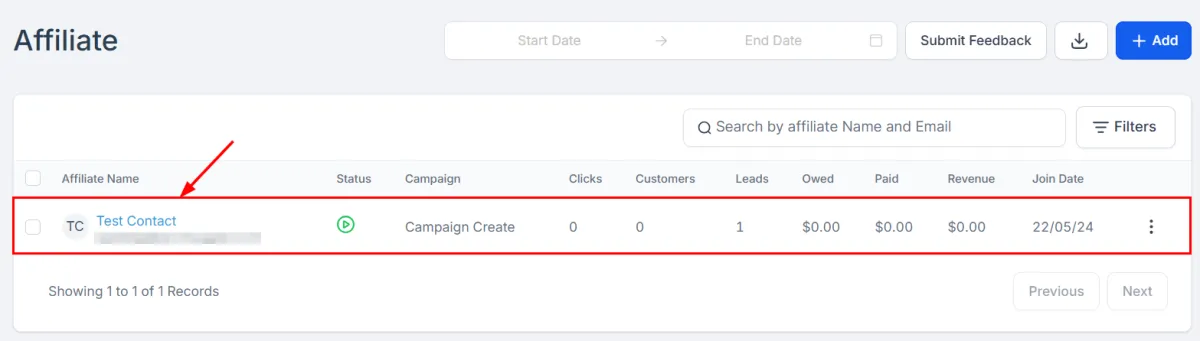
You will be presented with a list of all your affiliates on the platform. Locate and click on the profile of the affiliate under whom you want to add sub-affiliates. Ensure that the affiliate is active before proceeding to the next steps.

Adding Sub-Affiliates
Once you are on the affiliate's profile page, you will see all the relevant information and details about this affiliate. To add sub-affiliates, follow these steps:
Finding the Sub-Affiliate Tab
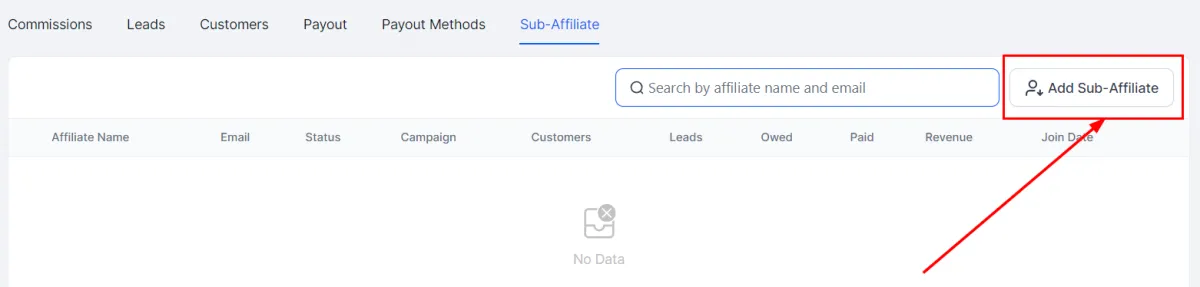
Scroll down to the bottom of the page until you find the Sub-Affiliate tab. Click on it to view a list of all sub-affiliates already added under this parent affiliate.
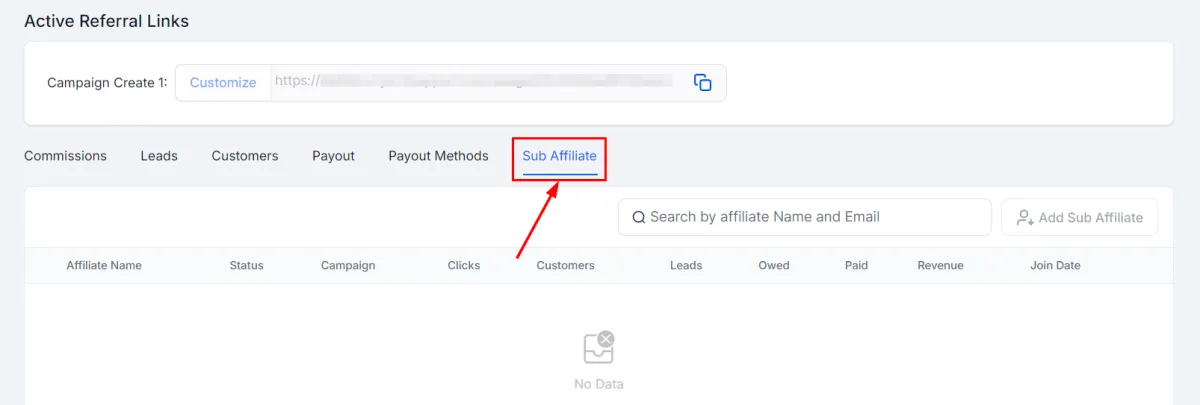
Adding a New Sub-Affiliate
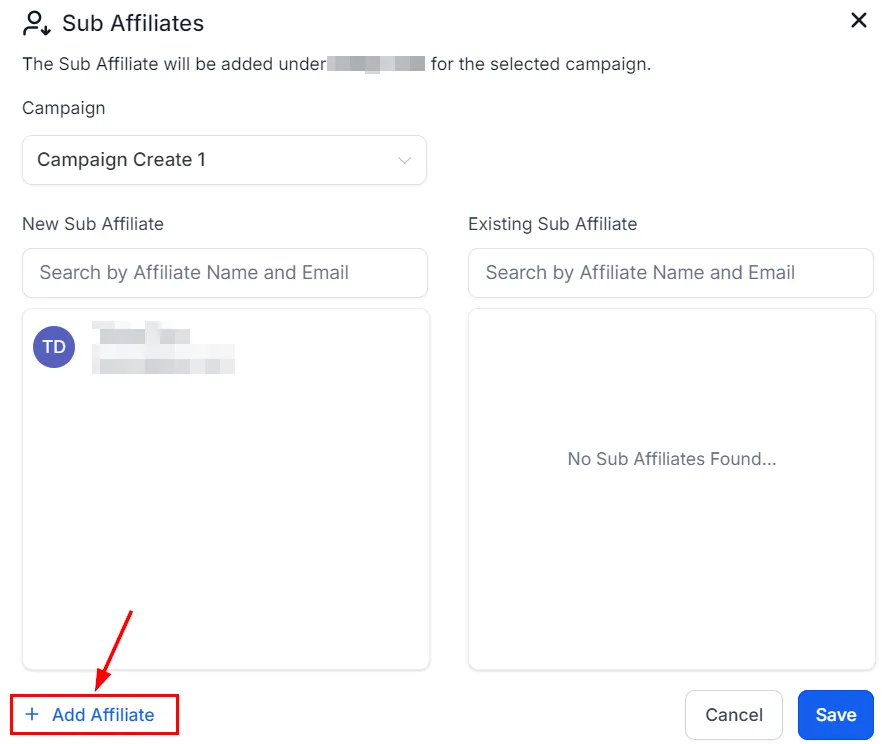
To add a new sub-affiliate, click on the button on the right side of the screen. A pop-up will appear allowing you to enter the sub-affiliate details.
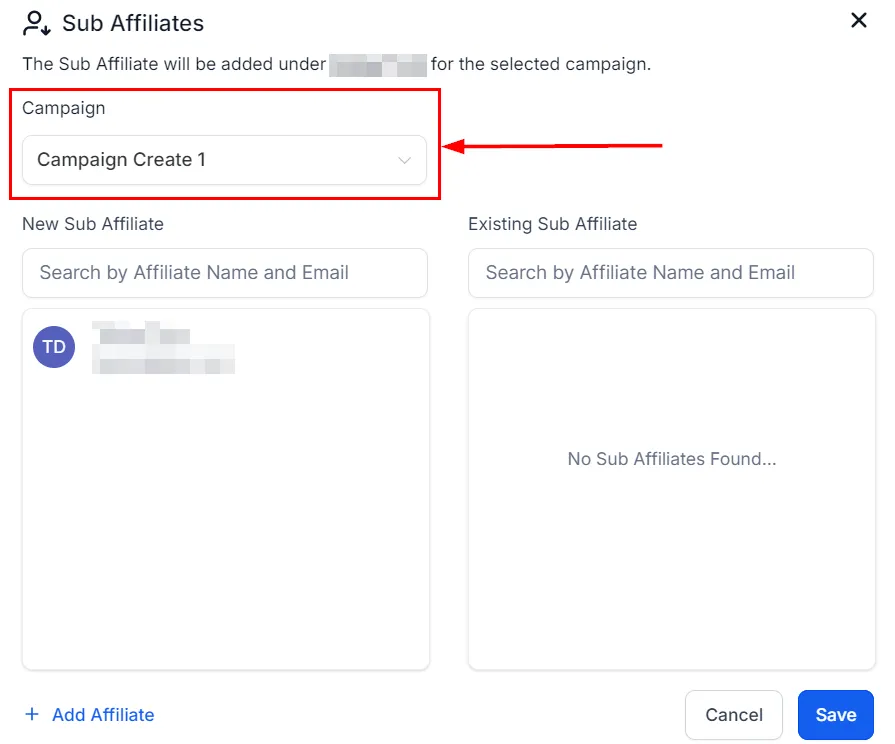
The first step in the pop-up is to choose the campaign for which you want to add the sub-affiliate. By default, it selects the first campaign the parent affiliate was added to.
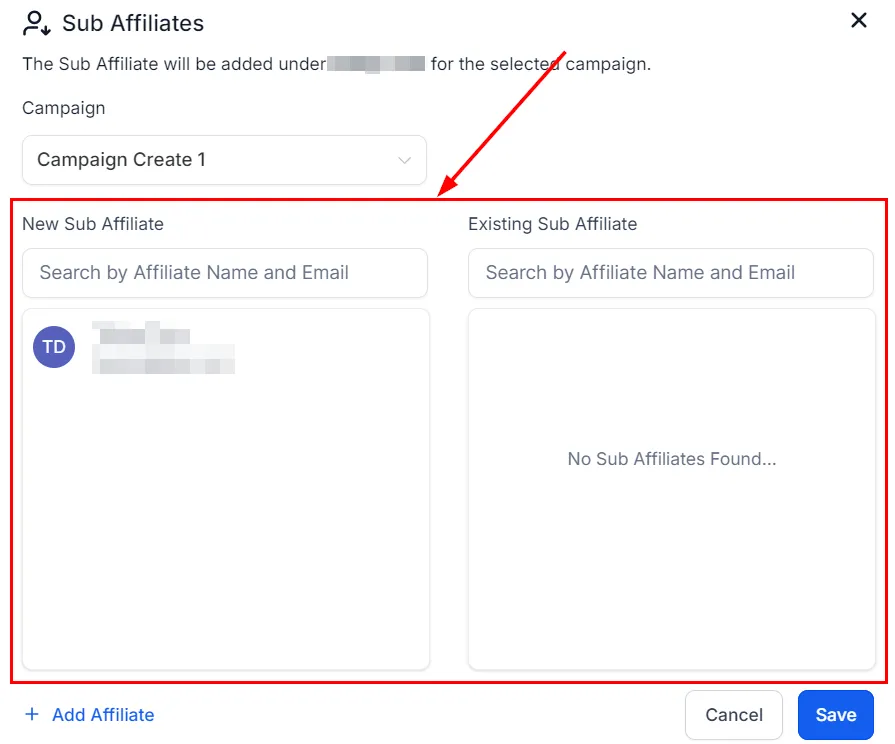
You will see two lists in the pop-up. The first list allows you to pick affiliates already present in the system. The second list shows existing sub-affiliates under this parent affiliate. You can search by name or email and click on the profile to add it.
Once you have made your selections, click on 'Save'.
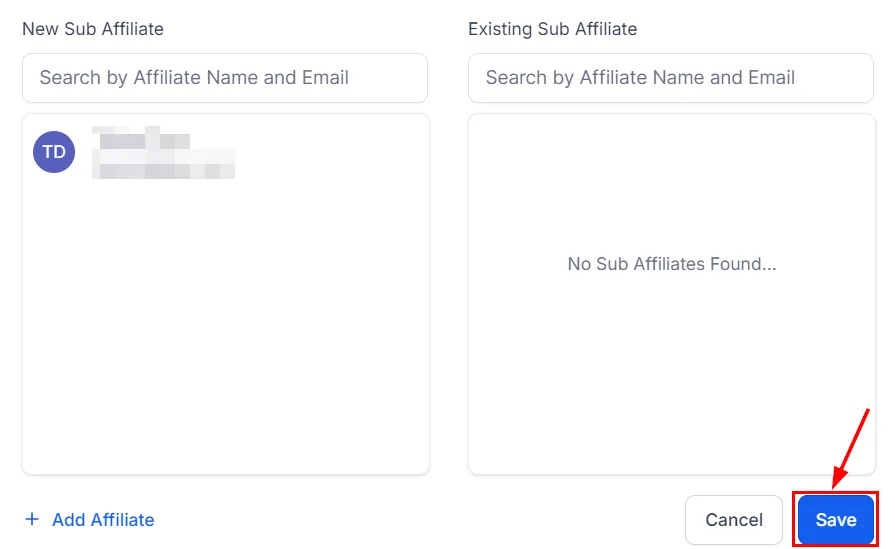
If the affiliate you wish to add is not already on the platform, you can create a new profile directly from this flow by clicking on Add Affiliate, entering their information, and then saving.
By following the outlined steps, you can efficiently add sub-affiliates to existing affiliates, ensuring your campaigns are organized and running effectively.
Frequently Asked Questions
Q: What if the 'Save' button doesn't work?
Ensure all required fields are filled out and that your internet connection is stable. If the problem persists, try refreshing the page or contact support.
Q: Can I add multiple sub-affiliates at once?
Yes. Sub-affiliates can be added in bulk.
Q: How do I remove a sub-affiliate?
You can remove a sub-affiliate by clicking on their profile in the 'Sub-Affiliate' tab and then saving your changes.
7. How to Delete Affiliates
Before diving into the specifics of how to delete an affiliate, it is essential to recognize its benefits and impact on affiliate program management. With this feature, managing your affiliate network is more simplified, allowing you to efficiently delete affiliates and all associated data, including leads, customers, commissions, and payouts. This ensures a comprehensive cleanup of your affiliate records, helping maintain a well-organized program. Additionally, the feature gives you greater control, empowering you to make decisive actions by removing affiliates who no longer align with your program’s objectives.
To make the most of this feature, follow these steps:
Navigate to the Affiliate Manager
From the left navigation menu, access the marketing tab. Then, select "Affiliate Manager" > "Affiliate" from the top navigation menu.
Select the Affiliate
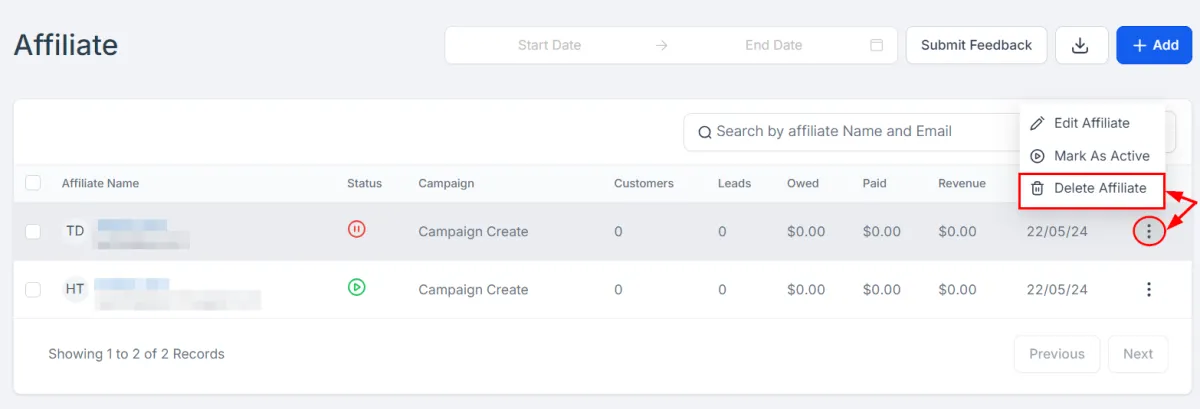
In the Affiliate section, you will see a list of all affiliates. Scroll through the list or use the search function to locate the specific affiliate you want to remove. Once found, click on the three vertical dots located next to their profile. From the drop-down options, select Delete to proceed with removing the affiliate from your system.
Confirm Deletion
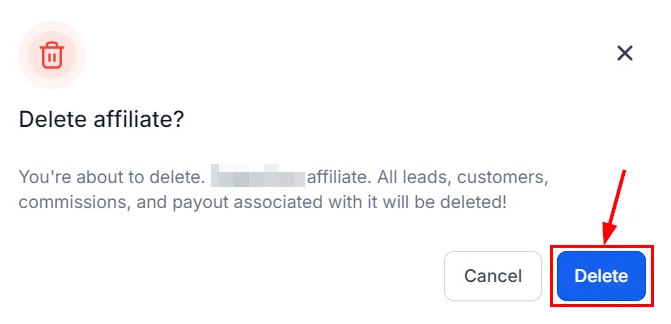
After selecting the delete option, a confirmation pop-up will appear, asking you to verify your decision. This step is crucial as it permanently removes the affiliate from your records. To finalize the action, click the Delete button within the pop-up. If you change your mind, you can cancel the action by clicking outside the pop-up or selecting the Cancel button.
By utilizing the affiliate deletion feature, you can effectively manage your network, ensuring that only affiliates aligned with your goals remain part of your program. This streamlined process not only removes affiliates but also cleans up associated data, helping to maintain an organized and efficient affiliate system.
Practical Tips and Considerations
- Exercise Caution: Given the comprehensive nature of this action, it's crucial to be certain before deleting an affiliate. Once deleted, all associated data cannot be recovered.
- Regular Audits: Regularly review your affiliate network to identify affiliates who are not performing or no longer fit your program's criteria. This practice ensures your network remains optimized and aligned with your goals.
Frequently Asked Questions
Q: What happens to the data associated with a deleted affiliate?
All data, including leads, customers, commissions, and payouts, are permanently removed and cannot be recovered.
Q: Can I delete multiple affiliates at once?
Currently, affiliates must be deleted individually to ensure accuracy and prevent accidental deletions.
Q: I accidentally deleted an affiliate. Can I undo this action?
Unfortunately, once an affiliate is deleted, the action cannot be undone. It's important to double-check before proceeding with the deletion.
8. How to Create Affiliate Coupon Codes
Unique affiliate coupons offer a powerful way to enhance your affiliate marketing strategy by providing exclusive discounts that motivate affiliates and boost sales. By assigning custom coupon codes, affiliates can offer tailored promotions to their audiences, resulting in increased engagement and higher conversion rates. In this guide, we'll walk you through the process of creating and managing unique affiliate coupons within the platform, ensuring you maximize the potential of your affiliate program.
Benefits of Unique Affiliate Coupons
Before diving into the setup process, let's explore the advantages of utilizing unique coupons for your affiliates:
-Enhanced Affiliate Motivation: By offering exclusive discounts, affiliates are more incentivized to promote your products, leading to increased sales.
-Increased Sales Potential: Exclusive discounts encourage purchases, driving higher sales and making your affiliate strategy more effective.
Creating Affiliate Coupon Codes
Follow these steps to create unique coupon codes for your affiliates within the CRM:
From the Affiliate List
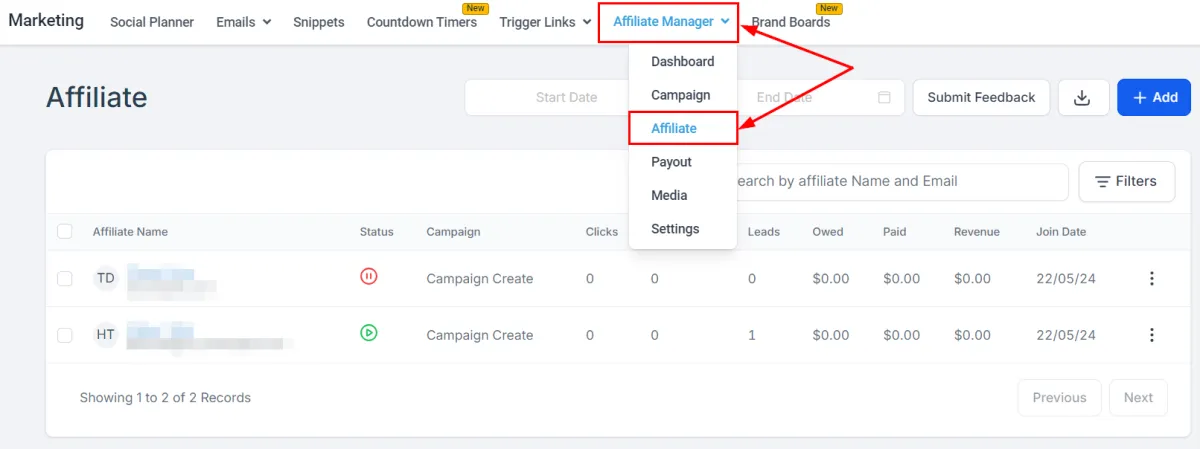
Navigate to the Affiliate Manager located under the Marketing section of the CRM, and select “Affiliate” from the dropdown.
Assigning a Unique Coupon
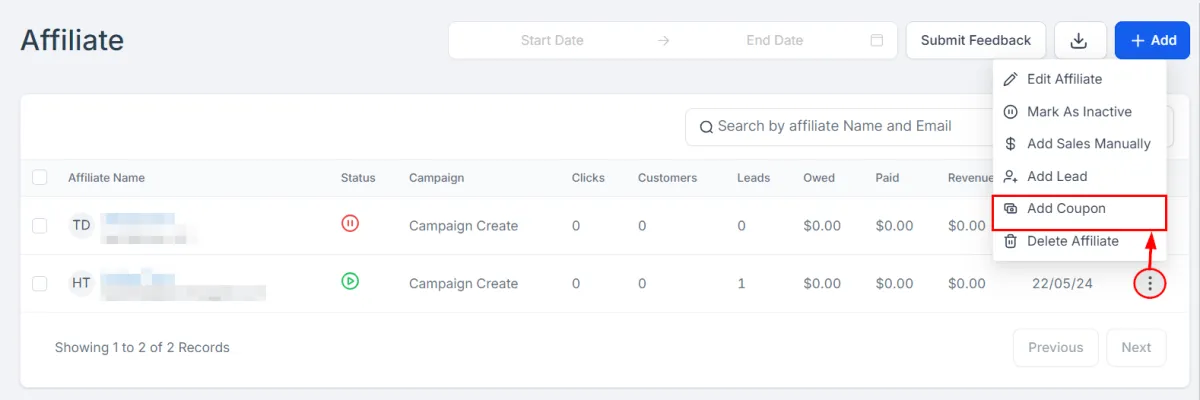
Locate the affiliate for whom you want to create a coupon. On the far right side of the affiliate’s row, you’ll find an action dropdown. Click this dropdown to reveal several options, then select “Add Coupon.” This will open the coupon creation window, allowing you to configure the coupon's details.
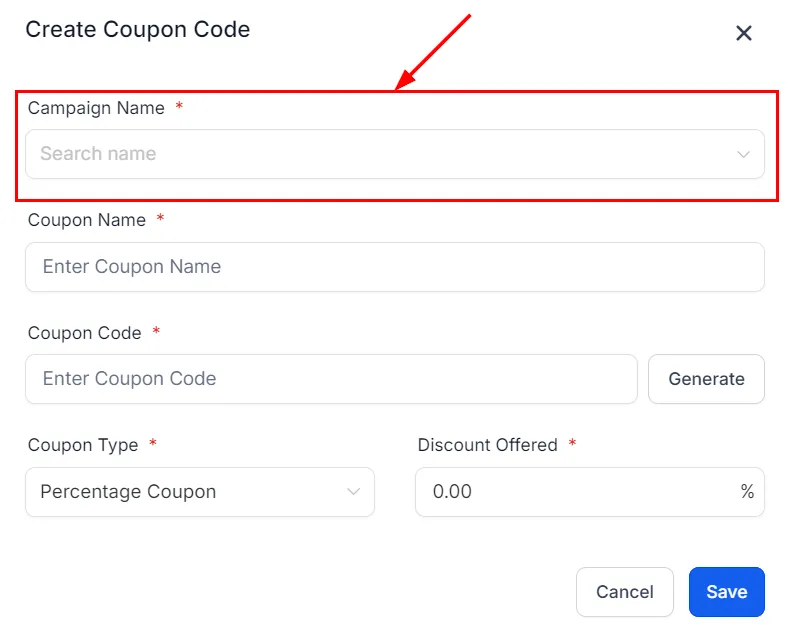
In the coupon creation window, the first step is to assign the coupon to a specific campaign. From the Campaign Name dropdown menu, select the campaign in which the affiliate is involved. This ensures that the coupon will be linked directly to the campaign, allowing for proper tracking and attribution of sales generated by the coupon.
Next, provide a name for the coupon in the "Coupon Name" field. The coupon name should be descriptive and relevant, as it will serve as an identifier for you and the affiliate. A clear and concise name helps to quickly distinguish the coupon from others and makes it easier to manage multiple coupons within the system.
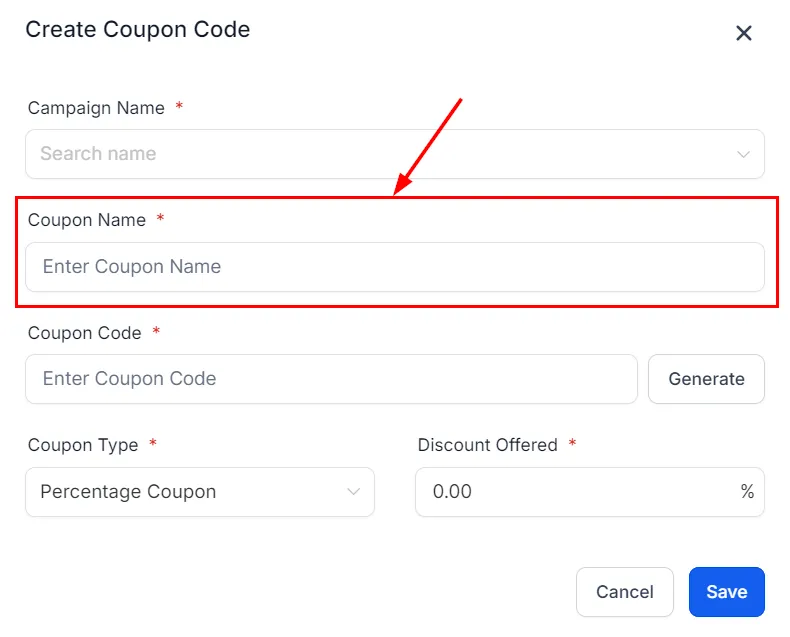
Create a custom coupon code or let the system generate one automatically. If you prefer a specific code, simply type it into the provided field. Alternatively, clicking the "Generate" button will produce a randomized coupon code, ensuring uniqueness without the need for manual input.
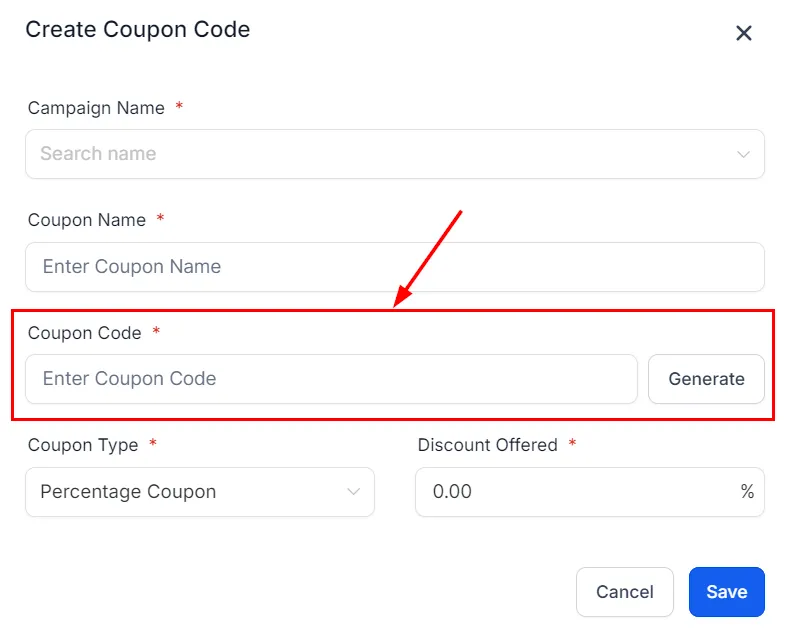
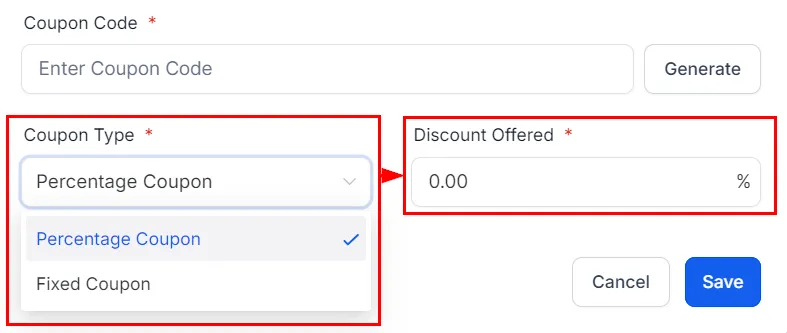
In the "Coupon Type" dropdown, select the type of discount you want to offer with this coupon. You can typically between percentage discounts (e.g., 10% off) or fixed-amount discounts (e.g., $20 off). Selecting the appropriate coupon type ensures that the discount aligns with your campaign strategy and provides affiliates with a clear incentive to promote the offer.
Click Save to confirm the addition!
From the Affiliate Profile
You can also add a coupon to the affiliate from the affiliate's profile. To do so, follow the steps outlined below:
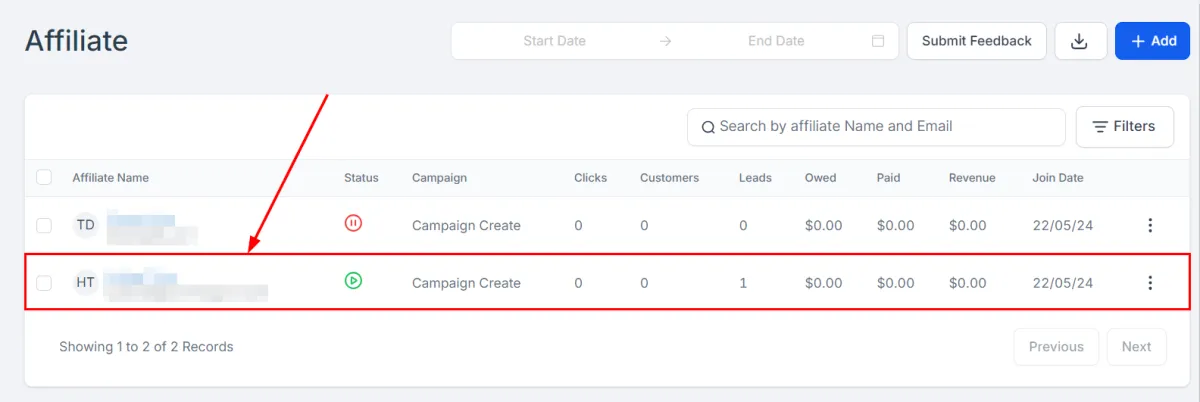
Select the name of the affiliate you wish to add the coupon to from the Affiliate Page.
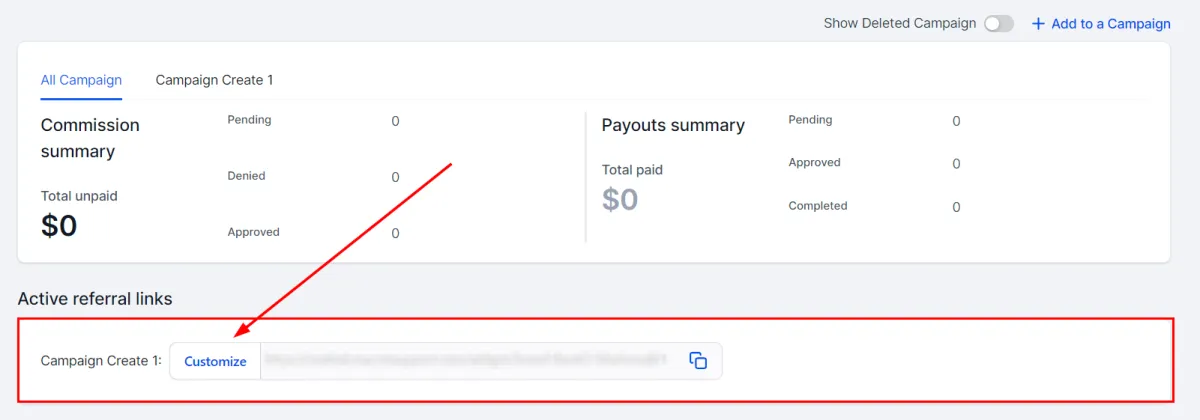
Scroll to the active referral links section within their profile. Here, you will see the list of campaigns the affiliate has been added to as well as the affiliate's URL. Click the “Customize” button beside the campaign you wish to associate the coupon with.
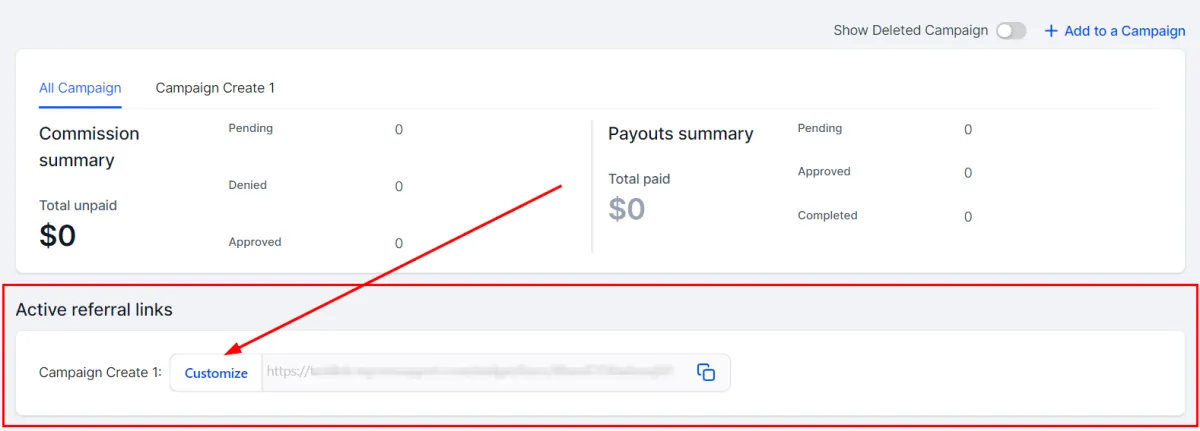
Navigate to the "Coupon Code" section and complete the required fields by assigning a name, entering or generating a unique coupon code, and specifying the discount parameters. Additionally, if the selected product involves recurring payments, you have the option to enable the coupon for recurring charges.

Once you’ve completed the configuration, save the changes to activate the coupon. After the coupon is successfully created, you can manage or edit it within this section. Be sure to share the generated coupon code with the affiliate so they can offer exclusive discounts to their audience!
Troubleshooting and FAQs
Q: What if the coupon code doesn't work?
A: Ensure the coupon code is correctly entered and check if any restrictions might prevent its use.
Q: Can I create multiple coupons for one affiliate?
A: Yes, you can create multiple coupons, but it's essential to manage them effectively to avoid confusion.
9. How to Generate Affiliate Magic Links
Affiliate magic links offer affiliates a convenient and efficient way to access their dedicated portal. These specialized links streamline the login process by eliminating the need for manual credentials entry, allowing affiliates to navigate to their dashboard quickly. Once inside, affiliates can track performance metrics, access their referral links and coupon codes, and monitor their earnings—all in a user-friendly environment. By providing this easy access, magic links not only improve usability but also encourage greater engagement with the affiliate program.
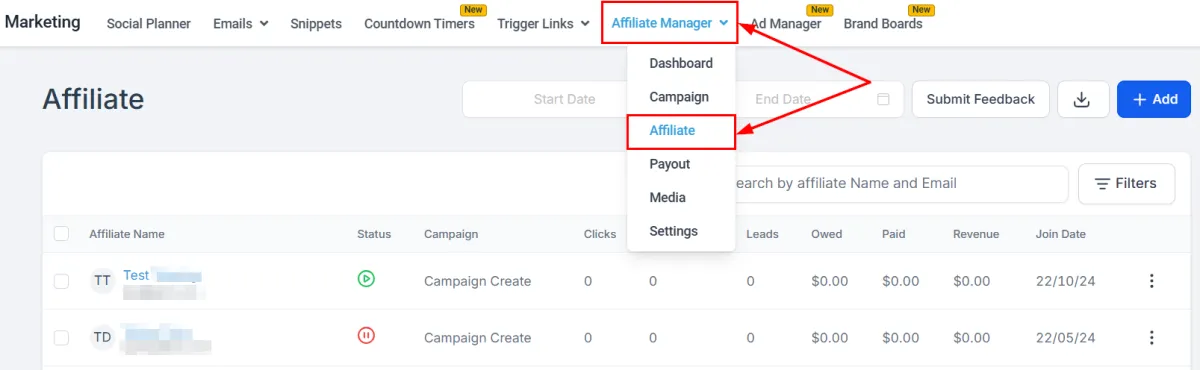
Navigating to Affiliates
To access this feature, select "Affiliate" from the Affiliate Manager dropdown list within the Marketing section.
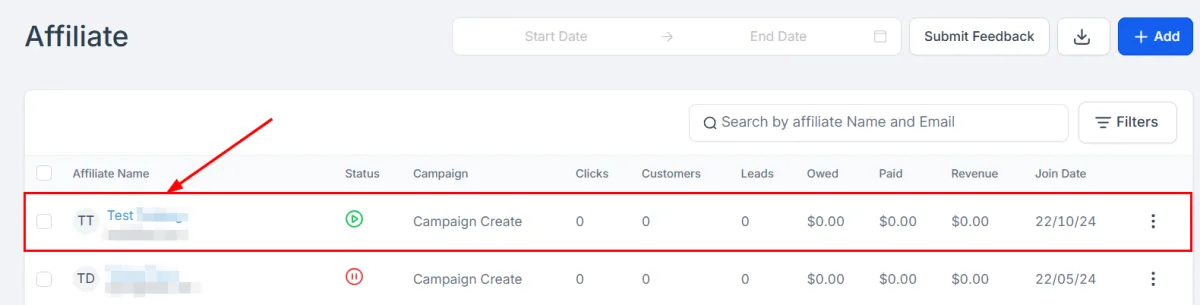
Accessing Affiliate Details
Next, click the affiliate's name to open their profile.
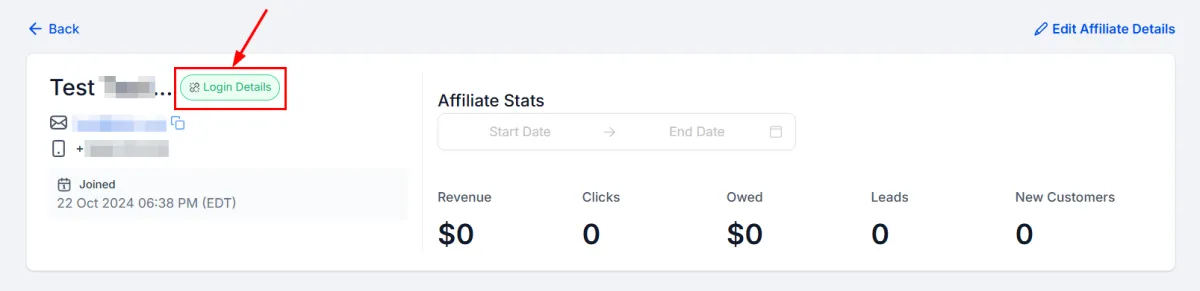
Generating Magic Links
Within their profile page, you will see the "Login Details" option in the Affiliate Details section.
By clicking on this option, a magic link will be generated. This link can then be easily copied from the window and shared with the affiliate, granting them quick access to their portal.
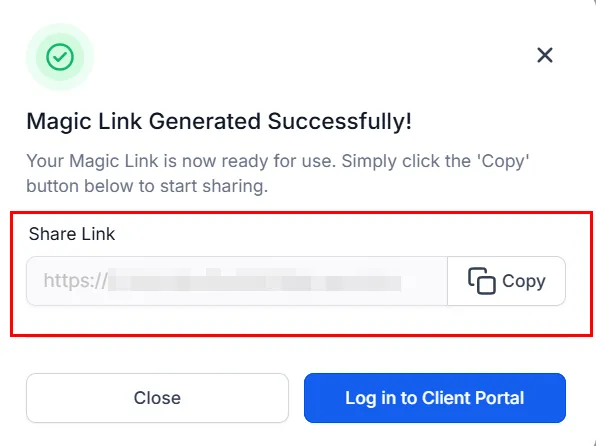
By simplifying the login process and providing instant access to essential features, these links empower affiliates to engage more effectively with the platform.
10. Manually Adding Sales to an Affiliate
The CRM offers the capability to add sales to an affiliate manually. This feature is particularly useful in two scenarios:
1. Online Sales Without Affiliate Attribution: When a sale is made online but the affiliate link is not used, and you wish to attribute this sale to a specific affiliate.
2. Offline Sales: When a sale is made offline, and you need to record and attribute it to an affiliate for accurate commission tracking and record-keeping.
This article will take you through the steps to account for these sales to ensure that your affiliates are rightly rewarded.
How to Add Manual Sales
Locate the sale that was not attributed to an affiliate in the Transactions section of your account. If the sale was made offline, create a manual invoice in the Invoices & Estimates section. This is essential for bookkeeping purposes.
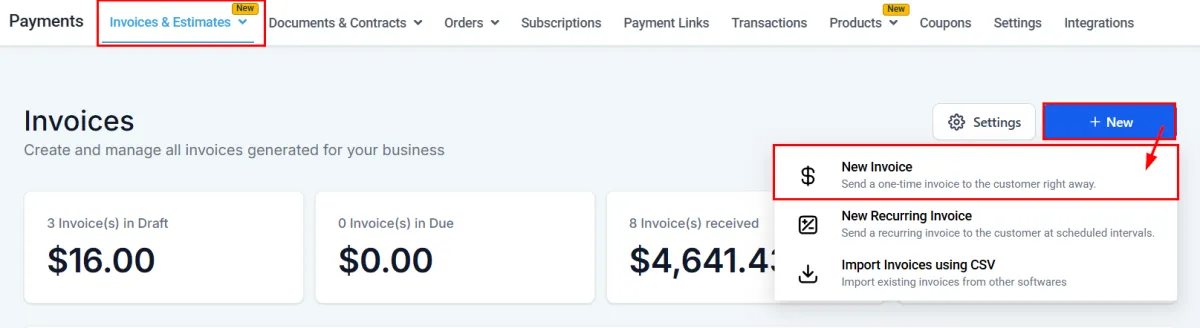
Enter the details of the sale, including the client's name, item description, amount, and record the payment.
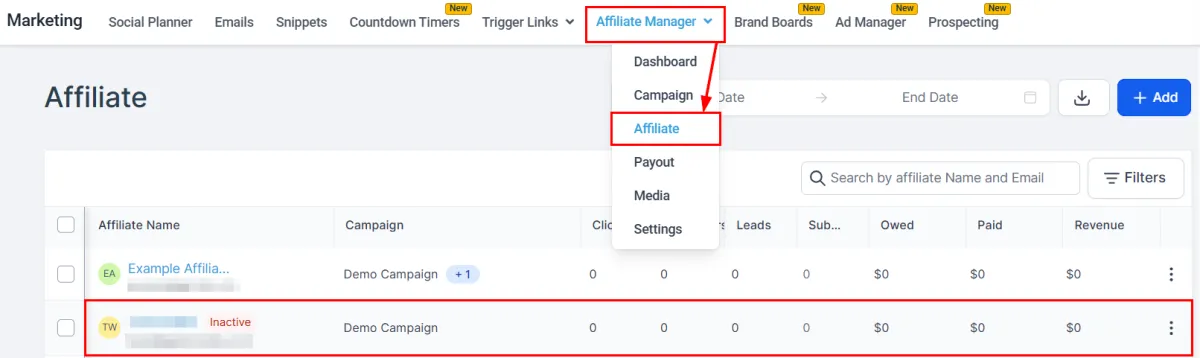
Then, navigate to the Affiliate Manager and find the affiliate to whom you want to attribute the sal
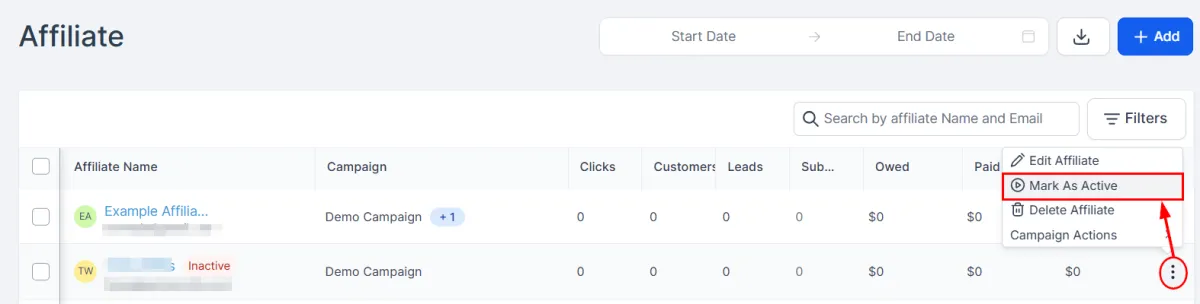
If you have selected an inactive affiliate, mark them as active from their associated actions menu.
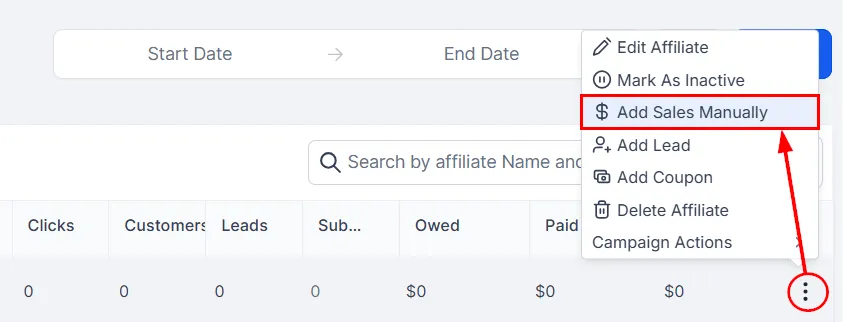
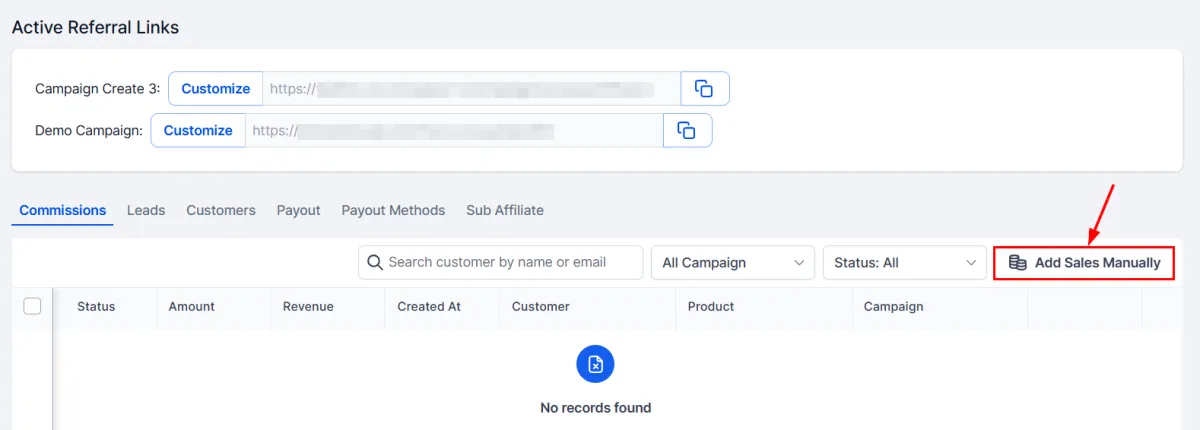
Once active, you will see the option to add manual sales. Go ahead and click it.
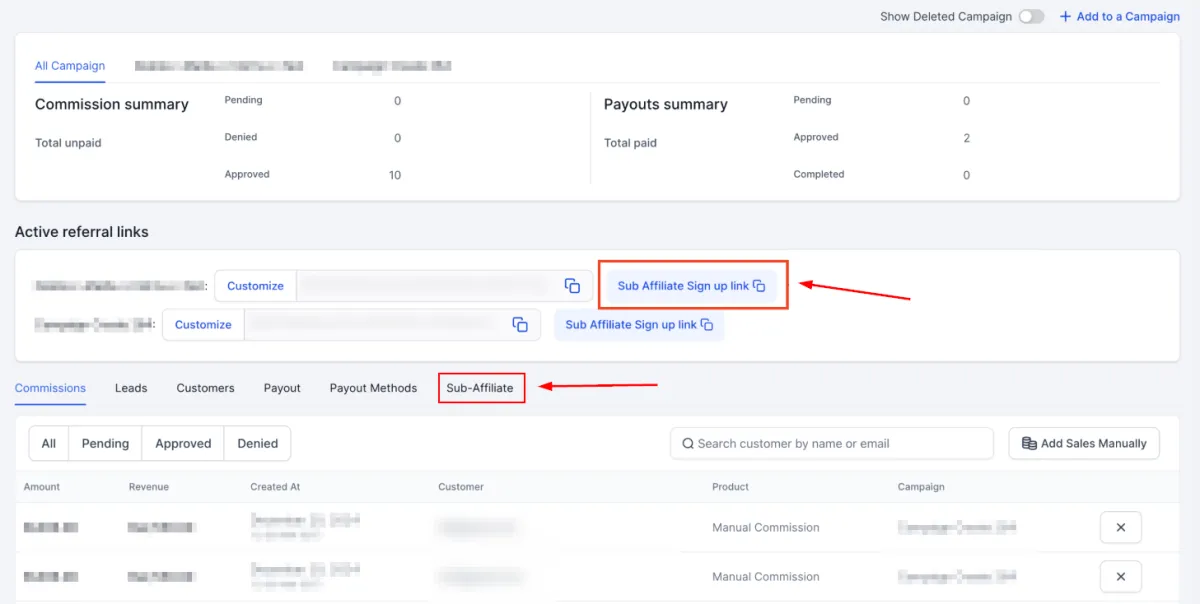
A pop-up will open for you to select the customer based on their name or email (1). Once selected, set the campaign the sale belongs to (2), then click next.
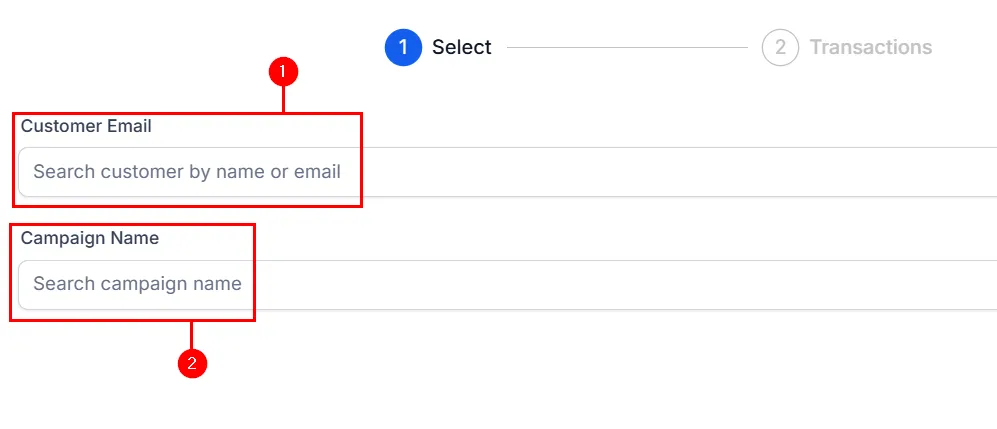
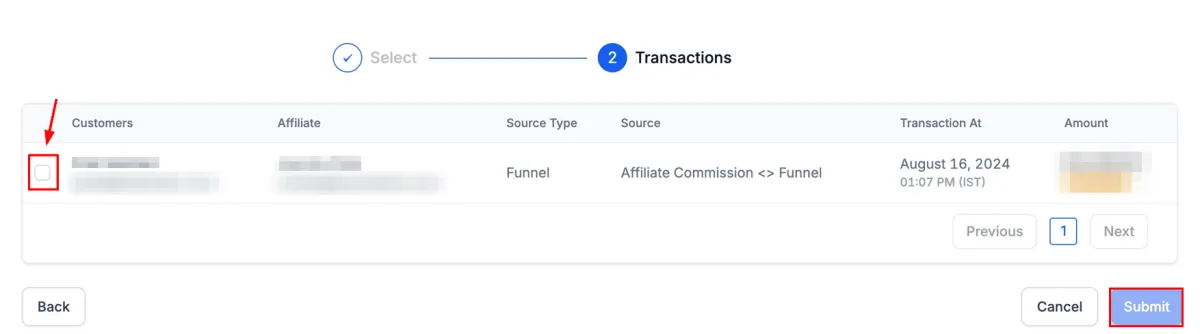
Now, you will be prompted to choose the transactions to be recorded under the affiliate. You can see an overview of when the transaction was made, as well as its source, to confirm it before completing the process.
Note: Manual sales can also be added from the affiliate highlights, accessible after clicking their name from the main page.
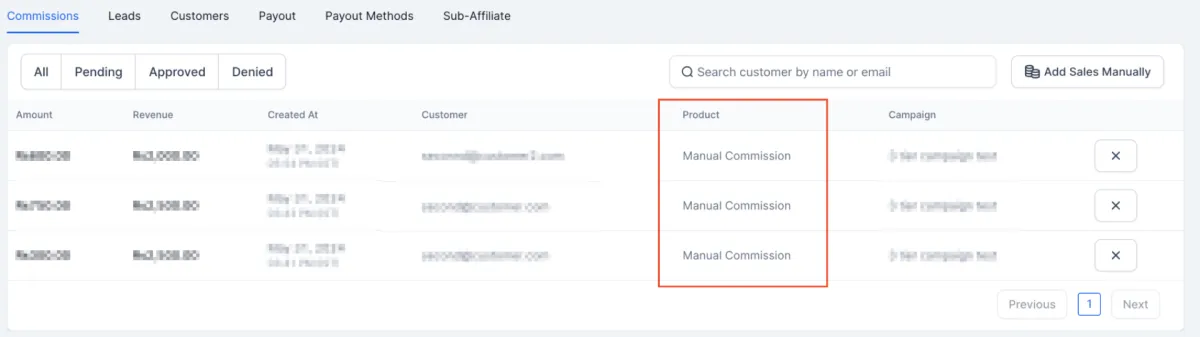
Whenever a commission is added manually, the product will show as “Manual Commission” in the Affiliate Highlights view.
By leveraging the manual sales feature, you can ensure every affiliate is credited accurately—whether the sale happened online without proper tracking or entirely offline. This not only maintains fair commission payouts but also keeps your records complete and transparent for both you and your affiliates.
Frequently Asked Questions
Q: What if the sale doesn't show up under the affiliate's record?
Ensure you've correctly entered the customer's email and selected the right transaction. If the issue persists, wait a few minutes and refresh the page.
Q: Can I attribute one sale to multiple affiliates?
No, each sale can only be attributed to one affiliate. Choose the affiliate who primarily facilitated the sale.
11. How to Customize Affiliate Manager Labels
Customizing labels in your Affiliate Manager enables you to align the platform with your unique brand identity and industry terminology. This personalization enhances the clarity and usability of your platform so you can create an intuitive, user-friendly experience that reflects your organization's goals.
Customizing Labels
To take full advantage of the customized labels in your Affiliate Manager, follow these steps:
Navigate to Customizations
From your account dashboard, head to the Marketing tab and click on the Settings option within the Affiliate Manager dropdown. Within the Affiliate Manager settings, find the "Customizations" menu. This is where you will be able to make your label adjustments.
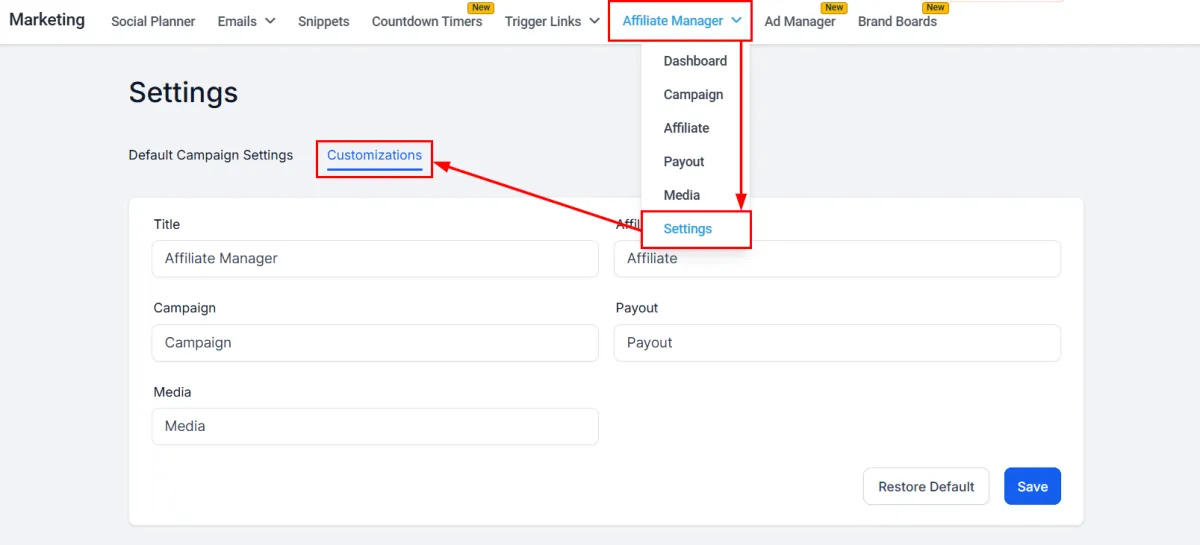
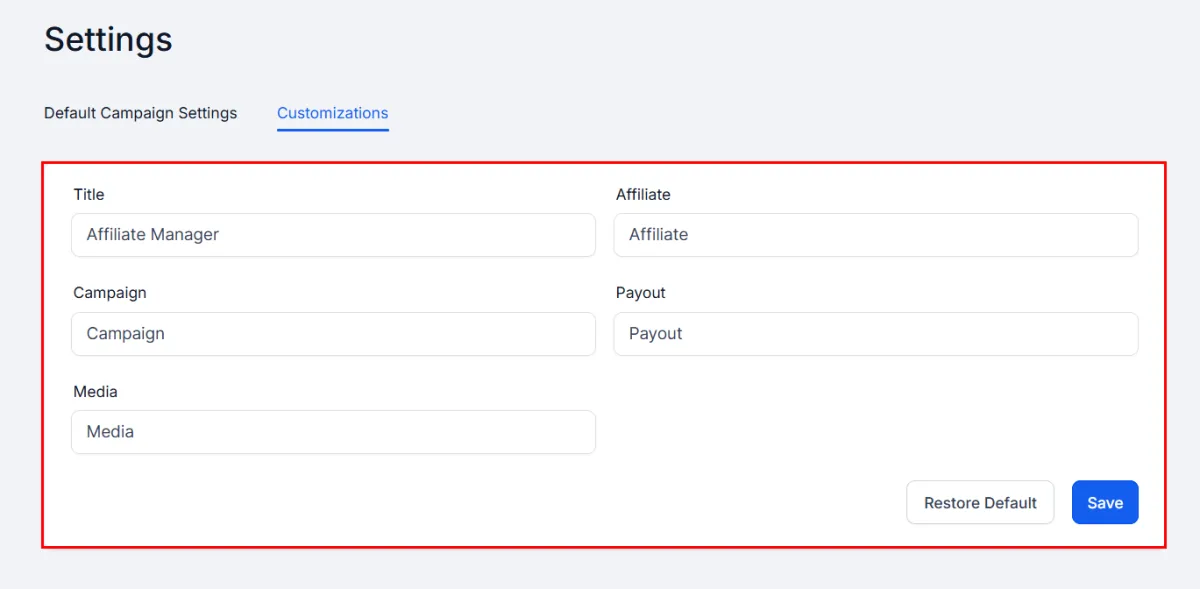
Choose Your Labels
Customize the name of each tab to align with your industry standards or team preferences. Default labels are displayed above each field to provide clarity on the specific elements being updated.
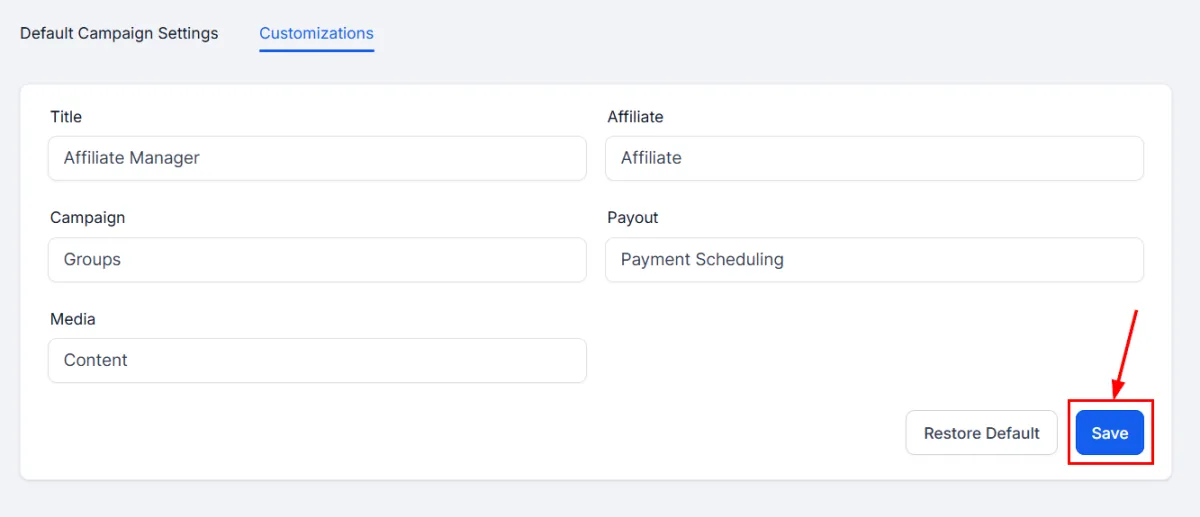
Save Your Changes
After making your desired customizations, ensure you save your changes to apply them to your Affiliate Manager.
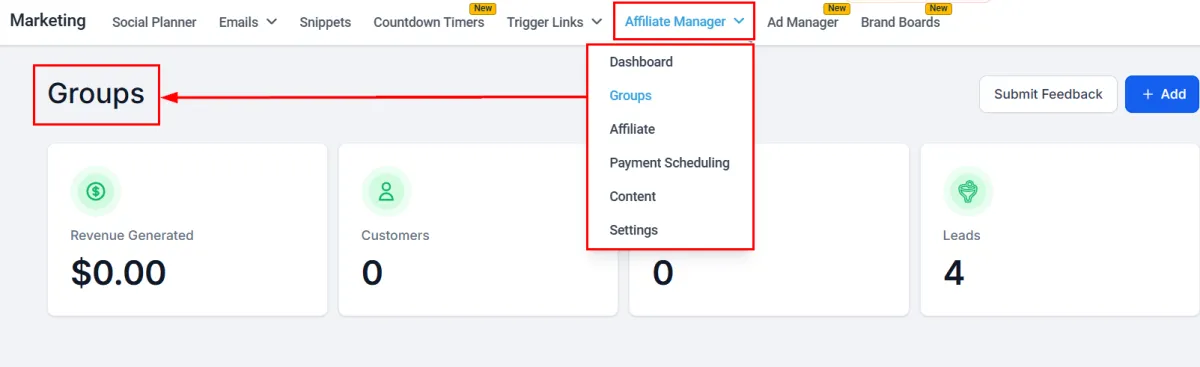
The platform will then reload to apply the changes to your account. Once loaded, the labels will be displayed both in the Affiliate Manager dropdown and in the left-hand corner of each section.
Revert Changes
To revert the labels to their default settings, click the Restore Default button in the Customizations section.
By following these steps, you can transform your Affiliate Manager into a seamless extension of your brand, creating a more cohesive and engaging experience for your users.
Frequently Asked Questions
How often can I change the labels?
You can update and customize the labels as often as needed to reflect changes in your branding or industry terminology.
Will changing a label affect my existing data?
No, changing a label will not alter any of your existing data or affiliate information. It simply changes how the information is displayed in the Affiliate Manager.
12. How to Add an Affiliate
Managing your affiliates efficiently is crucial to building a successful marketing program. Whether you're adding affiliates individually or in bulk, the process should be seamless and straightforward. This guide will walk you through the steps of adding affiliates to your system, ensuring they are linked to the appropriate campaigns and ready to start promoting. From manual entries to bulk uploads, you’ll learn how to get your affiliate network up and running with ease.
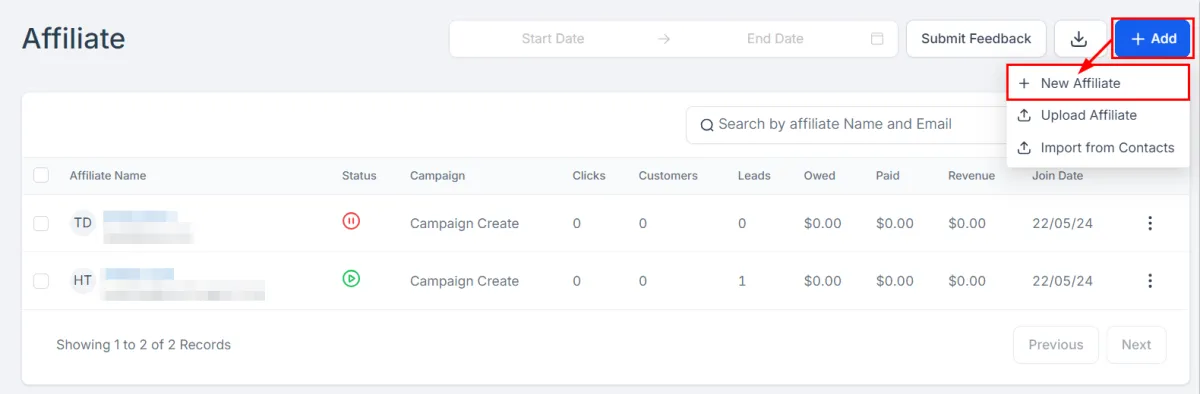
To add a new affiliate, begin by clicking the "Add" button located in the top right corner of the Affiliate page.
From here, you have two options:
Adding an Affiliate Individually
Affiliates can be added individually by filling out their information in the form provided after selecting the “+ New Affiliate” button.
1. Email: Enter the affiliate's email address. Their unique referral link will be sent to this address.
2. First and Last Name: Provide the affiliate's first and last name in the required fields.
3. Company Name: Optionally, enter the company name the affiliate is associated with.
4. Assign to Campaign: Select the campaign to which the affiliate should be assigned. Only one campaign can be selected at this step.
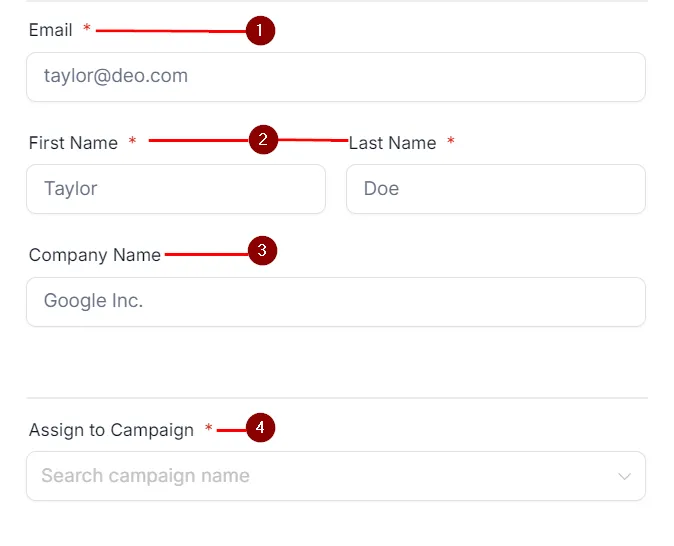
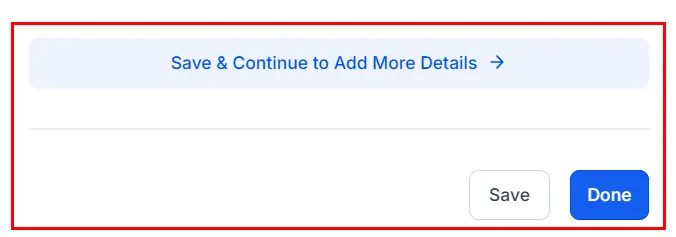
Click Done to add the affiliate, or click Save and Continue to add more details or adjust advanced settings.
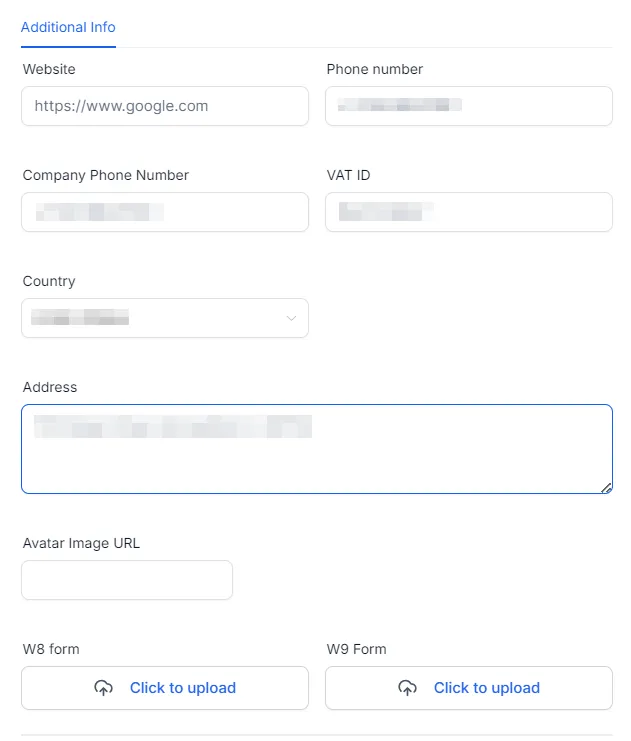
If you choose to add additional details, you can include the affiliate's phone number, VAT ID, address, or social media links. You also have the option to customize the affiliate's referral link or add a coupon code.
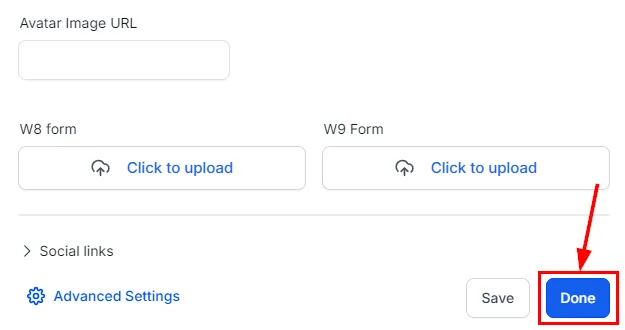
Once all the information has been entered, click Done to finalize and add the affiliate.
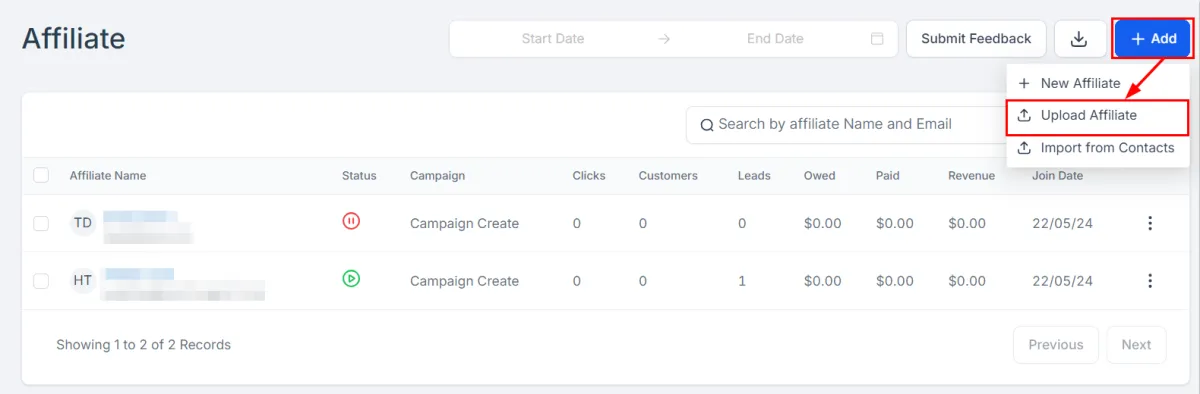
Uploading an Affiliate List
Affiliates can also be added in bulk by uploading a CSV file containing their information. To upload a bulk list, click the Add button, then select Upload Affiliate.
This will take you to the upload page.
Ensure your file is in CSV format and includes the following fields: First Name, Last Name, and Email. The maximum file size is 50MB. A sample document is available for reference.
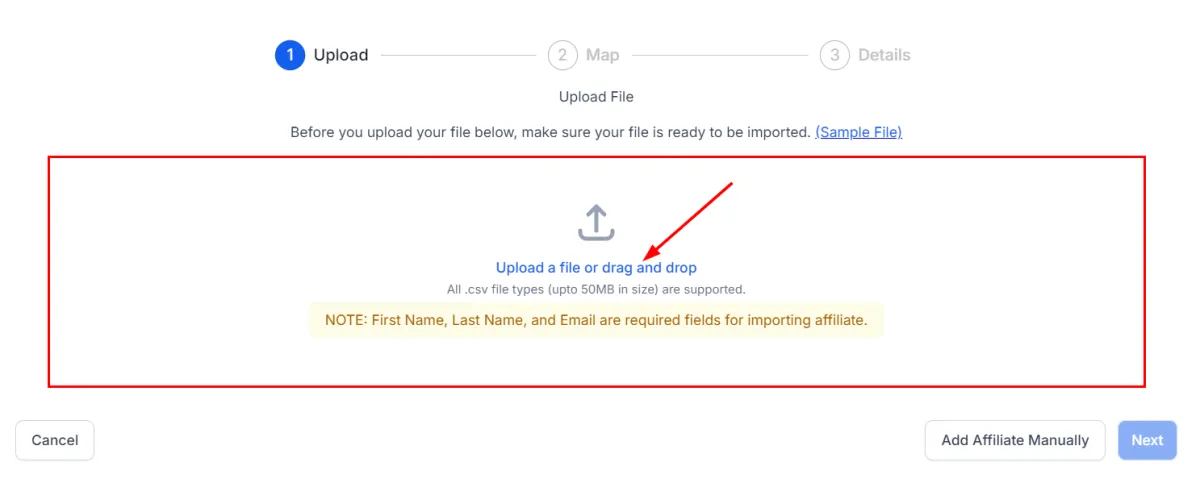
Once you’ve uploaded the file, click Next.
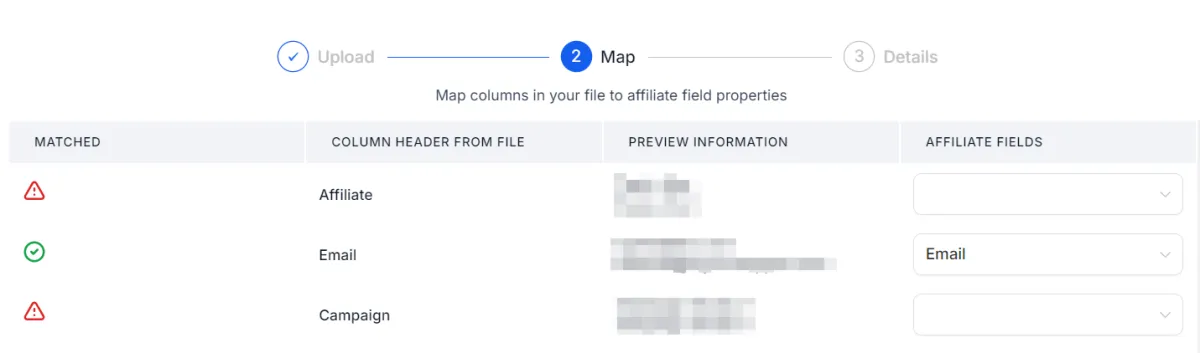
On this page, map the columns in your file to the corresponding columns in the affiliate table. The system will automatically identify matching fields—those that match will be highlighted in green, and those that don’t will be marked in red.
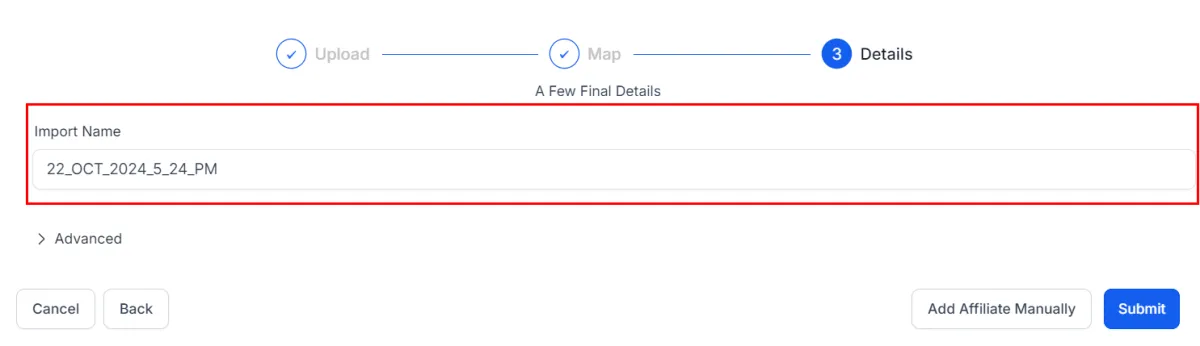
Before completing the upload, you’ll need to provide a name for the file. By default, the file name is based on the date and time, but you can rename it if preferred.
In the Advanced section, you can specify:
Whether to add the data as new records, update existing records, or both.
How to handle existing records in the CSV (e.g., update or skip empty values).
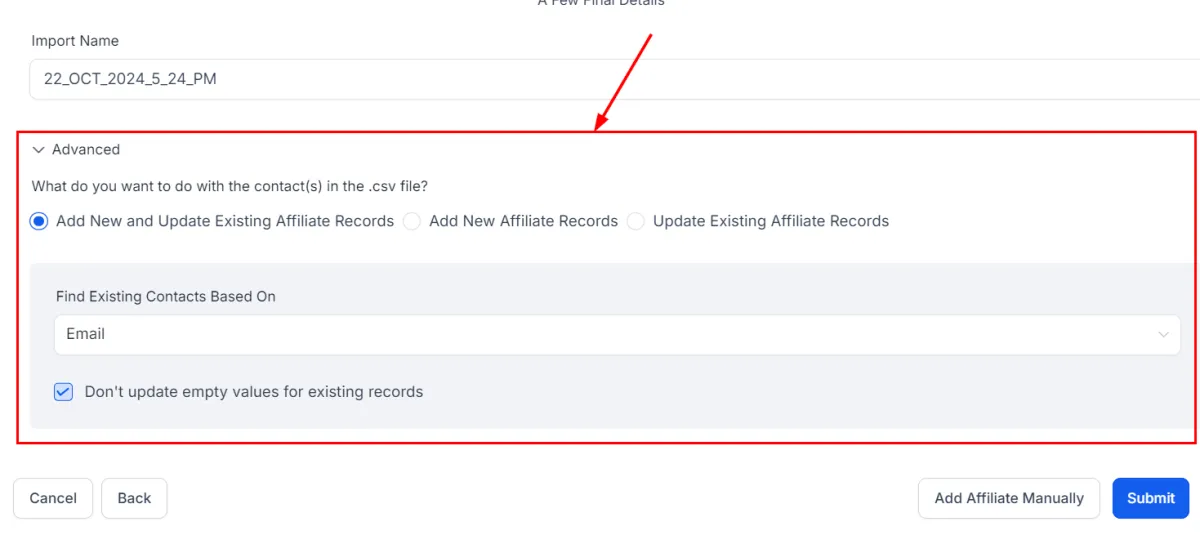
Click Submit when you have confirmed all the information entered.
Importing Affiliates from Contacts
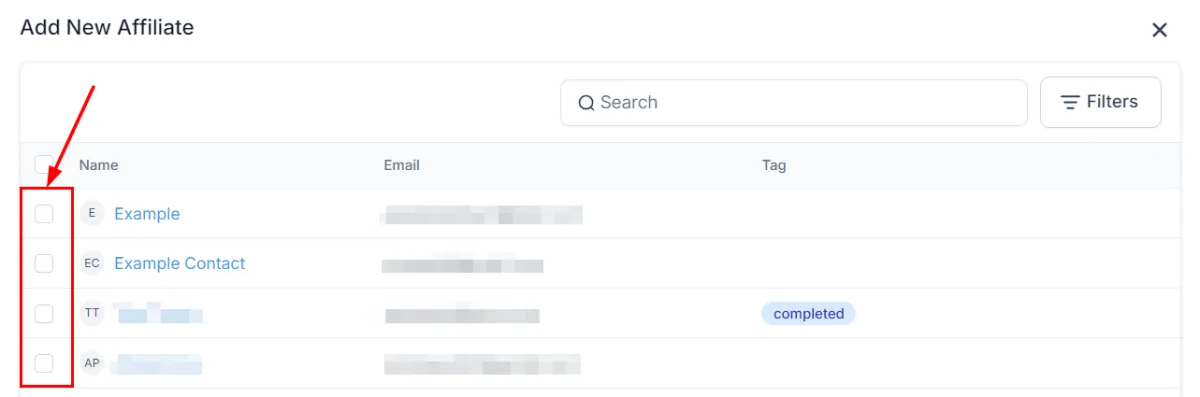
You can also import affiliate information directly from your existing contacts. Click the Add button and select Import from Contacts.
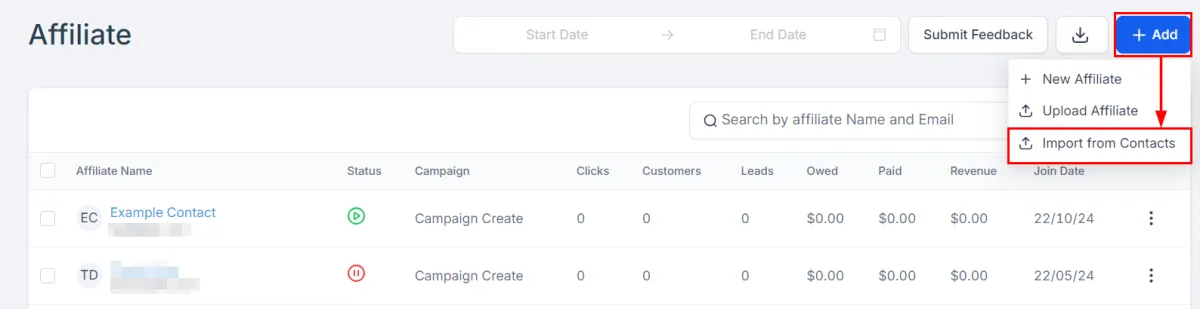
Check the box beside the contacts you wish to import, and click the Import option on the lower right-hand corner of the modal.
It may take a few minutes for the imported affiliates to appear, and they will be listed at the top once completed.
By following these steps, you can easily expand your affiliate network and ensure that each affiliate is properly set up within your system.
13. Lead Tracking in the Affiliate Manager
One of the most important aspects of having affiliates is tracking the leads they bring in for you. In cases where the leads they generate may not convert into sales, you can utilize Forms, Surveys, or Calendars as alternative sources to track these leads.
Begin by creating a new Affiliate campaign.
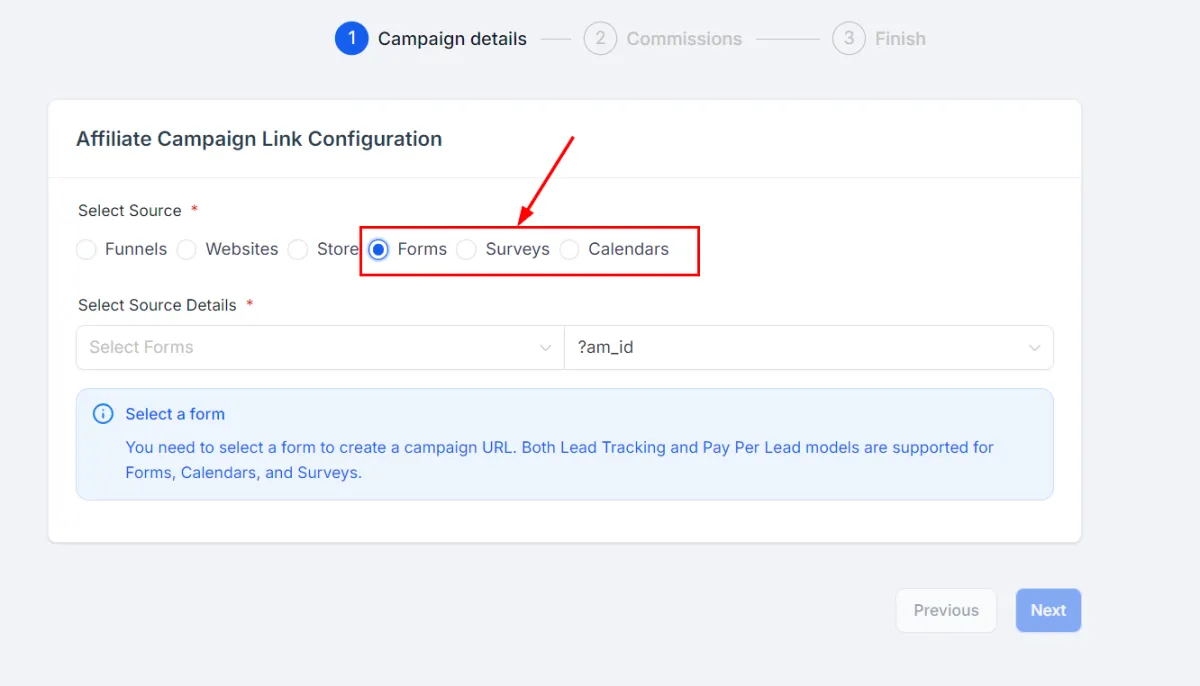
Your first step will be to select your preferred source from the Forms, Surveys, or Calendars category.
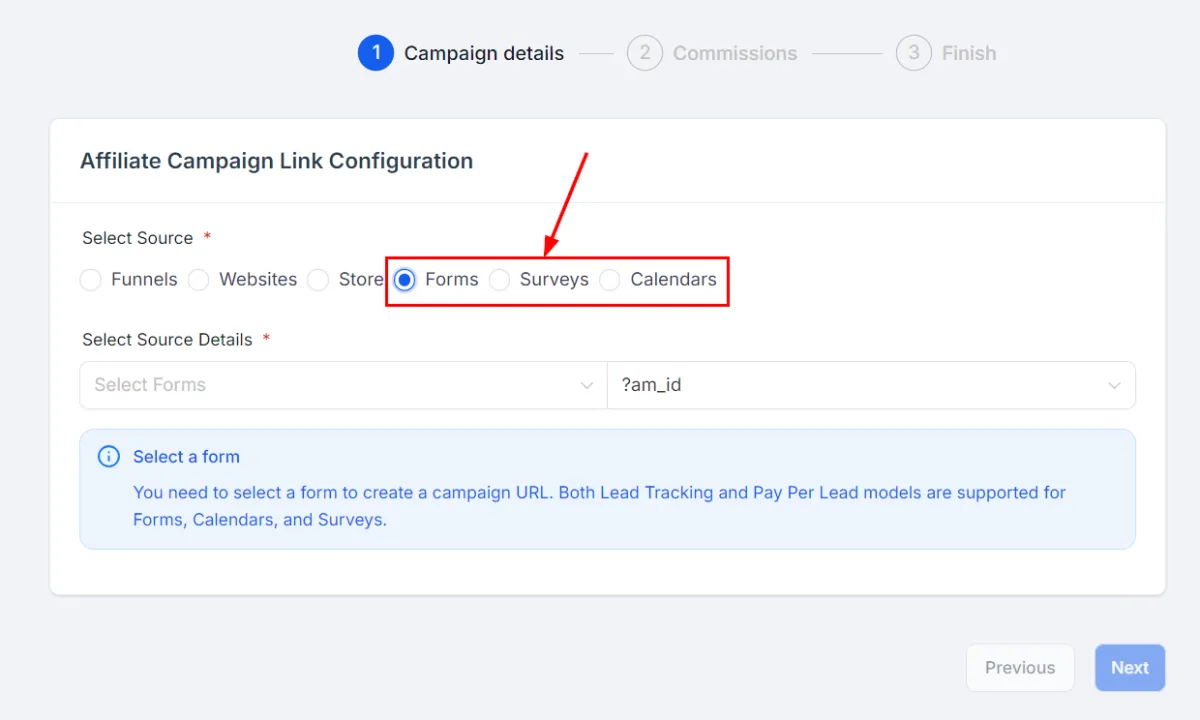
Open the Select source details drop-down menu to select the one you'll use and click next.
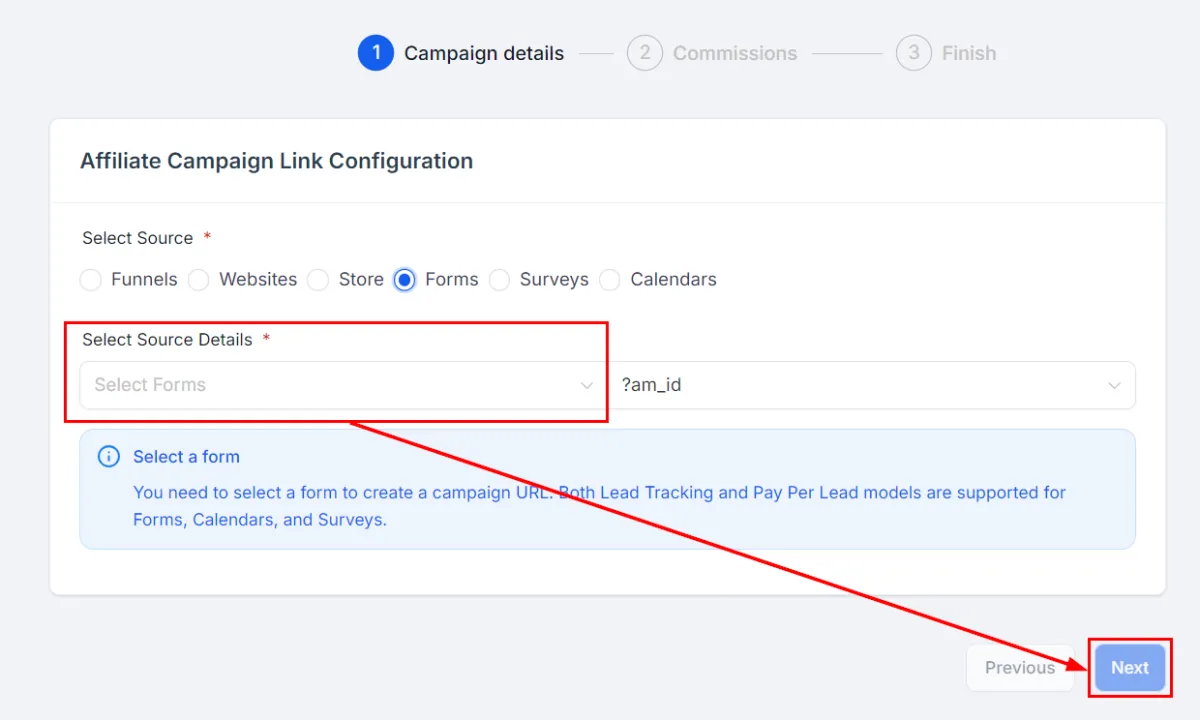
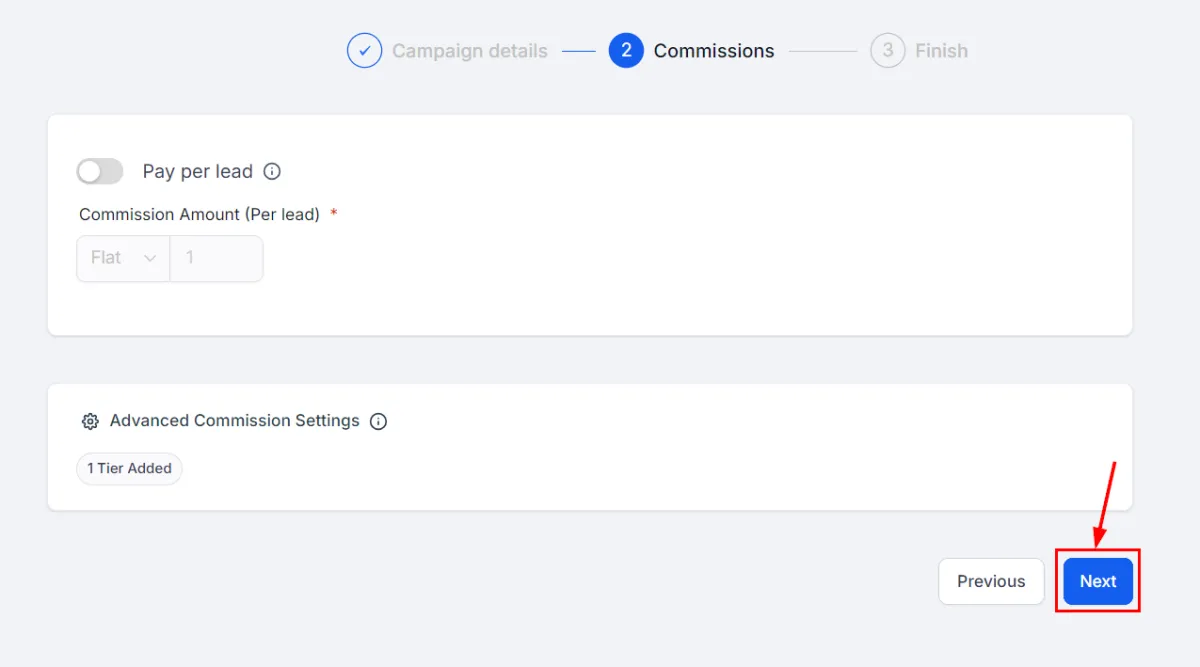
In the Commissions section, you can set up commission amounts, define tiers, and configure pay-per-lead structures. Click the “Next” button to finalize the campaign.
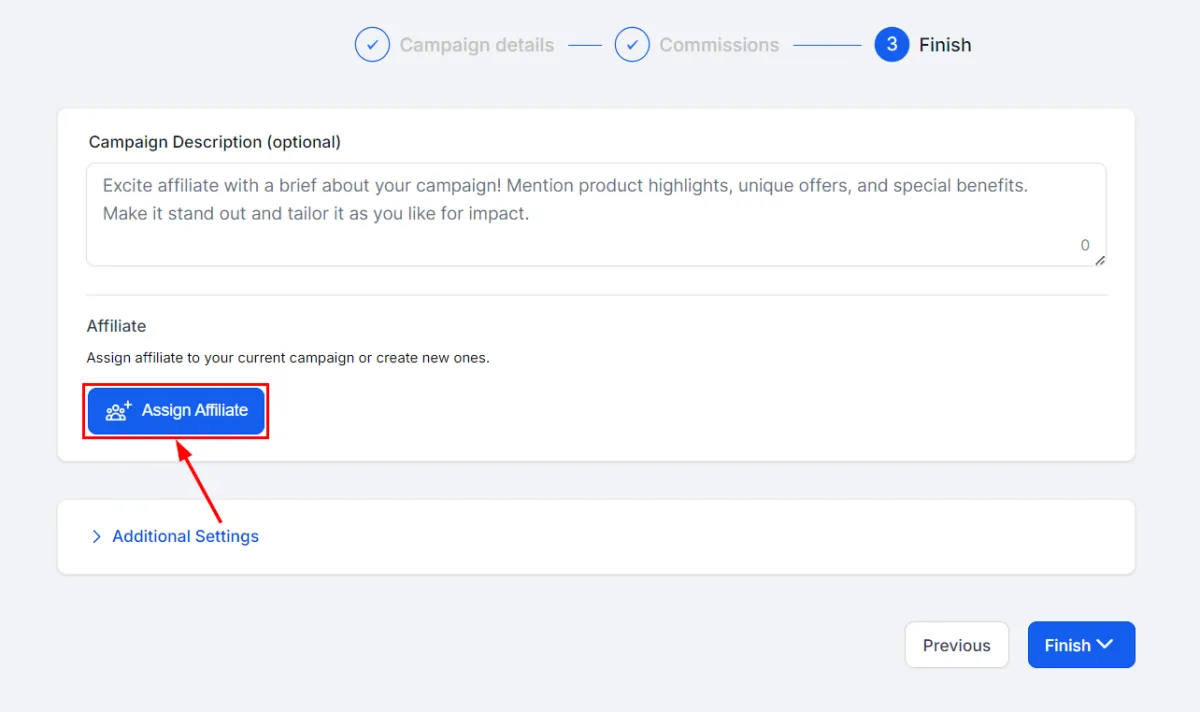
When utilizing lead tracking, there is no need to configure commissions. However, you must still add affiliates, and you have the option to include a description or adjust the settings as though commissions were being tracked.
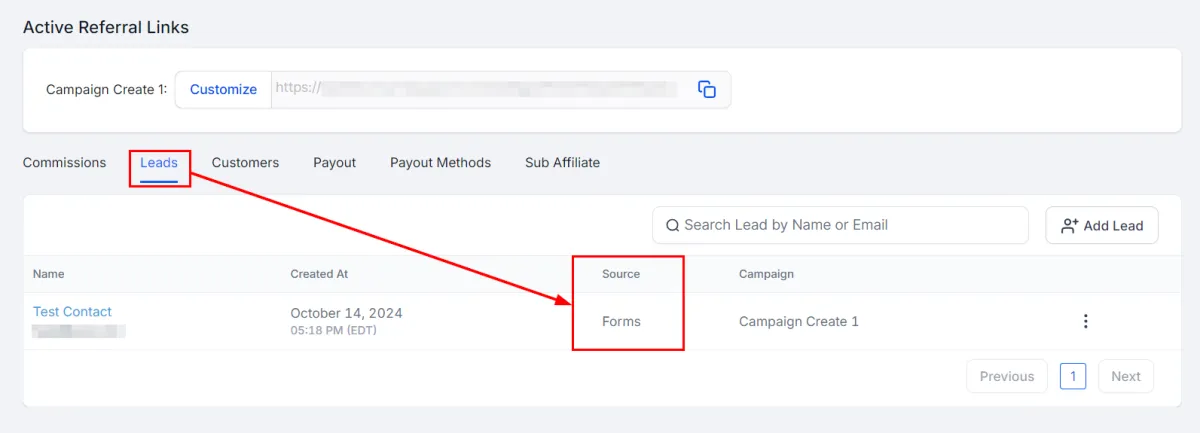
As your affiliates begin generating leads, you can quickly view the source by navigating to the Affiliates section. Simply click on the affiliate's name to open their Affiliate Highlights, and scroll down to the Leads section for a detailed overview.
That's all you need to do to start tracking leads! This process helps maintain organization with your affiliates, especially when you're relying on appointments, submissions, and leads. It's also beneficial if your sales occur outside the system, as it ensures leads remain linked to the appropriate affiliate, simplifying manual sales assignments.
📌Note: Custom Embeds are not supported for lead tracking. Forms/surveys/calendars have to be added as components inside a funnel or webpage to enable tracking.
14. Affiliate Manager Dashboard
The Affiliate Manager Dashboard is a powerful tool designed to streamline and optimize affiliate marketing efforts. Whether you're managing affiliates, tracking performance, or setting up commissions, this guide will help you navigate the dashboard effectively.
What is the Affiliate Manager Dashboard?
The Affiliate Manager Dashboard allows users to oversee and manage affiliate marketing programs within the platform. It provides comprehensive tools for monitoring affiliate activities, tracking referrals, and managing commissions.
Getting Started with the Affiliate Manager Dashboard
Navigate to the Affiliate Manager Dashboard from the Marketing > Affiliate Manager dropdown.
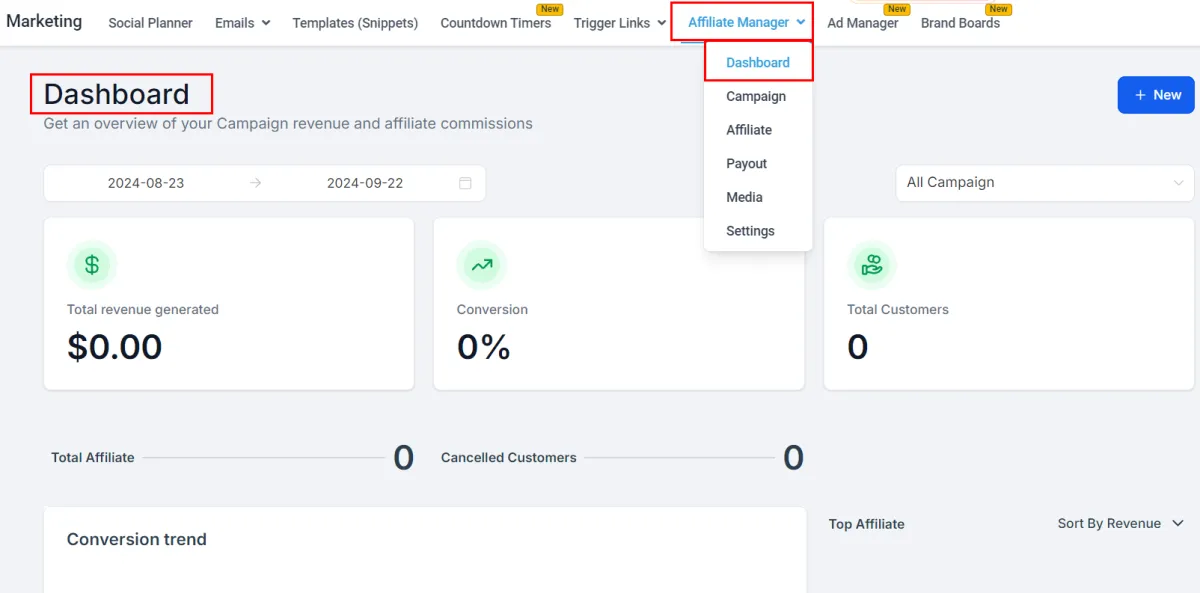
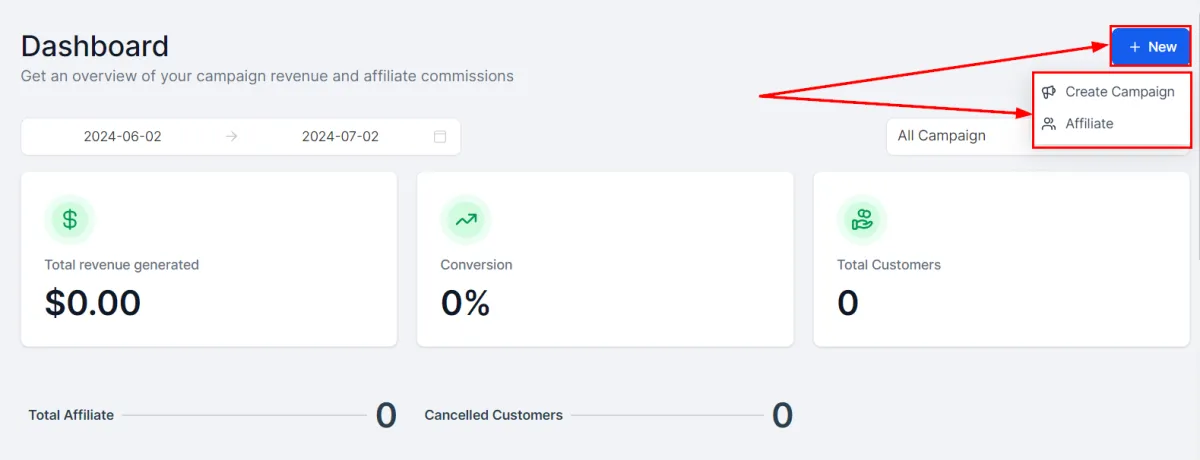
Creating a New Affiliate or Campaign
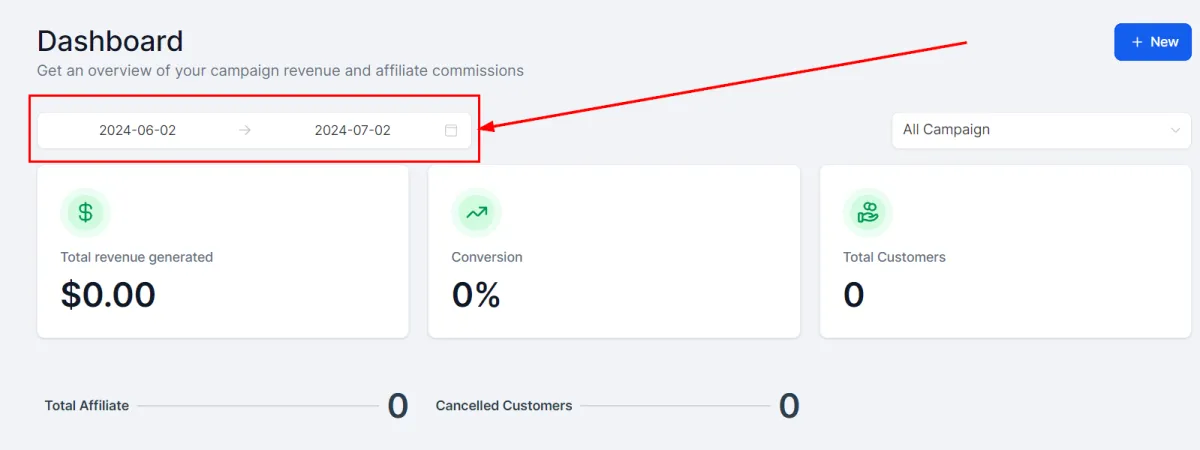
Date Range
Filter the data range on the Affiliate Dashboard from the calendar dropdown.
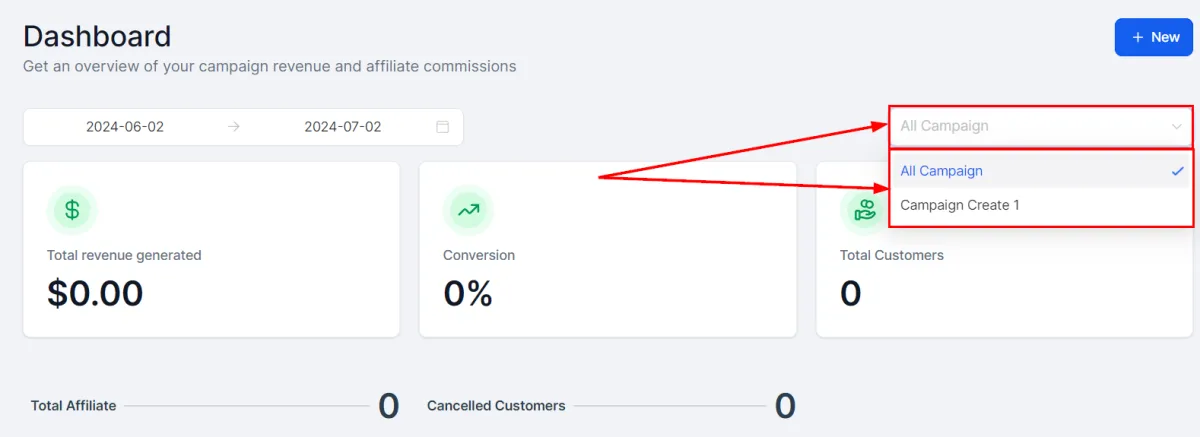
Campaign
Select "All Campaign" for a comprehensive overview of the campaign data, or choose specific campaigns to view detailed insights.
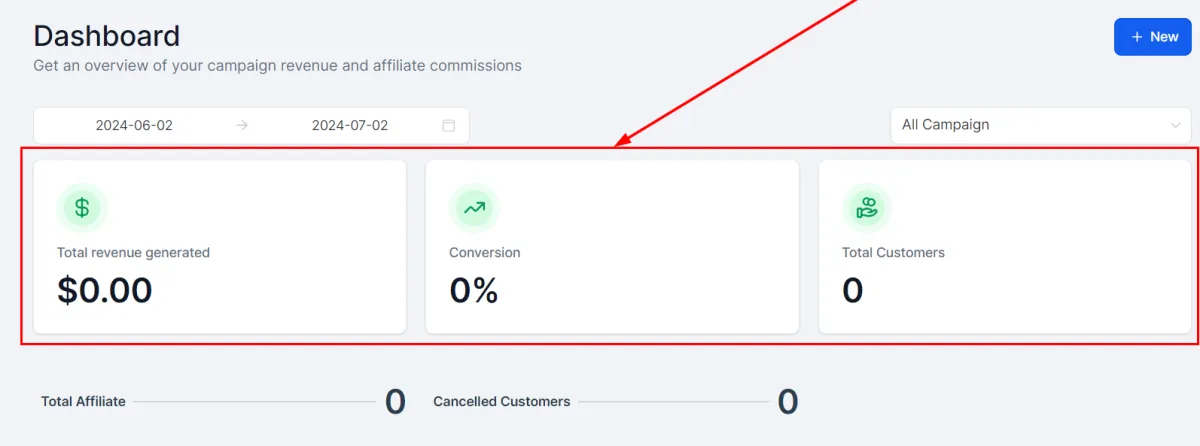
Core Metrics
View a summary of the total revenue generated, conversion rate, and total customers garnered.
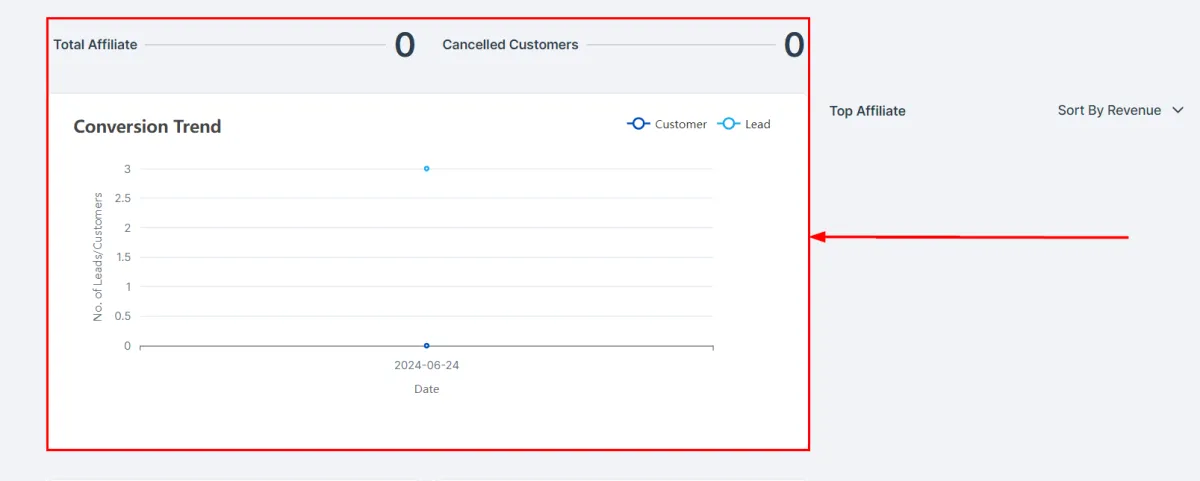
Conversion Trend
Explore in-depth insights with the Conversion Trend line graph, which highlights lead and customer trends for your campaigns over the specified date range.
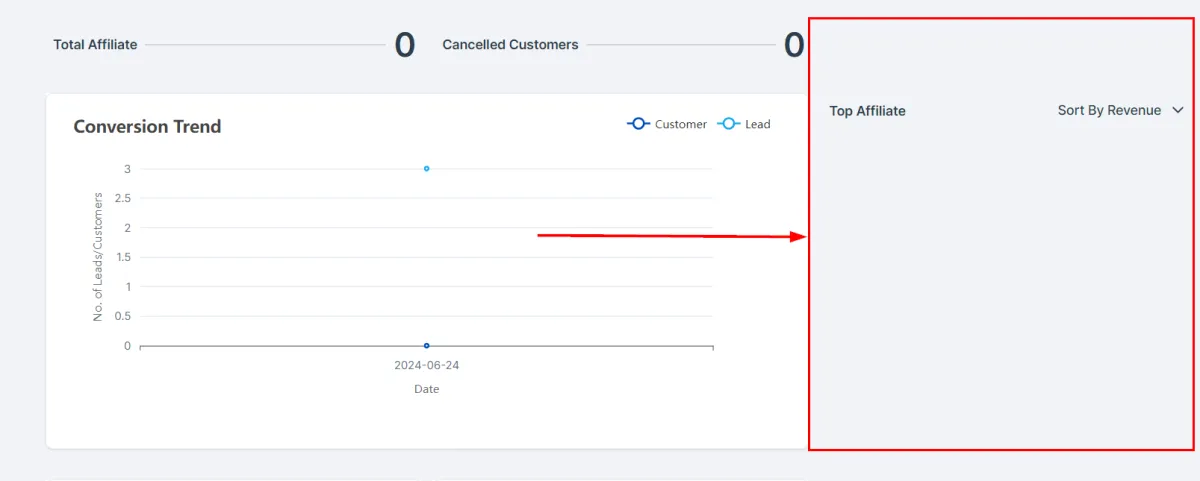
Affiliate Leaderboard
View your top 10 affiliates within this section. Filter affiliates based on revenue, commissions, leads, or customers.
Pending Actions
Easily monitor pending payouts and commissions. Click on "Pending Payouts" to swiftly navigate to the payouts page.

Latest Commissions and Affiliates
Keep updated with the newest affiliates and the latest commissions by viewing the pertinent details and actions within this section. Utilize the dashboard to approve or deny commissions efficiently.

To export your affiliates' sales as a CSV, click the button in the right corner.

By utilizing the features and tools available in the Affiliate Manager Dashboard, you can optimize your affiliate marketing strategy, track performance accurately, and foster strong relationships with your affiliates.
Frequently Asked Questions (FAQs)
Q: How do I add affiliates?
To add affiliates, navigate to the Affiliate Manager Dashboard and locate the option to add new affiliates. You can manually add affiliates or provide them with the generated sign-up link.
Q: Can I track affiliate performance and referrals?
Yes, the Affiliate Manager Dashboard allows you to track affiliate performance, monitor referral activities, and generate reports to analyze affiliate campaign effectiveness.
Q: How are commissions managed?
Commissions can be managed by defining commission rates, and payment schedules, and viewing commission payouts to affiliates within the Dashboard.
Q: How can I customize affiliate communications?
You can customize affiliate communications such as welcome emails, commission notifications, and promotional updates through the Affiliate settings. Personalize messages to align with your brand and engage affiliates effectively.
15. How to Enable Sub Affiliate Sign Ups for Affiliates
If you're running affiliate campaigns you might want to consider setting sub-affiliates. Sub-affiliates allow you to get the most out of your affiliate marketing by having your affiliate network grow your audience even more. You can enable this option from the get-go or if you have an active affiliate campaign you can add it at any point.
To start go to your Affiliate Manager inside the Marketing section and access your Settings. Inside Settings, you should see Default Campaign settings pop up.
Toggle “Sub-Affiliate signup page”, this will show a drop-down menu for you to select a form, please keep in mind that first name, last name, and email have to be marked as required fields or the form can not be chosen. After the form is selected press Save, you can come back to modify this later as well.

You can also enable this option when creating a new campaign on the Finish step, by opening Additional Settings and toggling the option.

When you enable this option for a campaign each affiliate will get a Sub Affiliate sign-up link and the sub-affiliates will be under their profile.
By following the steps outlined above, you can seamlessly integrate sub-affiliates into your marketing strategy, boosting growth and engagement with minimal effort. Don't hesitate to revisit and adjust your settings as your campaign evolves for continued success.
16. Affiliate Level Commission Settings
Managing affiliate commissions effectively is crucial for maintaining motivation and ensuring the success of your affiliate program. With Affiliate Level Commission Settings, you can set custom commission rates for individual affiliates within a campaign, offering a flexible and precise approach to commission management. This feature allows you to override campaign-level commission settings with affiliate-specific settings, making rewarding top performers and managing your affiliates easier.
This article will guide you through the steps to navigate and utilize the Affiliate Level Commission Settings, ensuring you can optimize your affiliate program to its fullest potential.
Navigate to the Affiliate Manager
To begin, log into your account and access the Affiliate Manager. This is where you will manage all aspects of your affiliate program, including setting individual commission rates.
Select the Affiliate
Next, go to the Affiliate Page. Here, you will find a list of all your affiliates. Select the affiliate for whom you want to set custom commission rates. This ensures you are making adjustments for the correct individual.
Choose the Campaign
Scroll down to the "Active Referral Link" section. Locate the campaign you want to customize and click on "Customize" next to it. This will allow you to configure the commission settings specific to that campaign for the chosen affiliate.
Configure Affiliate Level Commissions
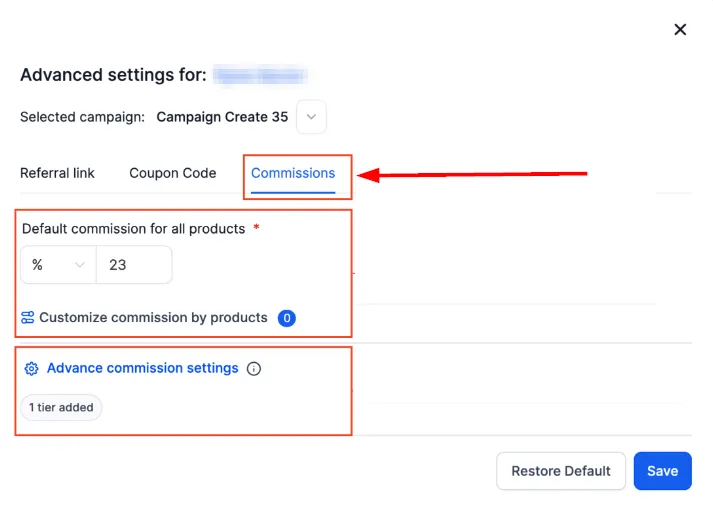
In the campaign settings, switch to the "Commissions" tab. Enter the custom commission rate for the selected affiliate. You can configure both the Default Commissions and Product-Based Commissions as needed. If the campaign is multi-tiered, you can also set commission rates for each tier. Remember to save your changes to apply the new settings.
By leveraging the Affiliate Level Commission Settings, you can effectively manage your affiliate program, ensuring top performers are adequately rewarded and motivated. This flexibility not only enhances affiliate satisfaction but also drives the overall success of your campaigns. Implement these steps to fine-tune your commission structures and maximize the potential of your affiliate marketing efforts.
Important Notes
Precedence: Affiliate-level commission settings will always take precedence over campaign-level settings for commission calculation. This ensures that your custom settings for individual affiliates are applied correctly.
Tier Management: Users cannot change tiers in the affiliate profile settings. The tier dropdown will be disabled. Changes to tiers must be made in the campaign settings.
Support: Currently, only affiliate campaigns where the source is a funnel or website support this feature.
17. How to Clone an Affiliate Campaign
Why It Matters
Cloning a campaign significantly reduces the time and effort required to set up new campaigns. By allowing you to reuse configurations and settings from existing campaigns, it streamlines the campaign creation process and ensures consistency in your marketing strategies. Embrace this feature to efficiently manage and deploy affiliate campaigns with greater ease and effectiveness.
How It Works
To utilize this feature, follow these steps:
1. Access the Affiliate Manager: Navigate to your Affiliate Manager within the Marketing section.
2. Select Campaigns: Click on the "Campaign" tab to view your existing campaigns.
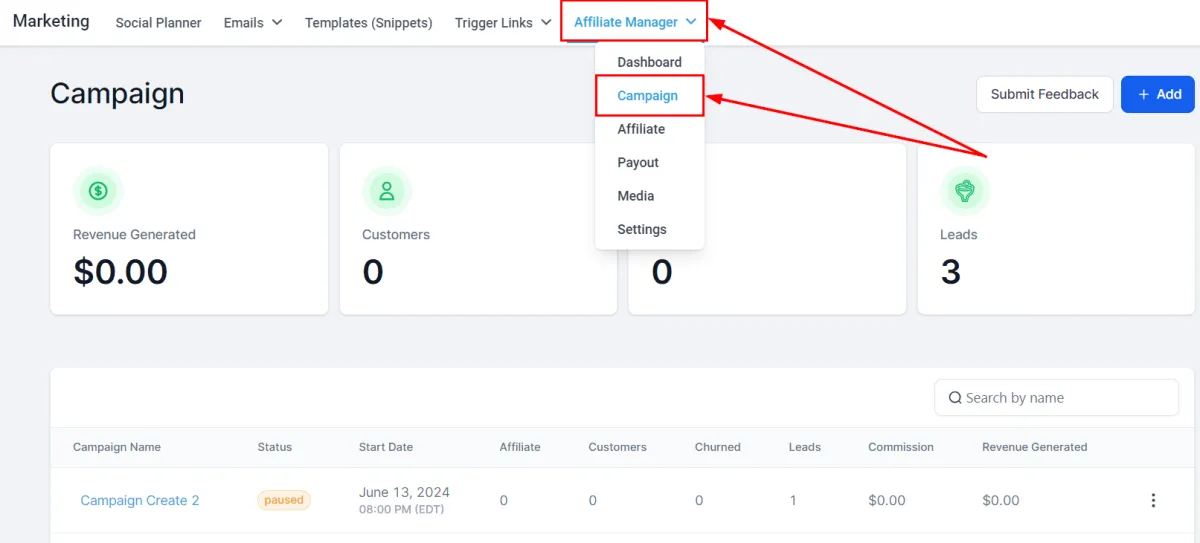
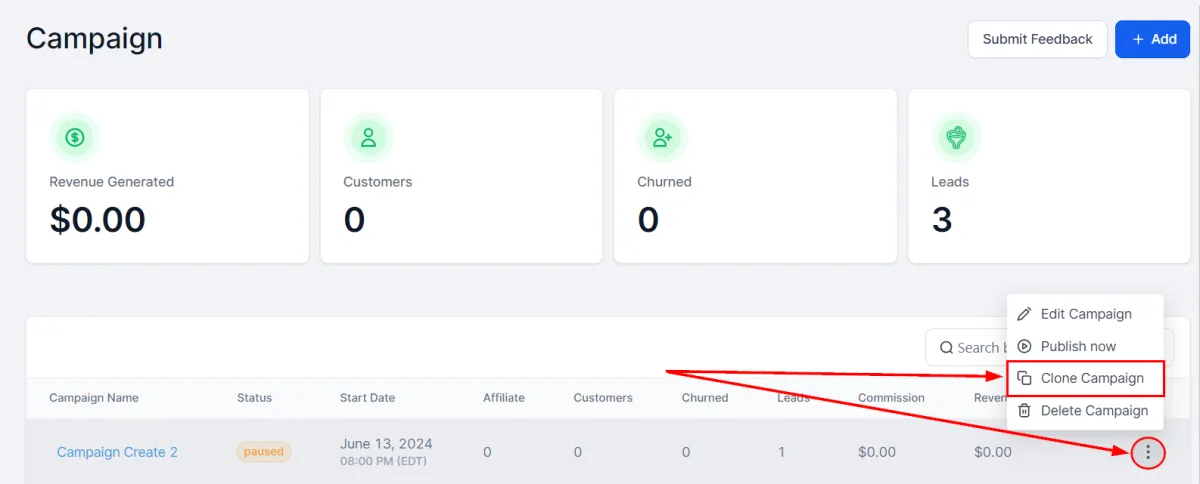
3. Initiate Cloning: Locate the campaign you wish to clone and click on the three dots associated with that campaign.
4. Choose "Clone Campaign": Select the "Clone Campaign" option from the menu.
5. Rename the Campaign: Enter an appropriate name for your cloned campaign.
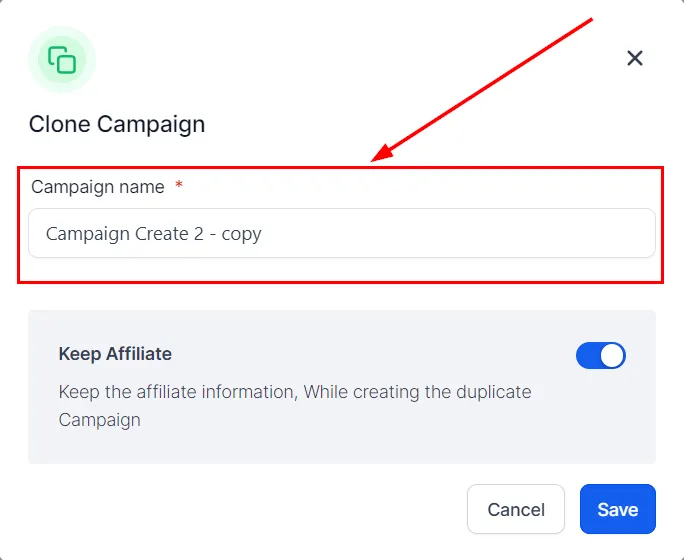
6. Decide on Affiliate Inclusion: Choose whether to retain the affiliates from the original campaign or start anew.
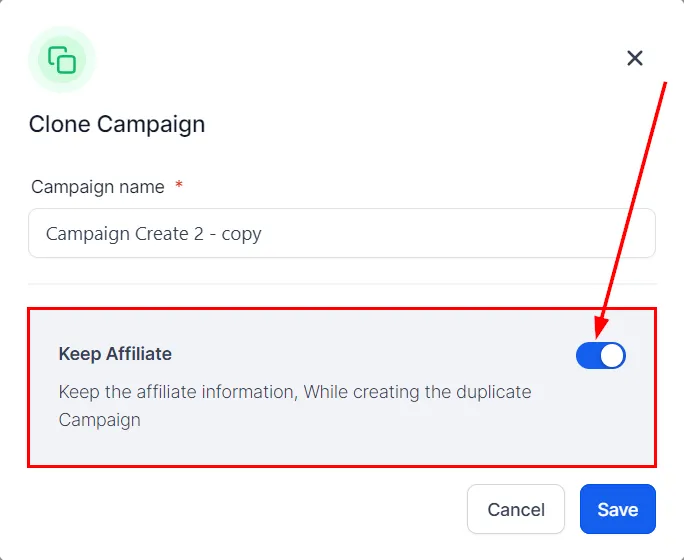
7. Save and Finish: Click "Save" to create the new cloned campaign.
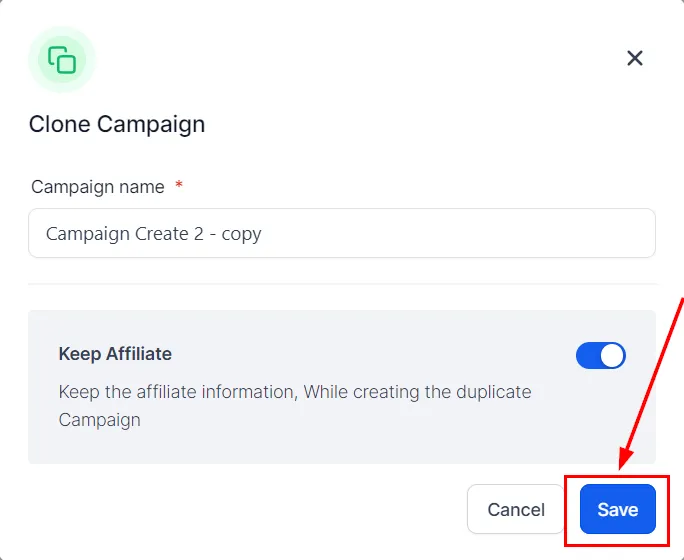
📌Note: the cloned campaign will be inactive by default, allowing you to make any necessary adjustments before publishing it.
Frequently Asked Questions (FAQs)
Q: What is the purpose of the campaign cloning feature?
The campaign cloning feature allows you to duplicate existing affiliate campaigns, which saves time and effort by reusing configurations and settings. This streamlines the creation process and ensures consistency across your marketing strategies.
Q: Can I modify the cloned campaign before publishing it?
Yes, the cloned campaign will be inactive by default, allowing you to make any necessary adjustments before publishing it. You can update settings, configurations, and other details as needed.
18. Setting Up an Affiliate Campaign
The key to a successful affiliate marketing campaign is having the right configuration for your business and its goals. By setting up the right configuration, you can tailor the campaign to your target audience, ensure effective communication with your affiliates, and maximize your returns. Let's check how to do it!
To initiate the campaign creation process, click the "+Add" button located in the upper right-hand corner of your screen.

Campaign Details
Campaign Name
Enter a distinctive name for this campaign in the Campaign Name field, which will serve as its identifier. By choosing a unique and easily recognizable name, you'll be able to quickly differentiate this campaign from others and efficiently manage your marketing initiatives.
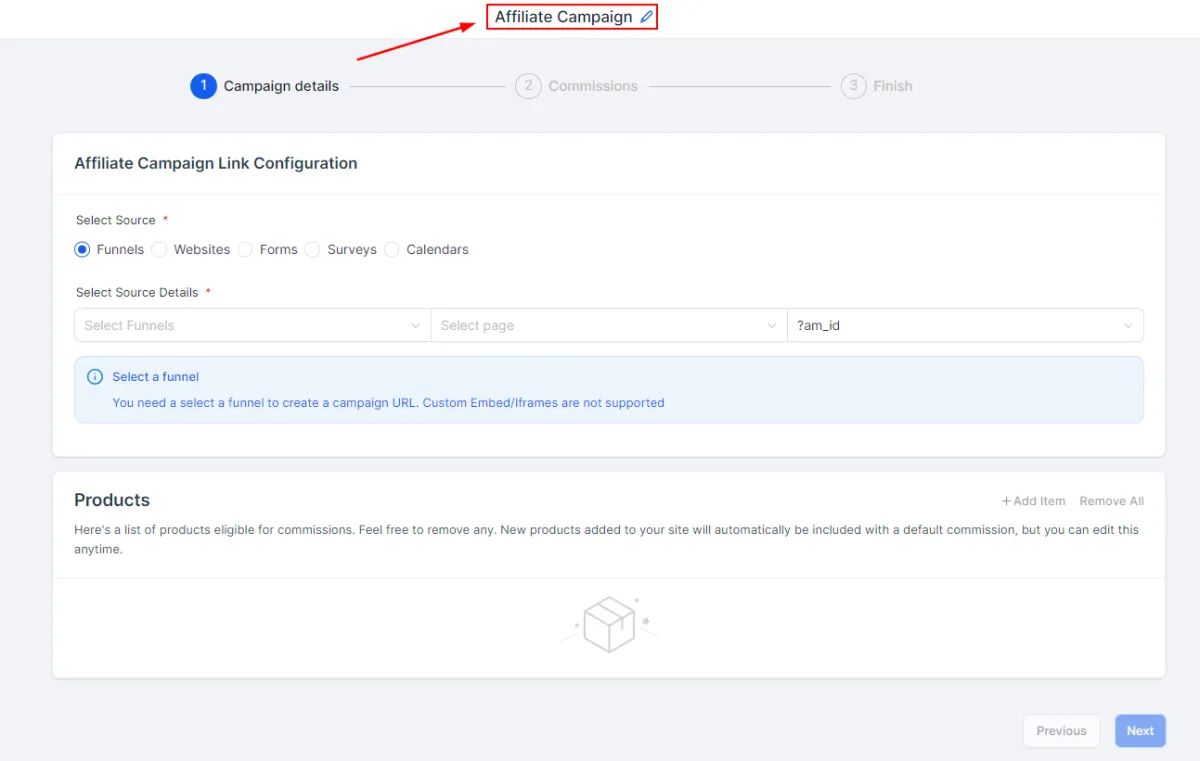
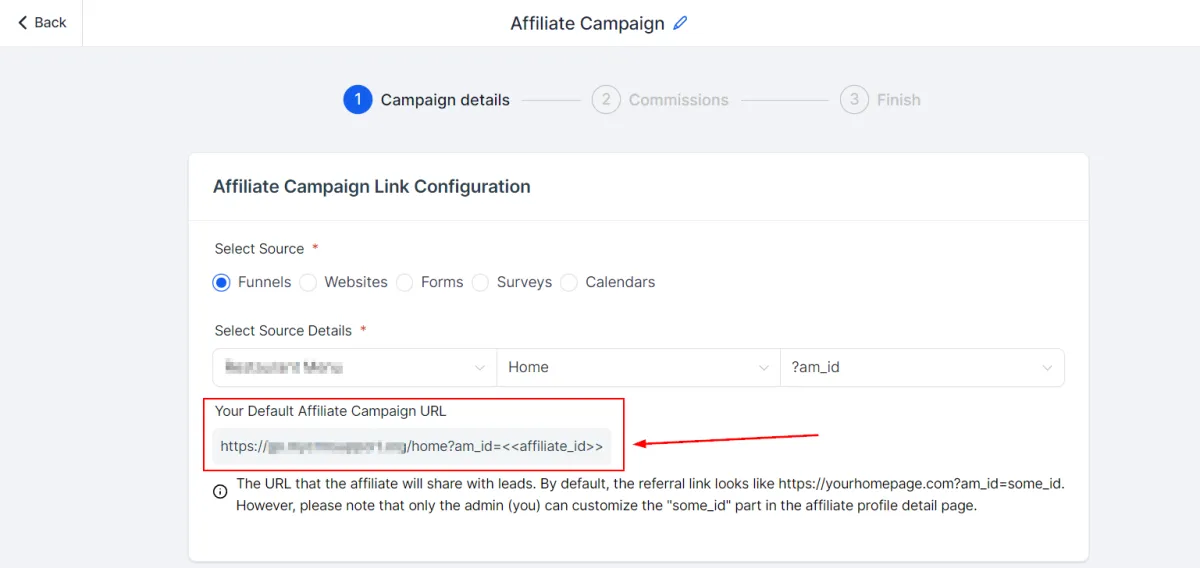
Source
Select the source from which the affiliate's leads will originate.
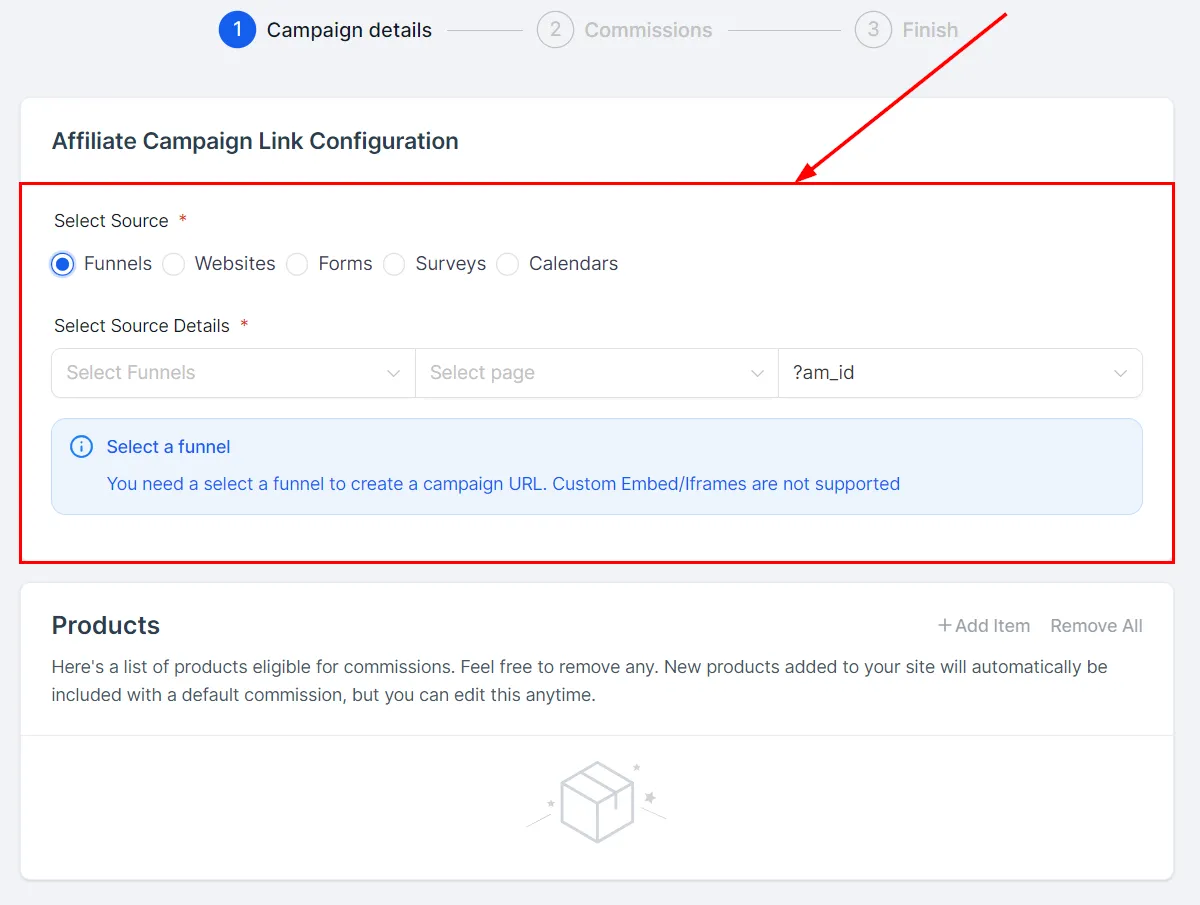
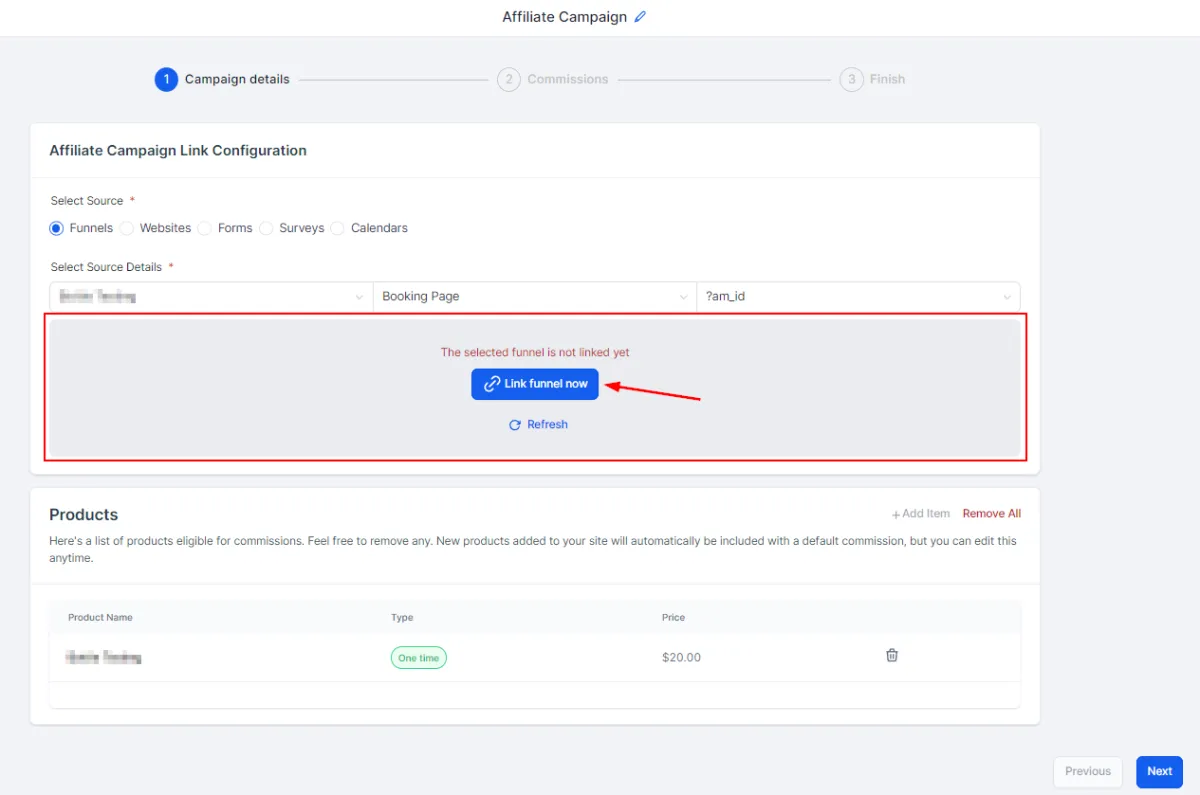
For funnels or websites, ensure that they are linked to a domain. If you haven't linked your domain yet, you can do so on the funnel page.
View the preview of your affiliate campaign URL in this section.
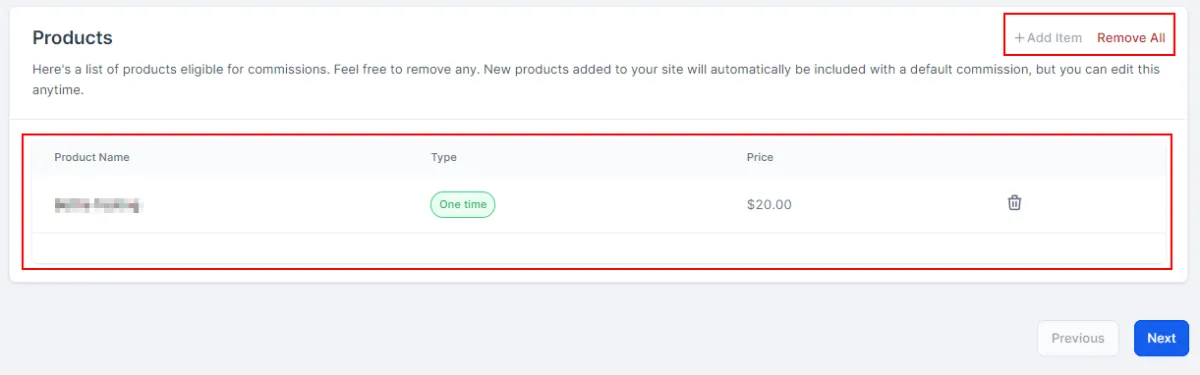
Products
Choose the products that will show on which an affiliate commission is applicable.
📌 Note: The affiliate campaign can only be activated once the respective products and affiliates have been selected. You will not be able to publish a campaign until these requirements are met.
You can save an affiliate campaign at any time and return later to add affiliates and products or services.
Select “Next” to proceed to the Commissions section for campaigns utilizing a funnel or website as the source. Commission settings do not apply to forms, surveys, or calendars; therefore, this section will be bypassed if one of these is chosen as the campaign source.
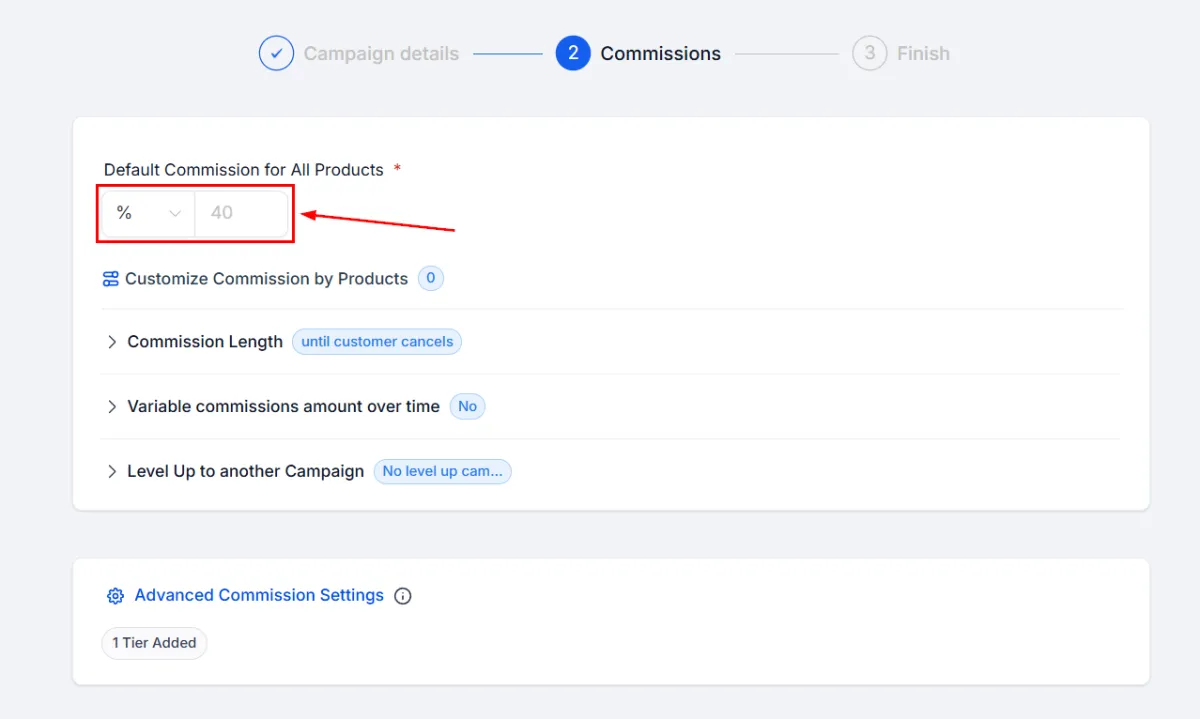
Commissions
The commission percentage refers to the proportion of each sale, expressed in percentage terms, that will be allocated as a commission to affiliates for their successful sales efforts. This predetermined rate ensures fair compensation for affiliates and provides a clear understanding of their earnings potential based on their sales performance.
Additional Commission Options
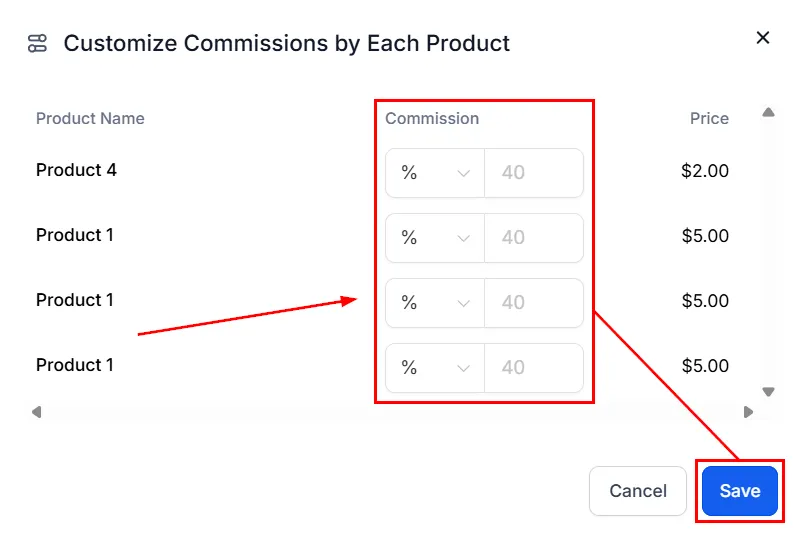
For multiple products, you can set customized commissions for each by clicking the two-toggle icon.
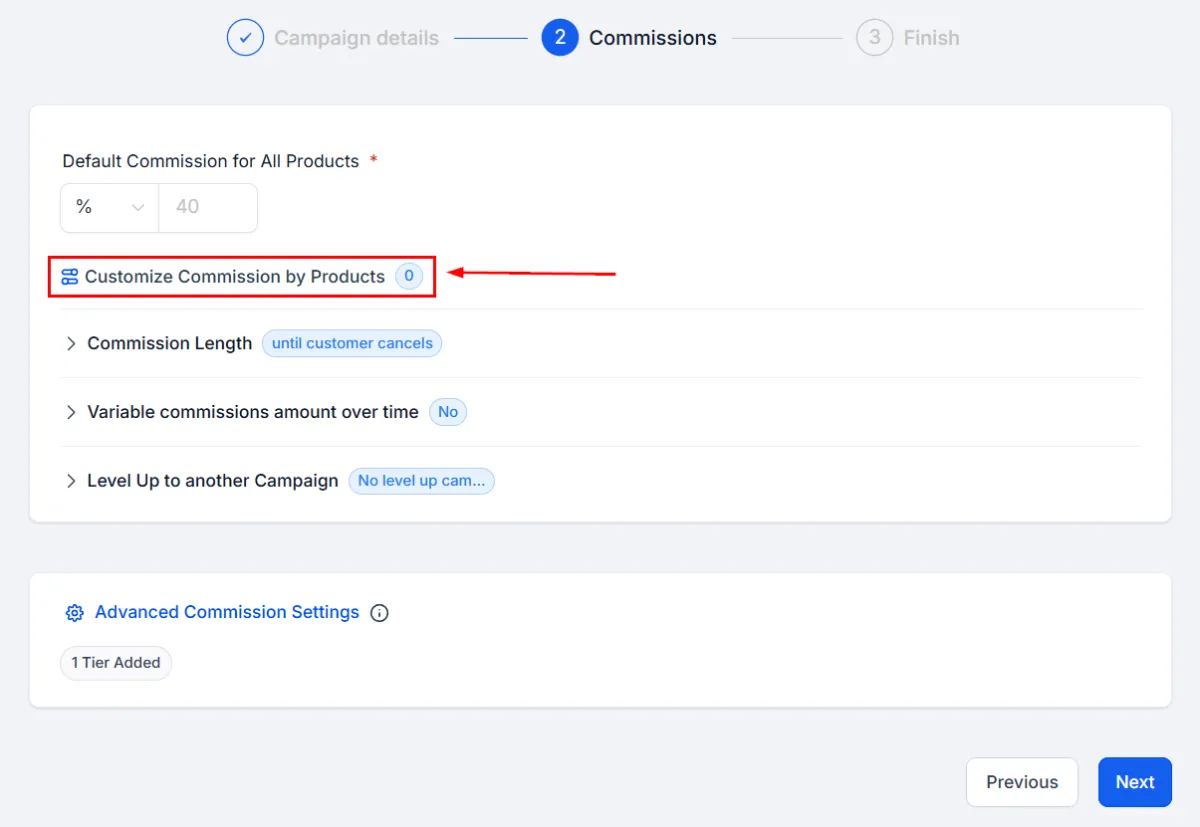
Enter the commission value, then click save.
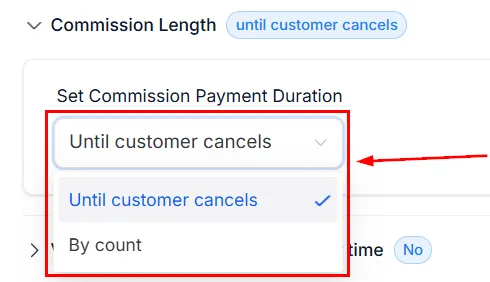
Open the Set Commission Length menu to set the commission payment duration.
If you want to give a little bonus to the first commissions, open the Variable commissions amount over time, select Two levels as your option.
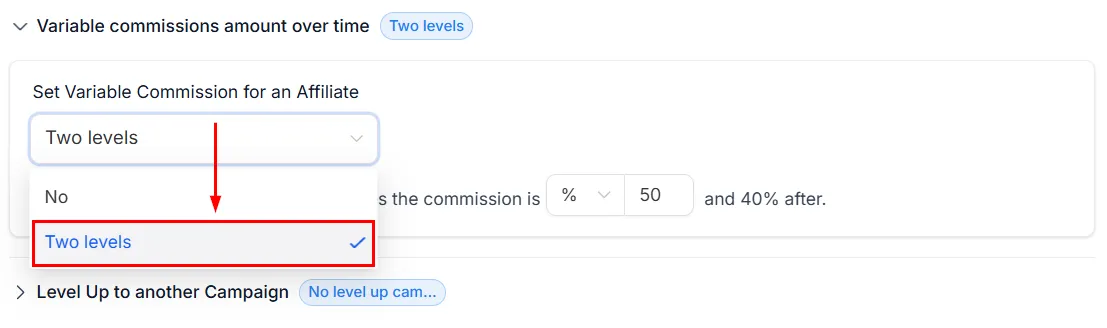
Set the number of transactions (1) and the commission value (2) for the starting bonus.
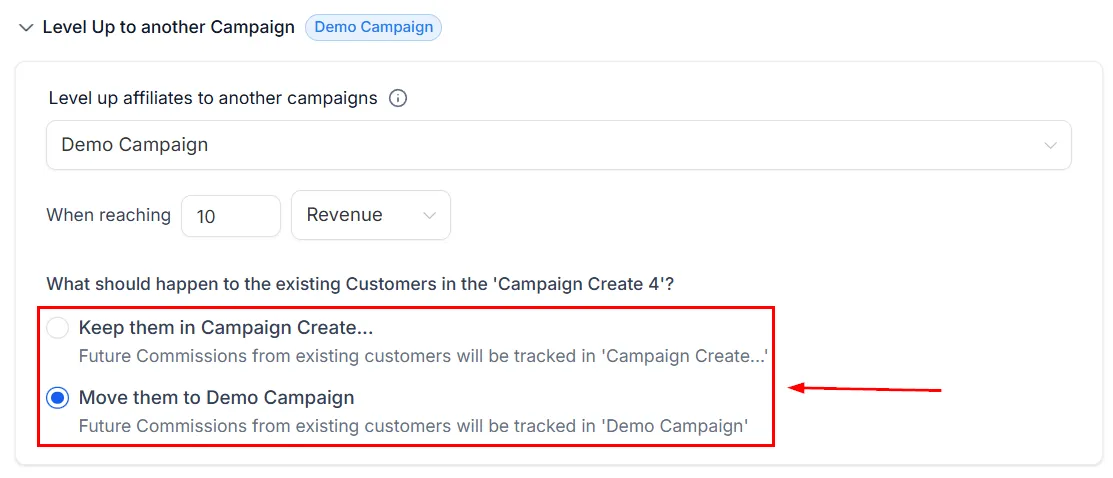
You can promote affiliates to a new campaign when they hit specific milestones by selecting a receiver campaign in the Level Up to another Campaign section.
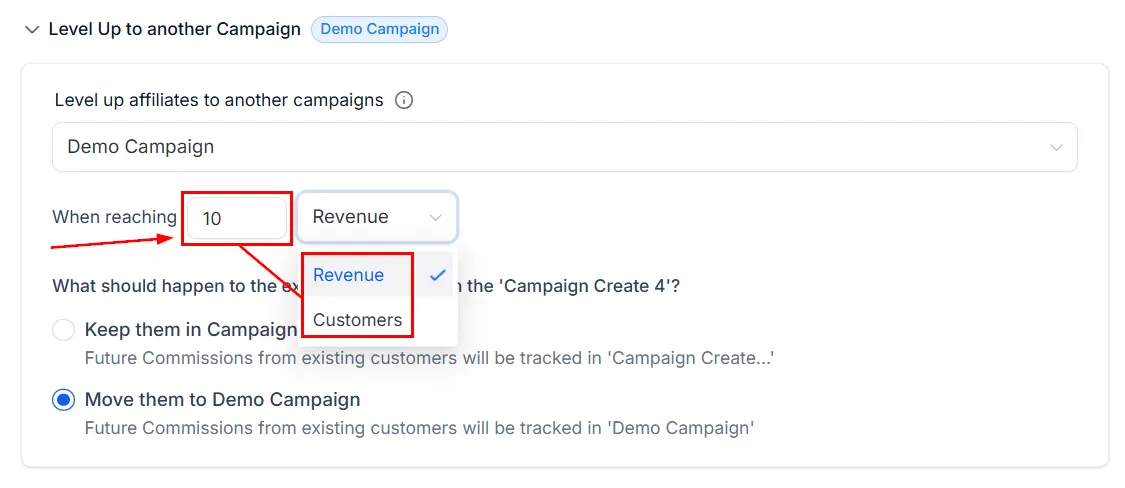
Lastly, pick an option for their referral customers.
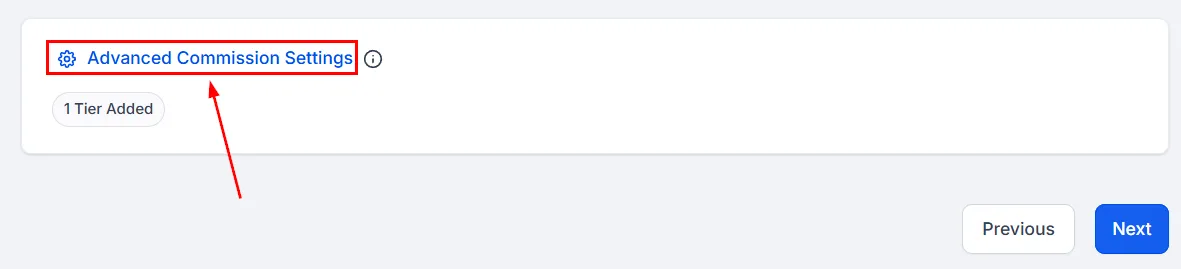
Advanced Commission Settings
You can set different tiers for the same affiliate campaign by clicking the gear icon.
This system allows you to divide your affiliates into different earning levels.
Once you've set the commission for the other tiers, click the “Save” button to finalize the campaign details.
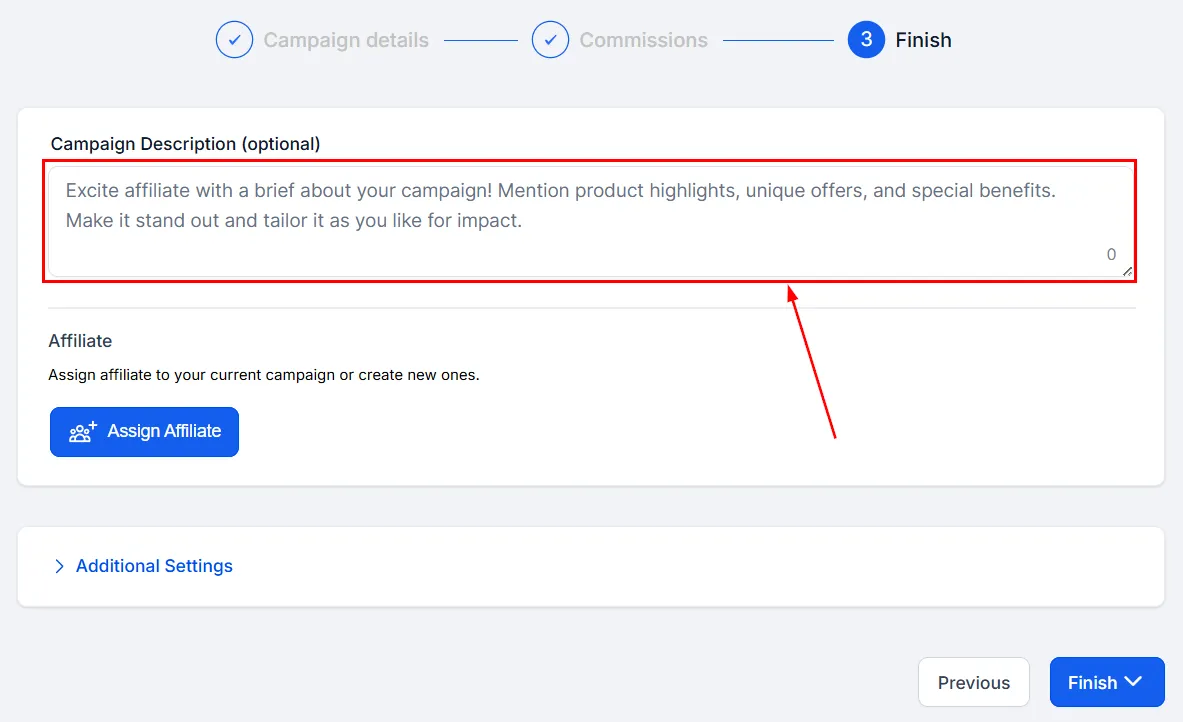
Campaign Description
In this space, you have the opportunity to provide a concise overview of the campaign's main objectives and elements. This brief description will help convey the essence of the campaign and allow others to quickly grasp its purpose and goals, ensuring clarity and effective communication.
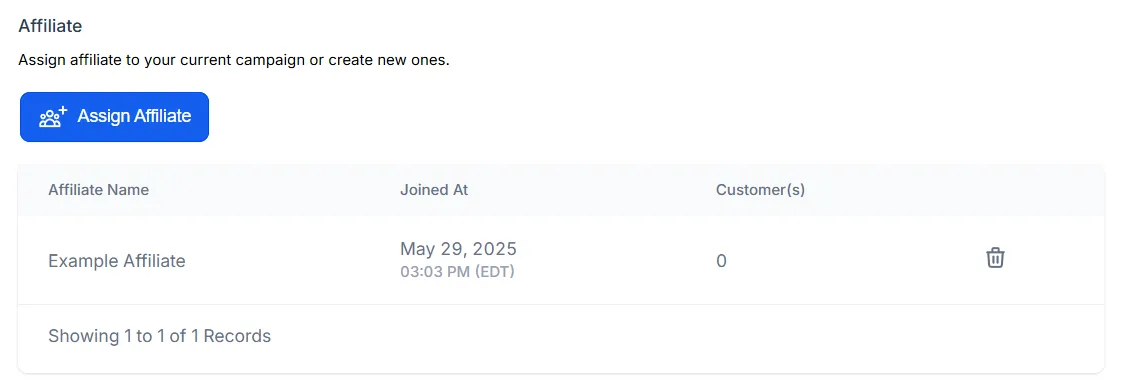
Add Affiliate
In this section, you will be presented with a list of available affiliates that can be added to your campaign. Each affiliate will be assigned a unique link specifically designed to promote the affiliate program.
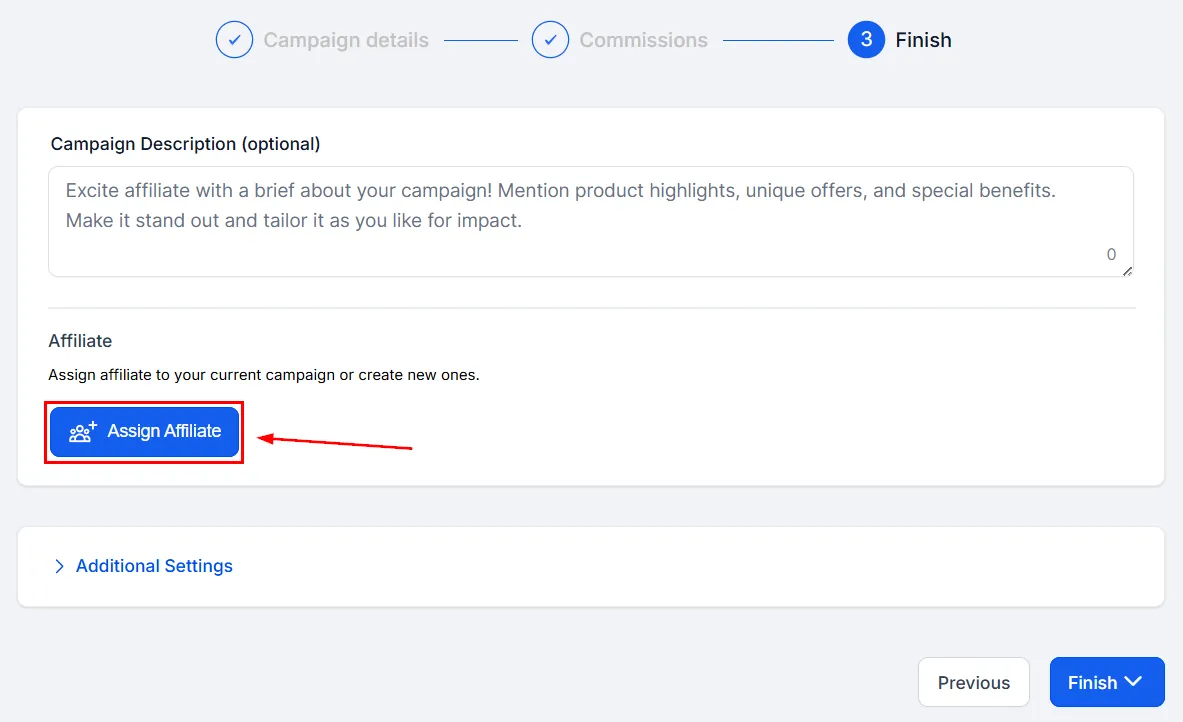
Please note that an affiliate can participate in multiple campaigns simultaneously and will receive a unique affiliate link for each campaign. This ensures accurate tracking and attribution of their promotional efforts across various initiatives.
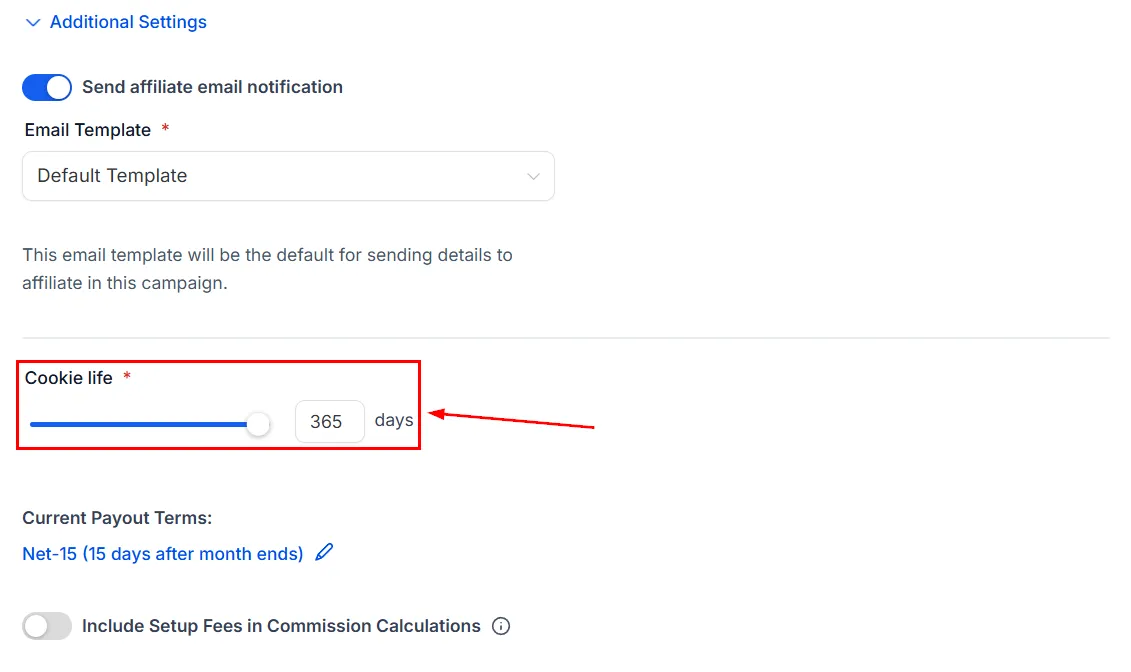
Cookie Life
Choose the duration, in days, that the cookie will remain active within the lead's browser. This selection determines the period for which the cookie will store information and track the lead's activities, ensuring an optimal user experience and effective lead management.
Payout frequency
The payout frequency option enables you to determine the specific time intervals at which payments will be issued to affiliates for each sale they generate. This customizable feature allows for better management of cash flow and ensures that affiliates are compensated according to your preferred schedule, fostering a healthy and productive partnership.
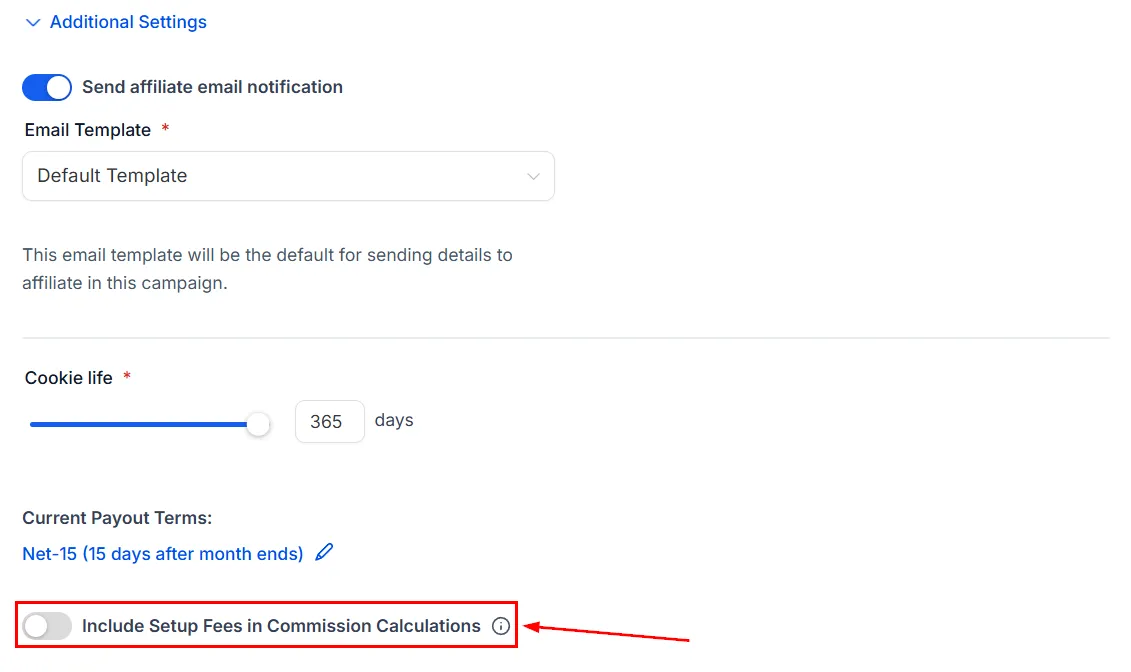
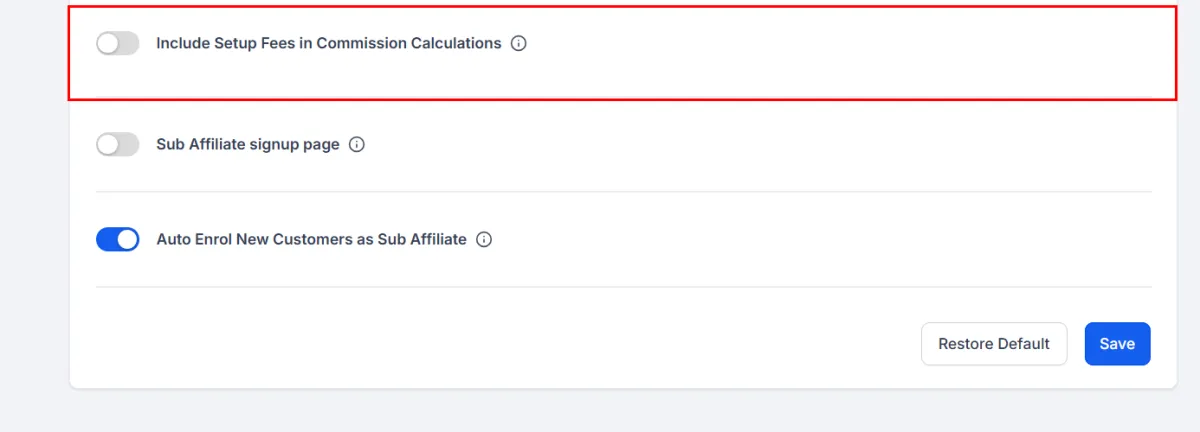
Set up Fee Additions
For any products with set-up fees, toggle the button for the option so you can include them in the commissions for your affiliates. This will be reflected in the total payout once processed.
Sub Affiliate Options
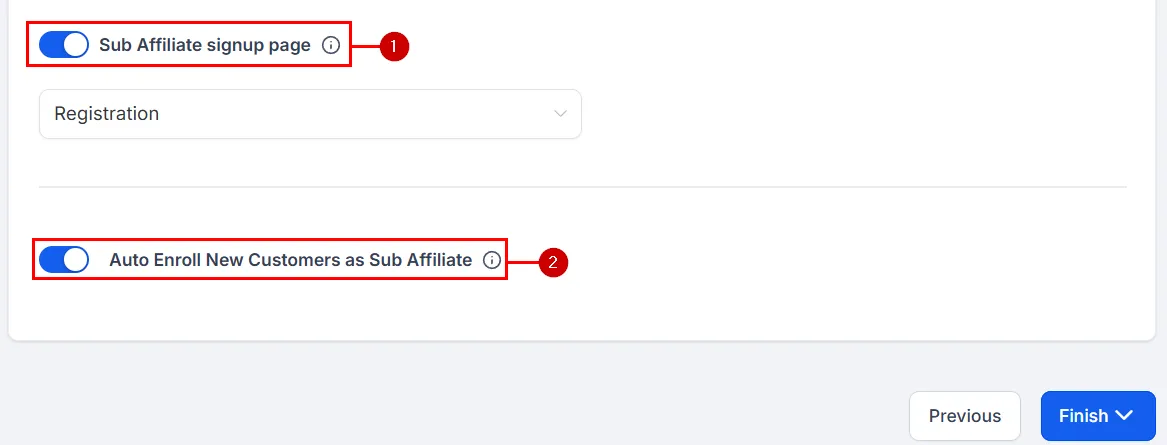
When offering multiple tiers, you can set up the options to manage sub-affiliate recruitment; these will be
1. Sub Affiliate signup page: By toggling this option, you can select a form that your affiliates can share to recruit sub-affiliates independently.
2. Auto Enroll New Customers as Sub Affiliate: When enabled, new customers will automatically be enrolled as sub-affiliates under the Affiliate who brought them in.
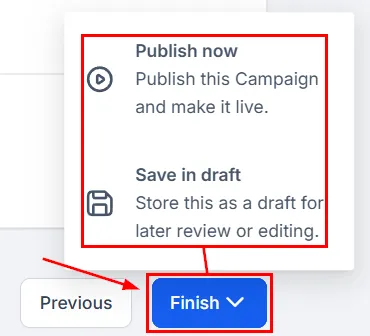
The final step is to click "Finish" and select "Publish Now" to make your campaign active and ready. If you prefer to save the campaign without making it live, select "Save in Draft" to keep the campaign paused.
By following the outlined steps and ensuring all elements are appropriately set, you can effectively launch and manage a robust affiliate marketing campaign that drives growth and achieves your business objectives.
19. How to Automate Affiliate Payouts with PayPal
This guide will walk you through automating affiliate commission payments using PayPal. Before proceeding, ensure your PayPal account is connected. You can verify this by navigating to the Payments tab and selecting Integrations. If your account is connected, you'll see the option to Manage it. If not, please connect your account first. For assistance, refer to our available articles on setting up PayPal integrations.
How It Works
Initiating and Confirming Payouts
Go to the Payout section of your Affiliate Manager inside of the marketing section.

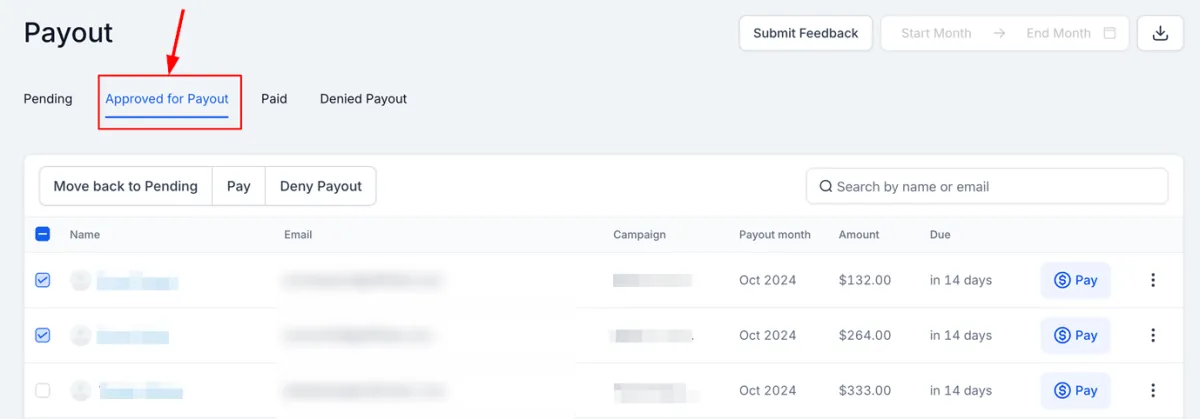
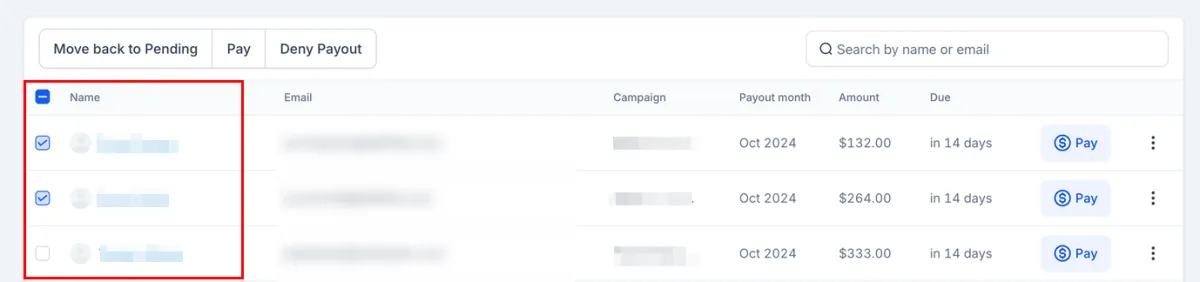
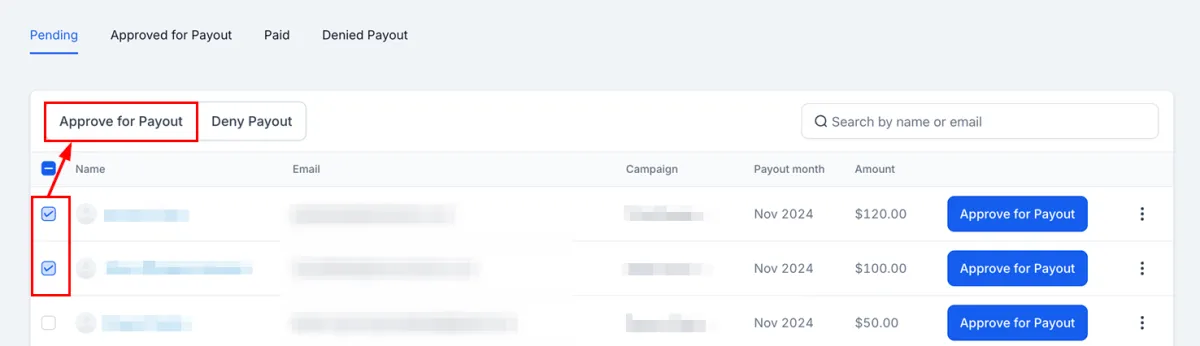
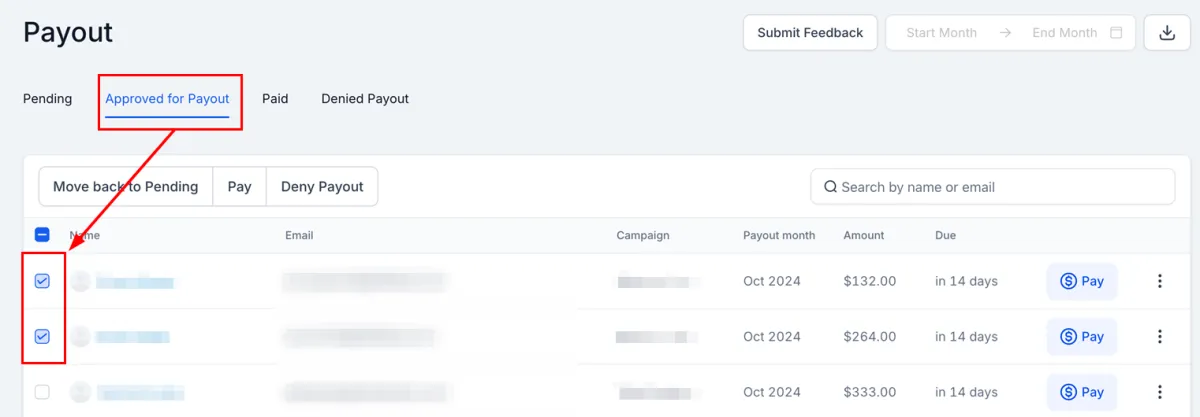
Select the Approved for Payout tab. Here, you can select the affiliates for payout by checking the box next to their name.
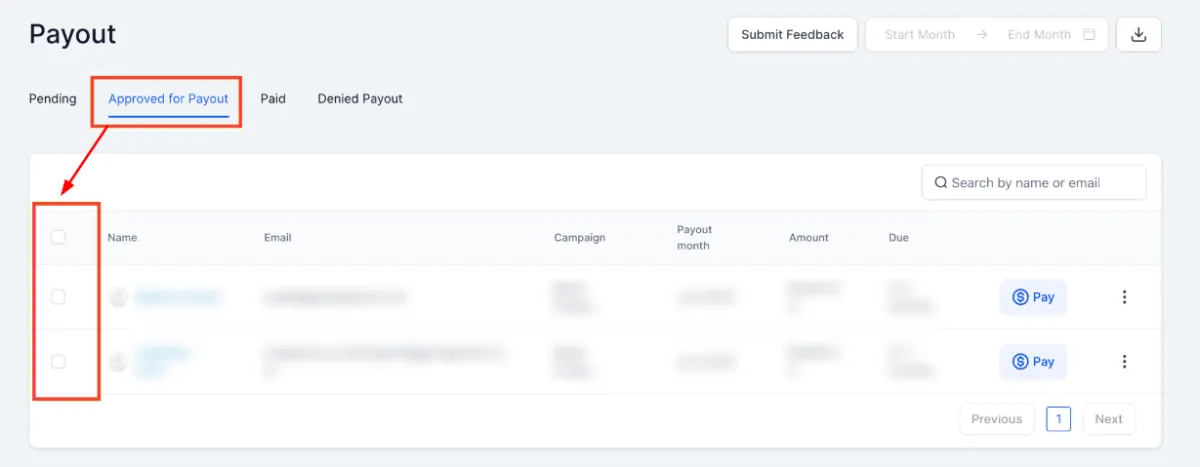
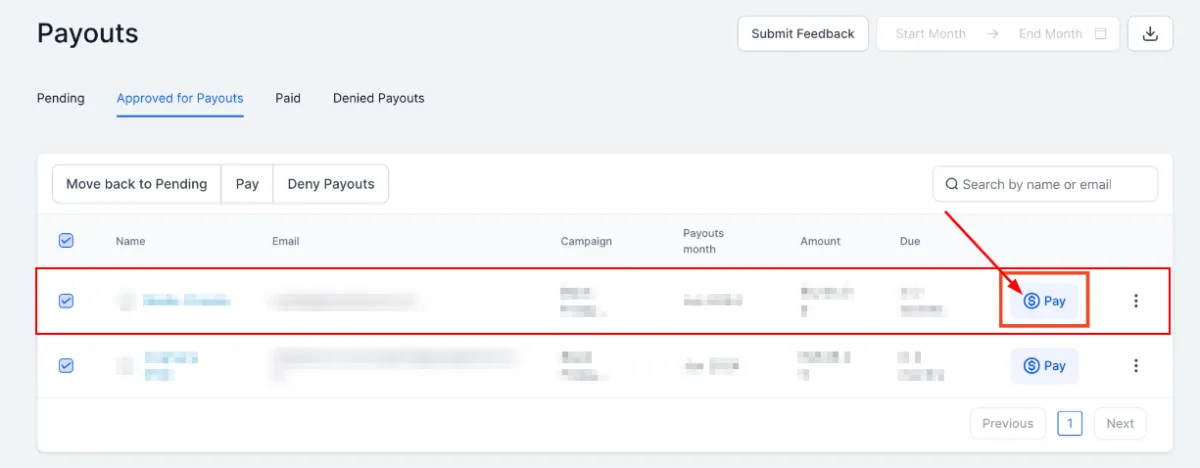
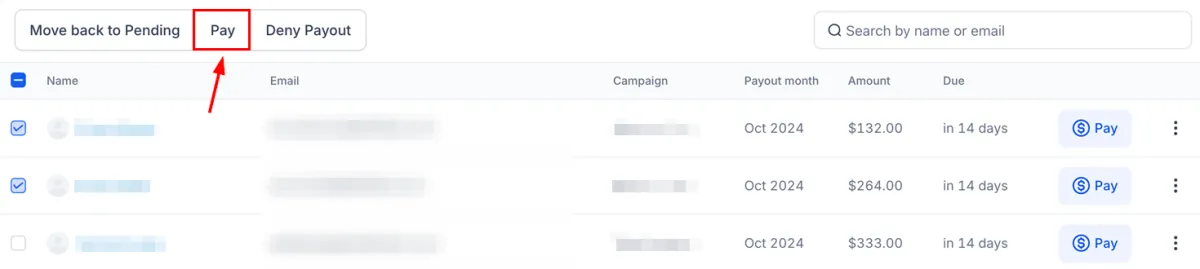
To finalize the payout the actions will vary depending if you're paying out to just one affiliate or several at the time. For individual payout click the $Pay button.
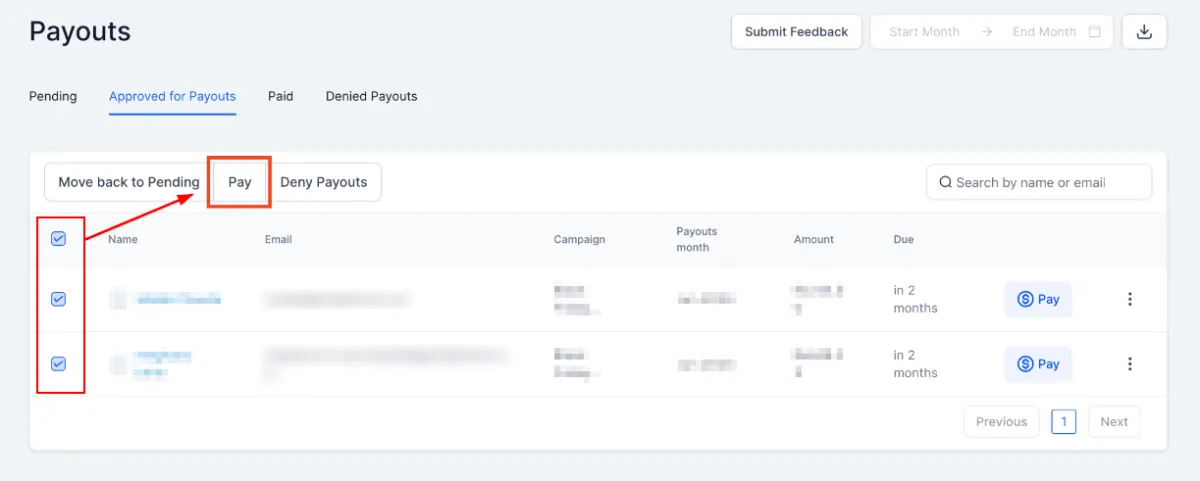
To pay multiple affiliates, click on the Pay button on top. This will be for all affiliates you selected.
Review and confirm the details for the payout. If everything is correct, click on Pay Now to finalize.
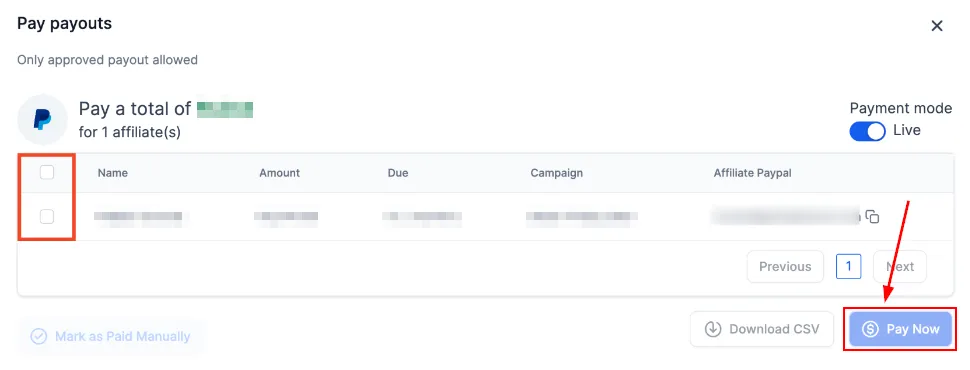
If you have not added a PayPal account for any of the affiliates, click on Add Account to do it. Once you add it, click Pay Now to complete the action.

📌Note: Affiliates can also add their payout information in the Commissions section of their affiliate Dashboard once you have enabled the option in the Affiliate Manager Settings.
Completed Payments
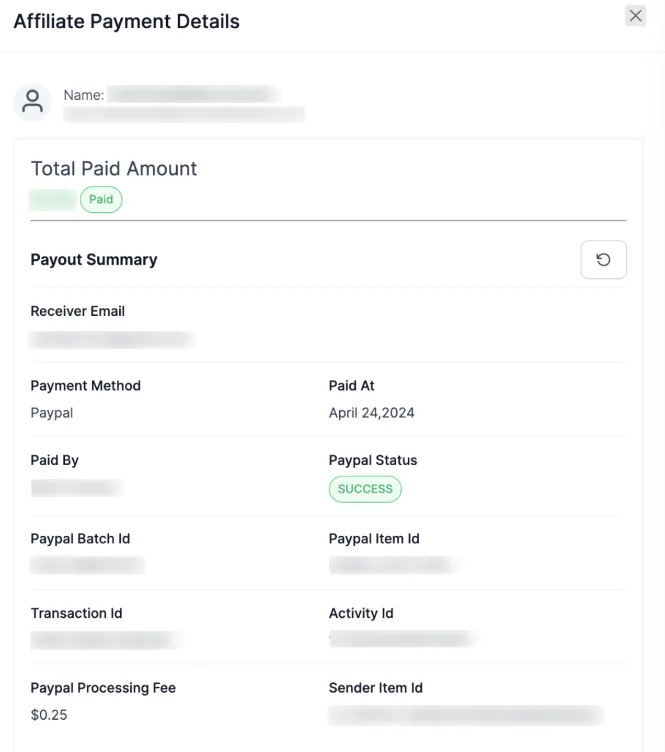
You can see the successful payments under the Paid tab. For more details on a payment, click the three dots to view them.
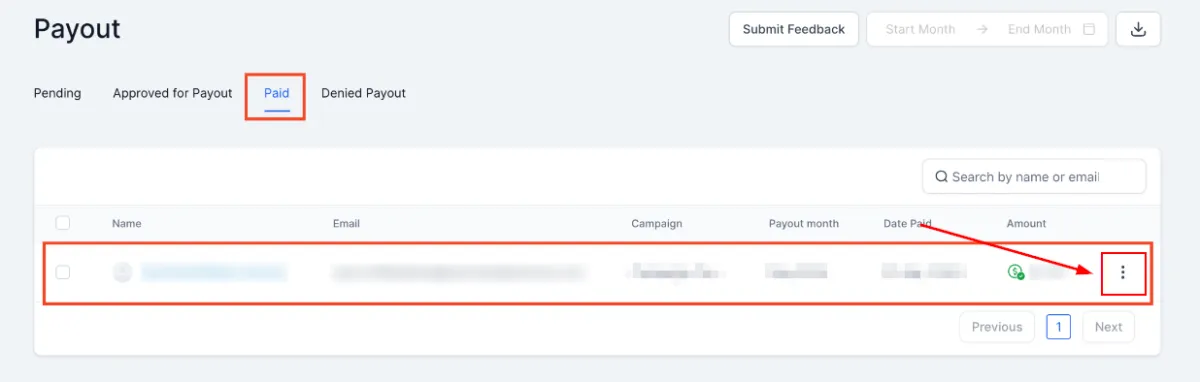
You will then be able to see the details of the payment, including the payment date and amount, as well as its status.
That's all there is to it. You can use this to advance the commission payout to your affiliates or ensure the commissions are paid on time.
📌 Note: PayPal may take some time to process payments, during which the transaction status may temporarily appear as "Pending." To view the most up-to-date status, click the refresh icon. It is recommended that affiliates regularly monitor their transaction status within the Commissions section of their account for real-time updates.
20. How to Pay Affiliates for Lead Generation Using Pay-Per-Lead
A Pay-Per-Lead (PPL) program is a performance-based commission model where affiliates earn a commission for each lead they refer, rather than receiving payouts solely upon successful sales. This approach differs from the traditional pay-per-sale model, which rewards affiliates only when a sale is completed.
While PPL programs often offer lower commissions per lead—sometimes as little as $0.01—they can be more cost-effective overall. Affiliates may generate more leads than sales since encouraging visitors to take small actions is generally easier than converting them into customers. However, this can also lead to increased costs, especially when the criteria for generating a lead are minimal, such as:
- Form Submission
- Calendar Booking
- Survey Submission
Why It Matters
Cost Efficiency: PPL programs typically feature lower per-lead commissions, which can help manage and reduce overall costs.
Increased Lead Generation: Affiliates are likely to generate more leads than sales, providing more opportunities for customer engagement and growth.
Improved Flexibility: These programs allow for customizable commission structures with multiple tiers, supporting a variety of actions to align with your business objectives.
Enabling Pay-Per-Lead for Your Affiliate Campaigns
Create a New Campaign
Begin by creating a new affiliate campaign.
Select Source Type
Choose Forms, Surveys, or Calendars as the source for your campaign, then configure the source details. The Pay-Per-Lead model currently supports these three sources.
Enable Pay-Per-Lead
Navigate to the Commissions tab and toggle on the Pay-Per-Lead option.
Set Per Lead Commission
Set the commission amount affiliates will receive for each lead they generate.
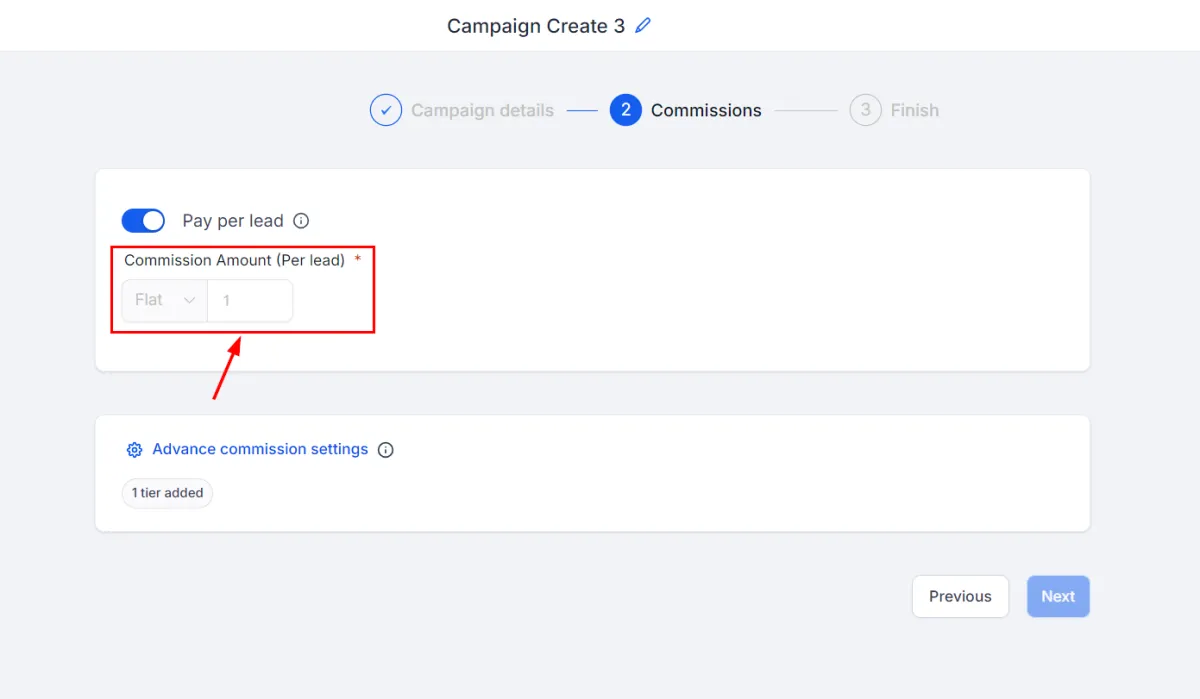
Configure Advanced Commission Settings (Optional)
If needed, set up Multiple Tiers under advanced commission settings to further customize the commission structure.

Add Campaign Description & Assign Affiliates
Provide a campaign description and assign the affiliates who will participate in this campaign.
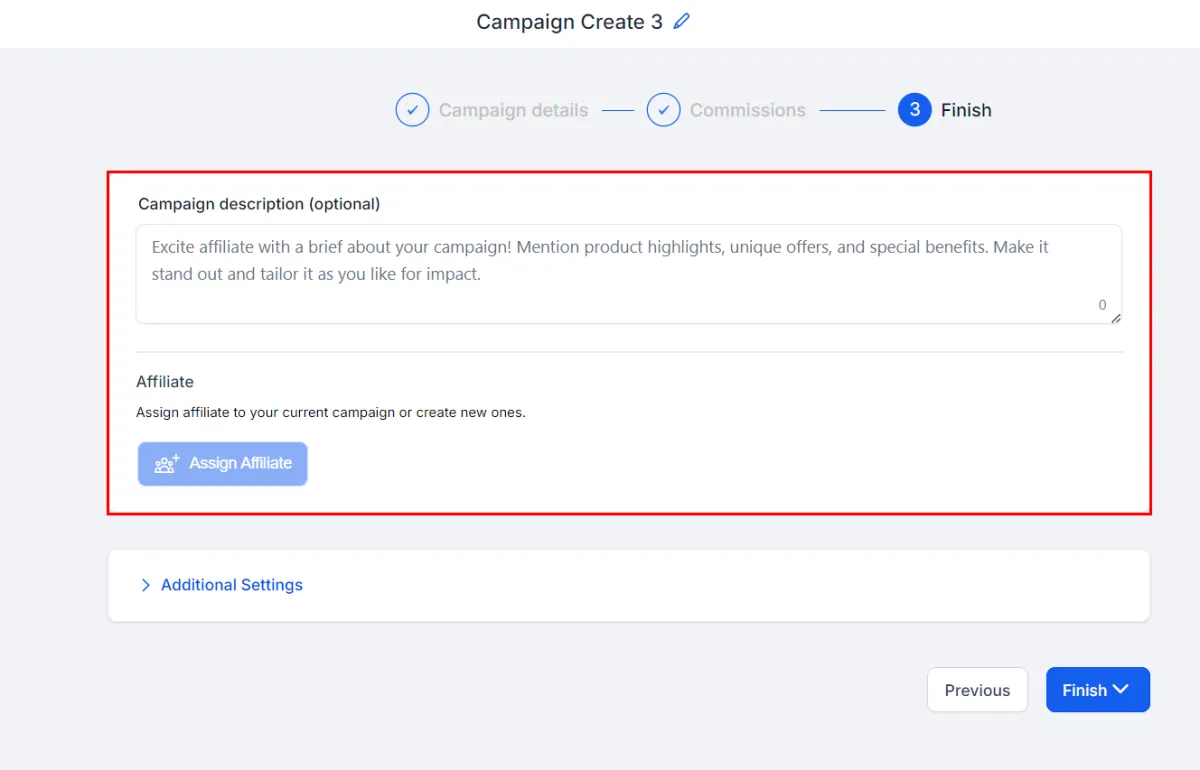
Review & Finalize
Review the additional settings, make any necessary adjustments, and then publish your campaign.

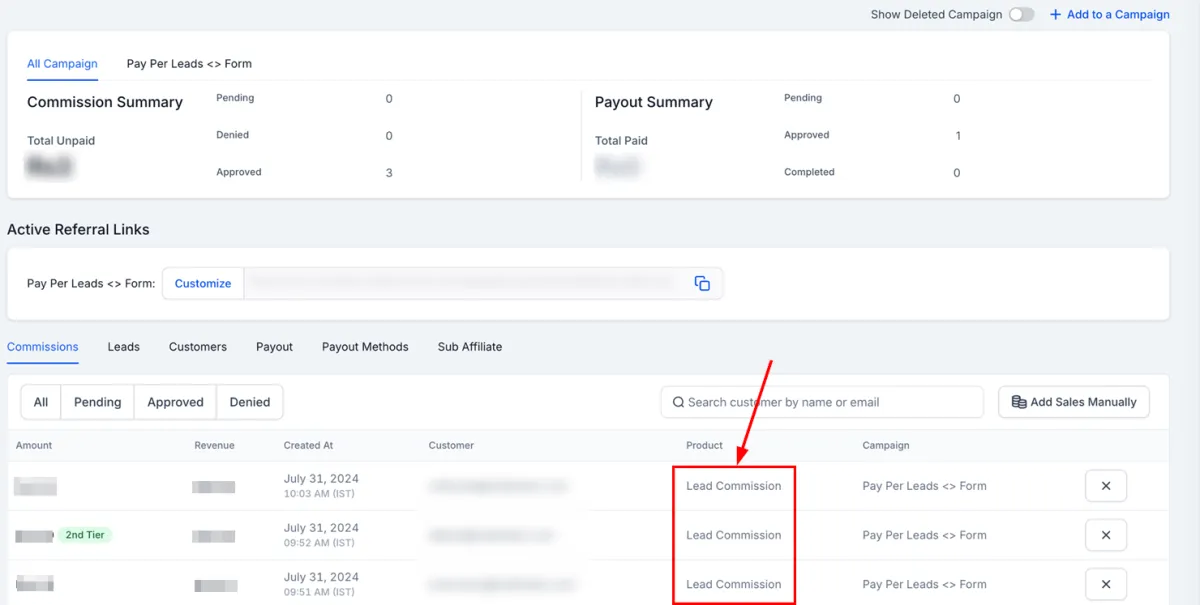
Tracking Leads and Commissions
Once the campaign is live, commissions will automatically be generated for affiliates as they produce leads. These leads and their corresponding commissions can be tracked in the Commissions tab within the affiliate’s profile page. The Product column will display "Lead Commission" to indicate the source of the commission.
By following these steps, you can effectively implement a Pay-Per-Lead program to drive lead generation and optimize your affiliate campaigns. This model not only offers flexibility and cost efficiency but also aligns with your business objectives, ensuring a tailored approach to performance-based marketing.
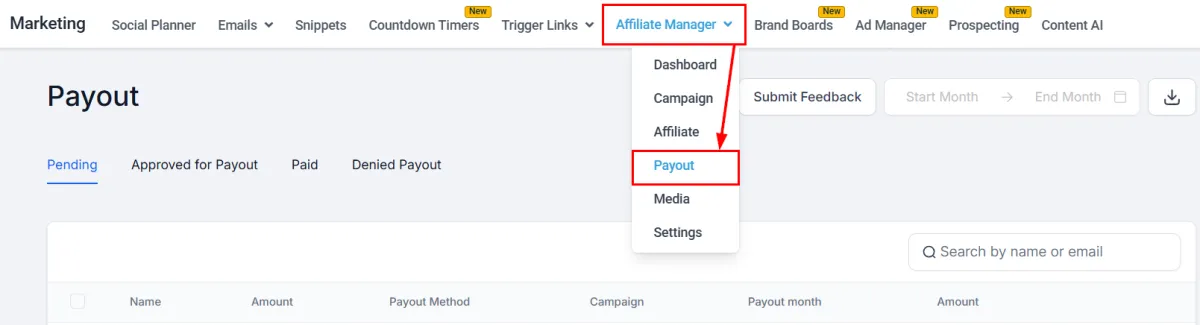
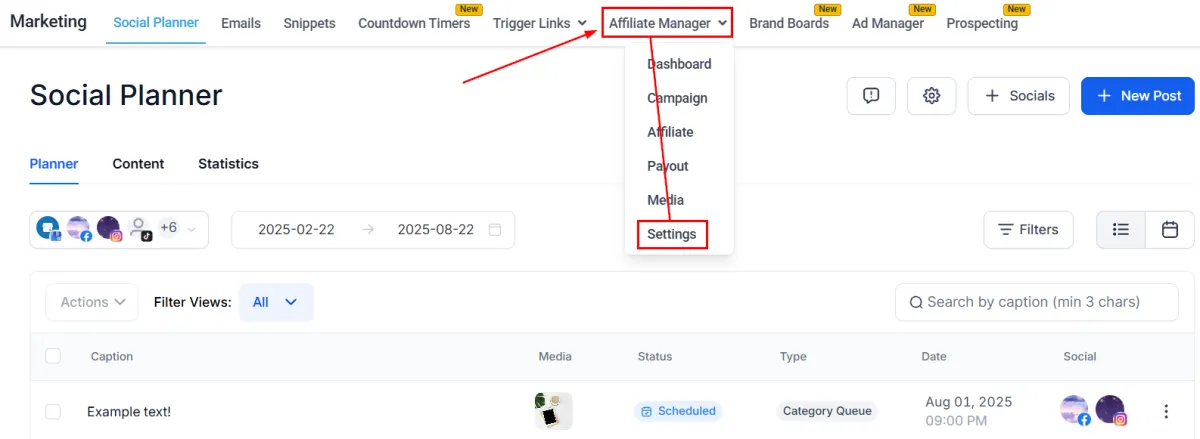
21. Affiliate Payouts
Within the Affiliate Payouts section, you can review and either approve or deny payouts. Once a customer signs up through an affiliate link, the associated payout and commission are automatically recorded and appear under the "Payout - Pending" tab on the 1st of the following month or based on your customized setup.
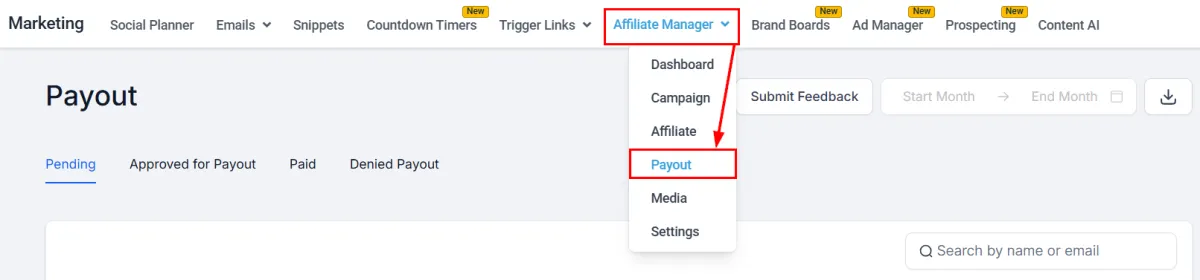
Select the Payout option from the Affiliate Manager dropdown to access this feature.
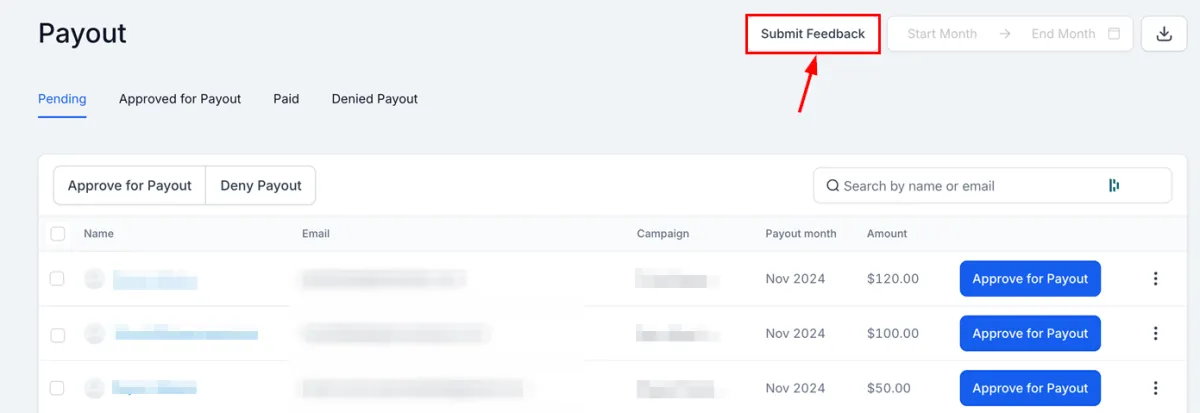
Submit Feedback
Offer suggestions, report issues, or share insights that could help improve the system. By submitting feedback, users contribute to the ongoing enhancement of features, usability, and functionality.
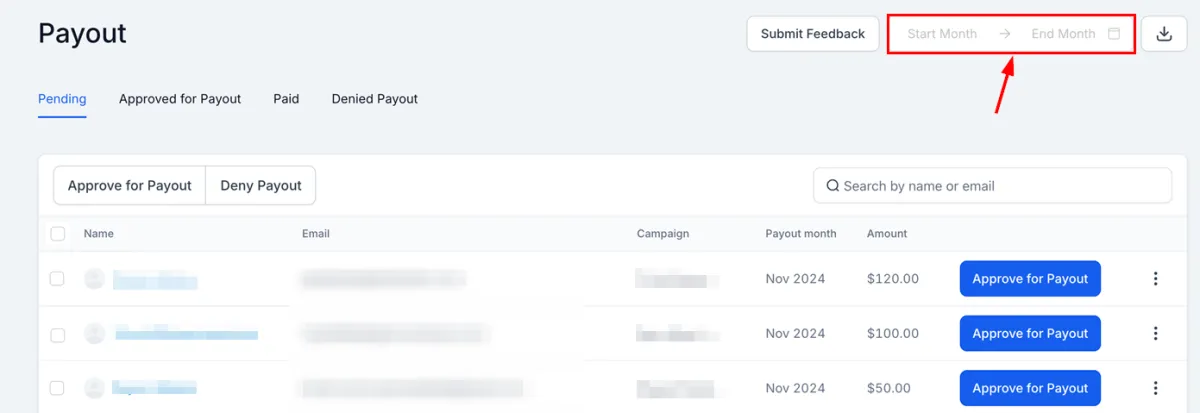
Date Range
Affiliate payouts can be easily filtered by selecting the desired payout month using the date filter feature. This allows affiliate owners to narrow down the list of payouts to a specific month, providing a more organized and focused view of payouts generated within that time frame.
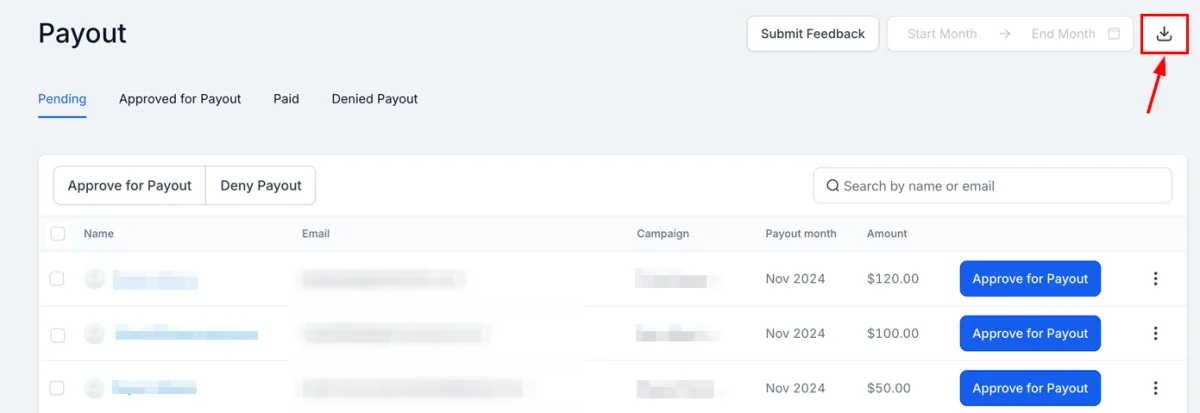
Export
Export the payout details as a CSV file by clicking the "Export" button. A file containing Affiliates who were approved for payout should be uploaded to the payment gateway to complete the manual payment process.
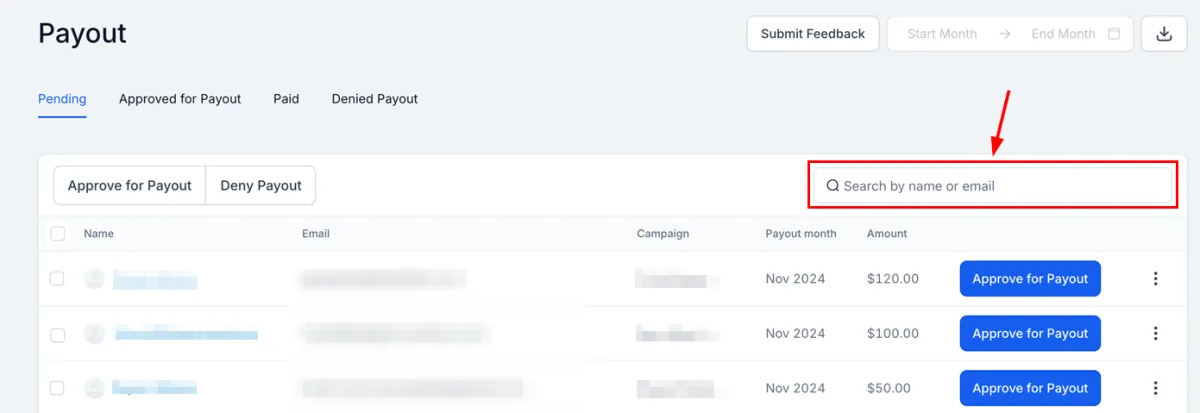
Search Bar
To quickly find a specific affiliate, utilize the search bar by entering the affiliate's name. This feature allows for efficient navigation and helps you locate the affiliate you are looking for with ease.
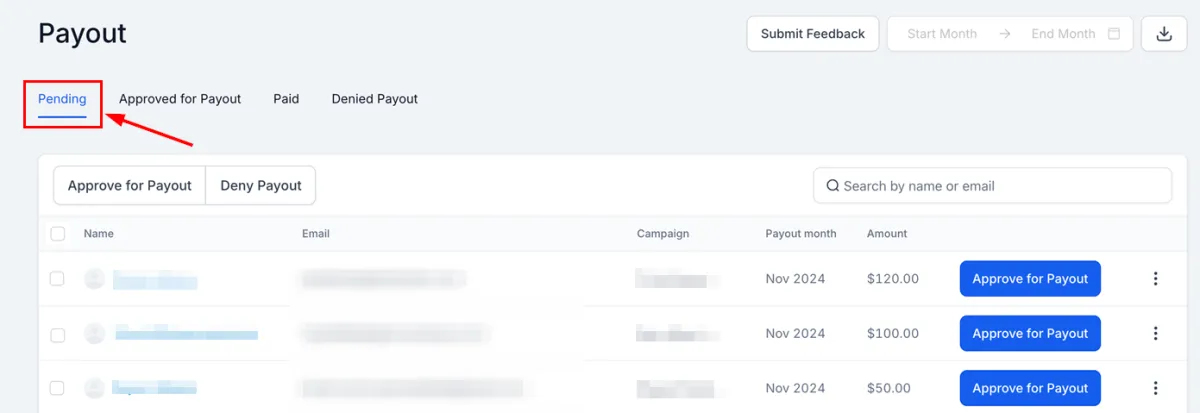
Pending Payouts
All generated payouts from various campaigns will be displayed under the "Pending" tab, organized by month.
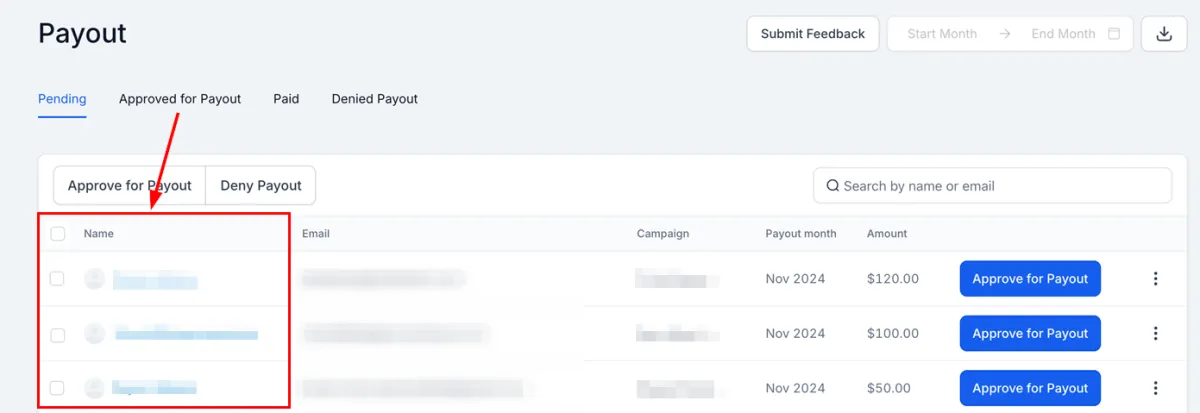
Affiliate Name
This column lists the names of all affiliates eligible for a payout.
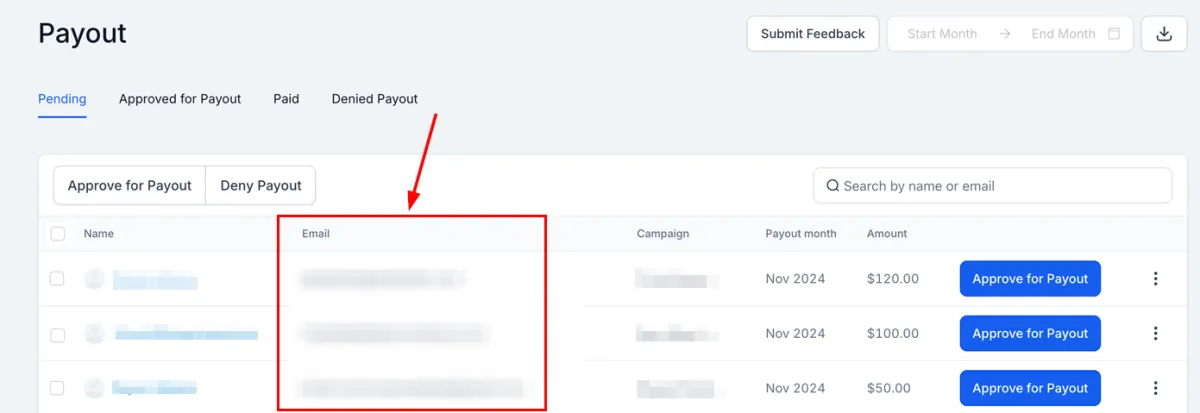
Displays each affiliate’s email, which is used to receive their unique affiliate ID.
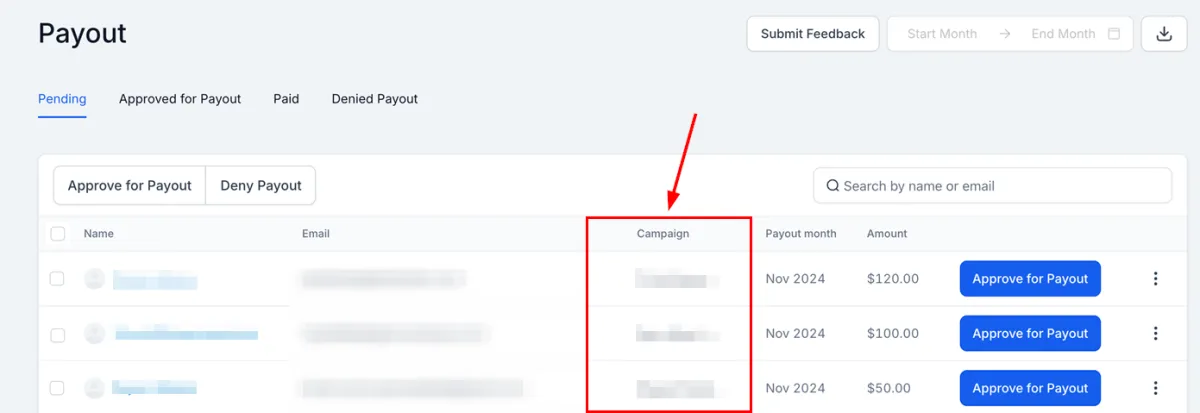
Campaign
Shows the campaigns each affiliate is associated with.
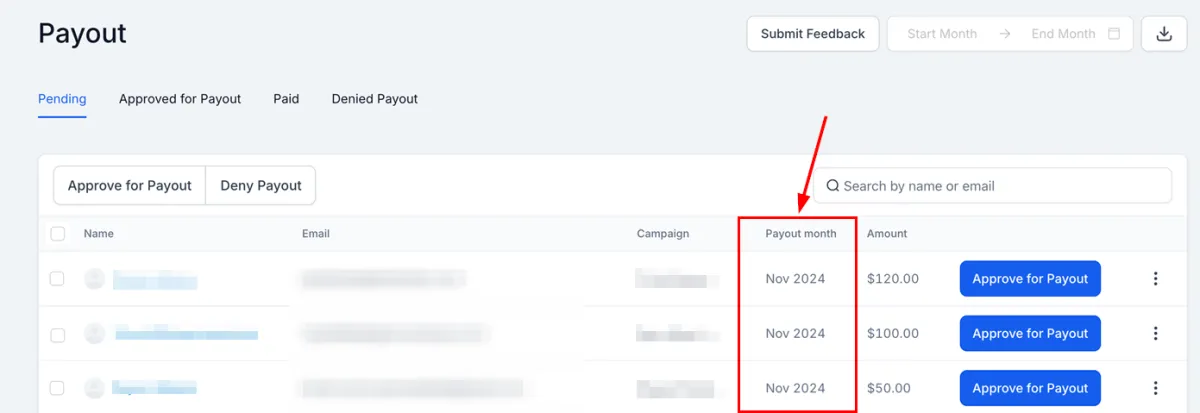
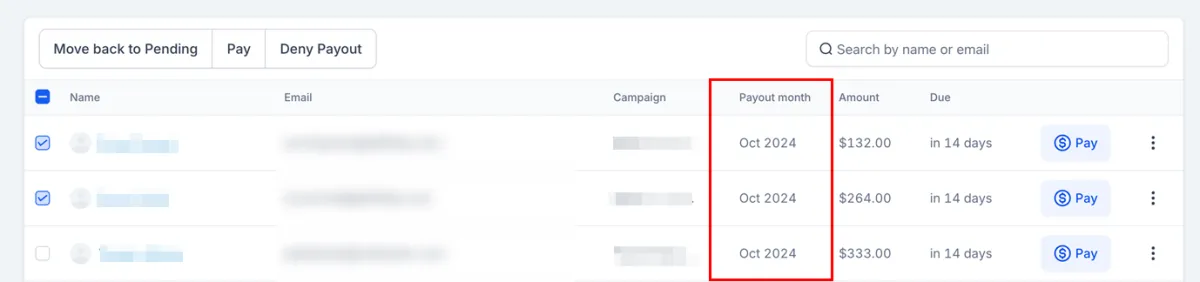
Payout Month
This column indicates the specific month and year to which the payout is attributed.
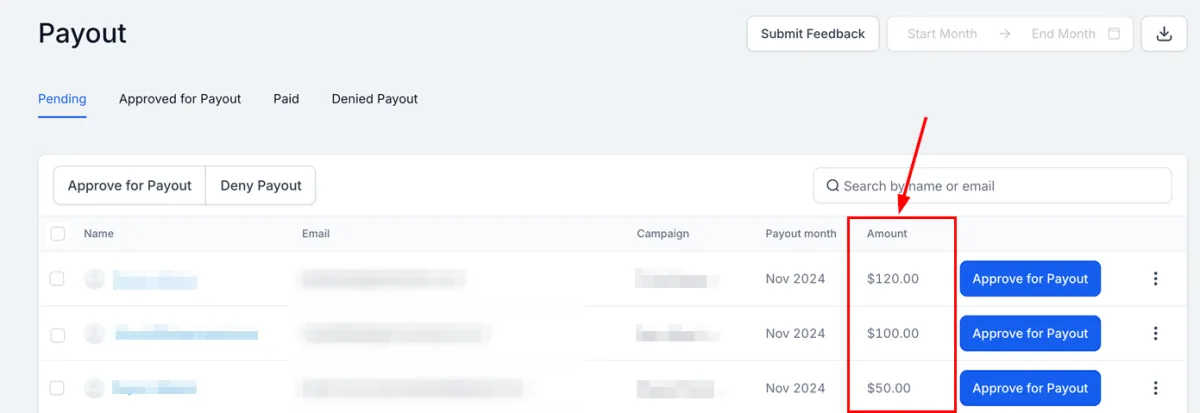
Amount
Displays the pending commission for each affiliate.
It is the responsibility of the affiliate owner to review these payouts and approve eligible affiliates for payment by clicking the "Approve for Payout" button.
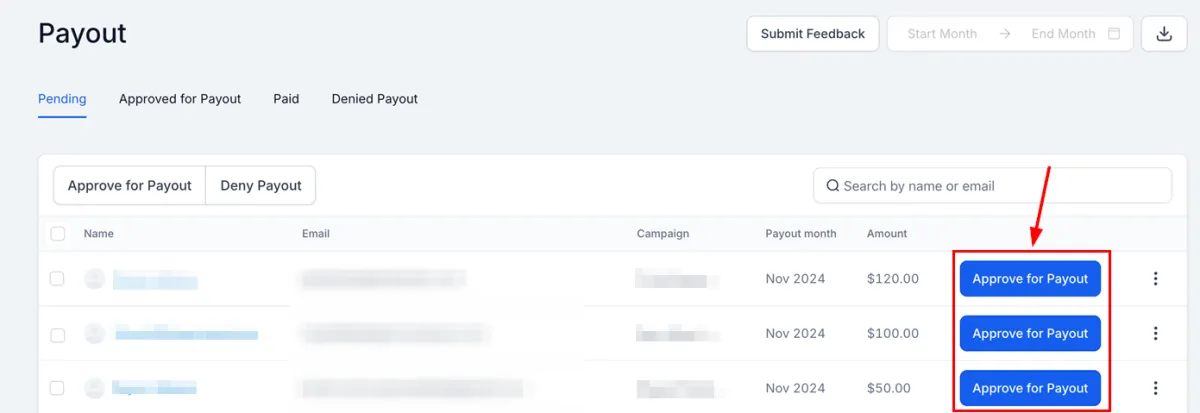
Once a payout is approved, it moves to the "Approved for Payout" tab.
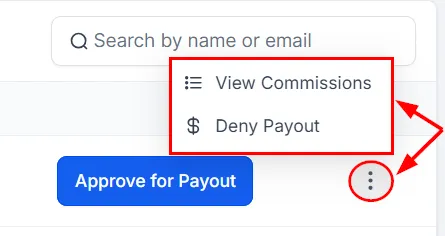
Actions Menu
From the three-dot action menu next to each affiliate, you have the option to view the past commissions of each affiliate or deny their current payout.
Approved for Payout
After approval, payouts move to the "Approved for Payout" tab, where the affiliate owner can export a file containing affiliate details and the corresponding payout amounts. This file is used to process payments through the payment gateway.
Affiliate Name
This column lists the names of all affiliates with an approved payout.
Displays each affiliate’s email, which is used to receive their unique affiliate ID.

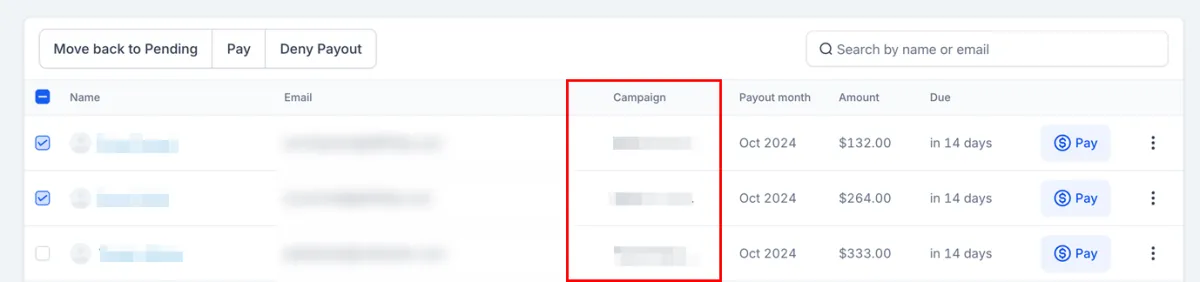
Campaign
Shows the campaigns each affiliate is associated with.
Payout Month
This column indicates the specific month and year to which the payout is attributed.
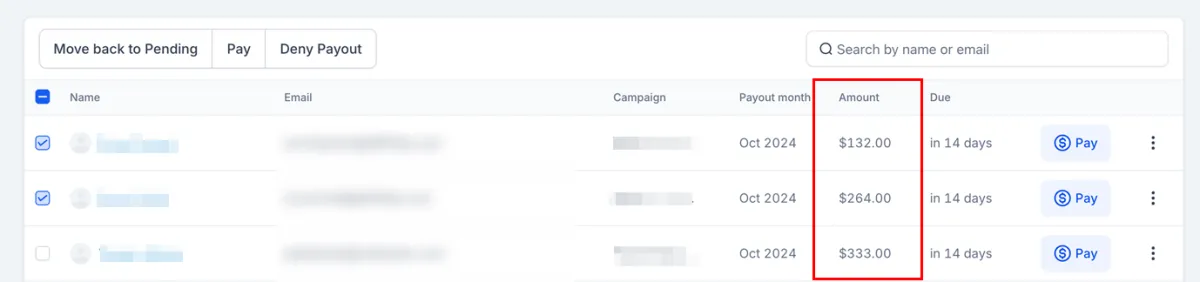
Amount
Displays the commission for each affiliate.
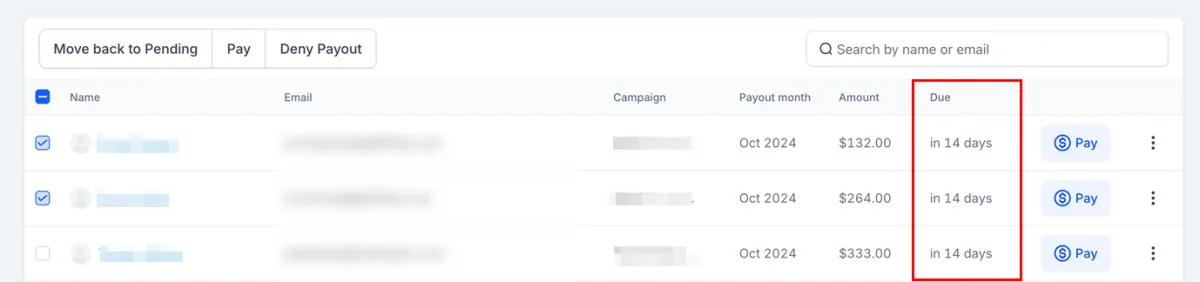
Due Date
Indicates the deadline for payment.
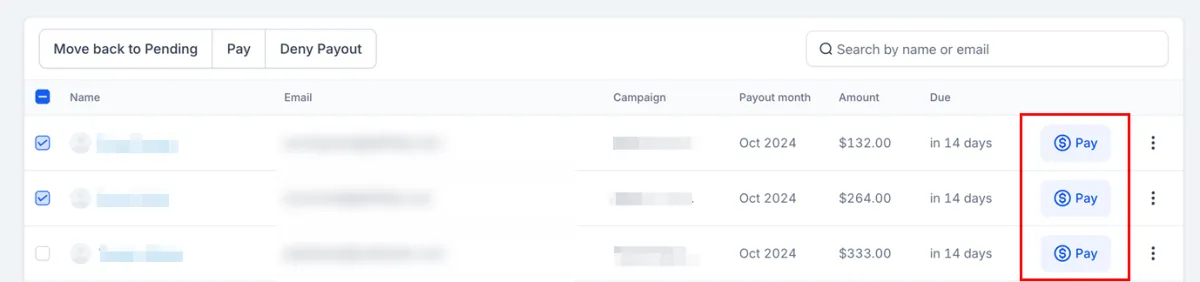
To pay affiliates, click the “Pay” button. A Confirmation modal will then appear with details of the transaction before it is processed.
Once payments have been made, the affiliate owner should mark the payout status as "Paid." The payment will be completed through your connected payment gateway. Currently, these four payment gateways are supported for affiliate payouts:
-Stripe
-NMI
-Authorize.net
-Paypal
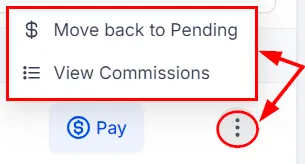
Actions Menu
From the three-dot action menu next to each affiliate, you have the option to view the past commissions of each affiliate or move the payout back to the "Pending" tab for further review.
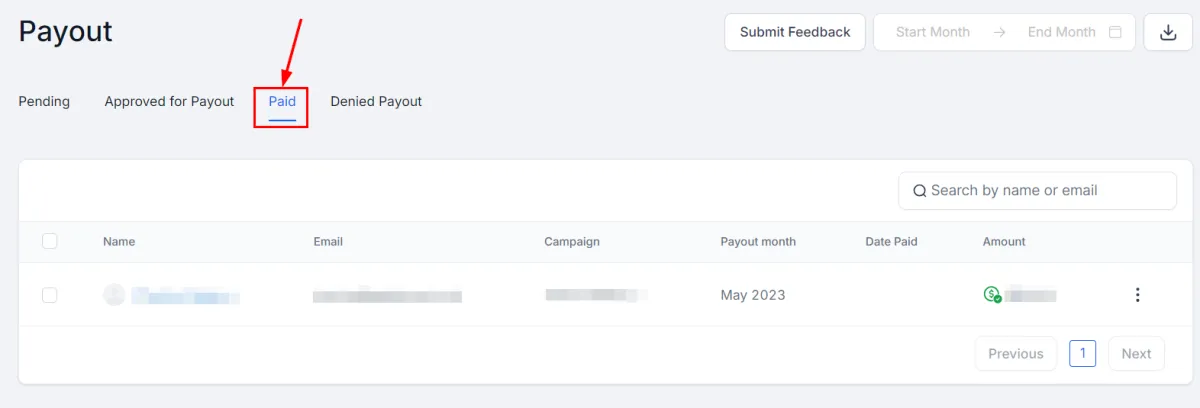
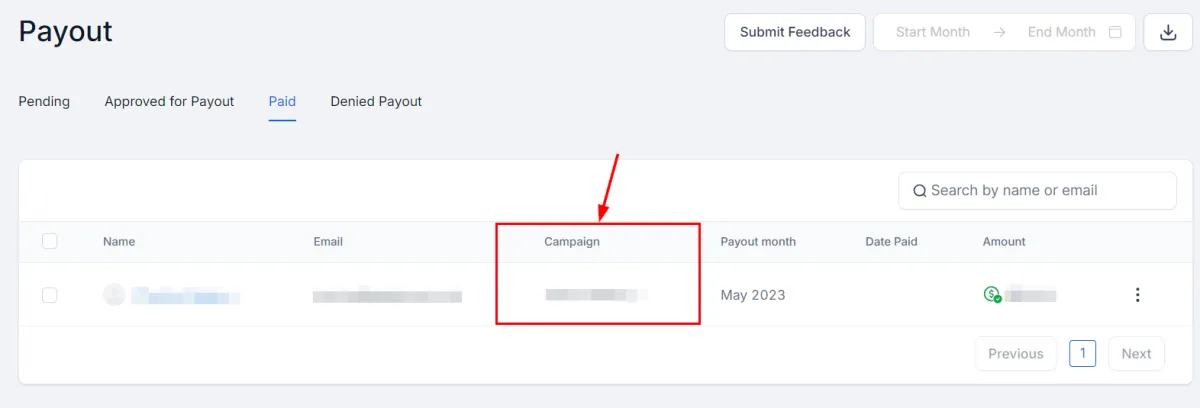
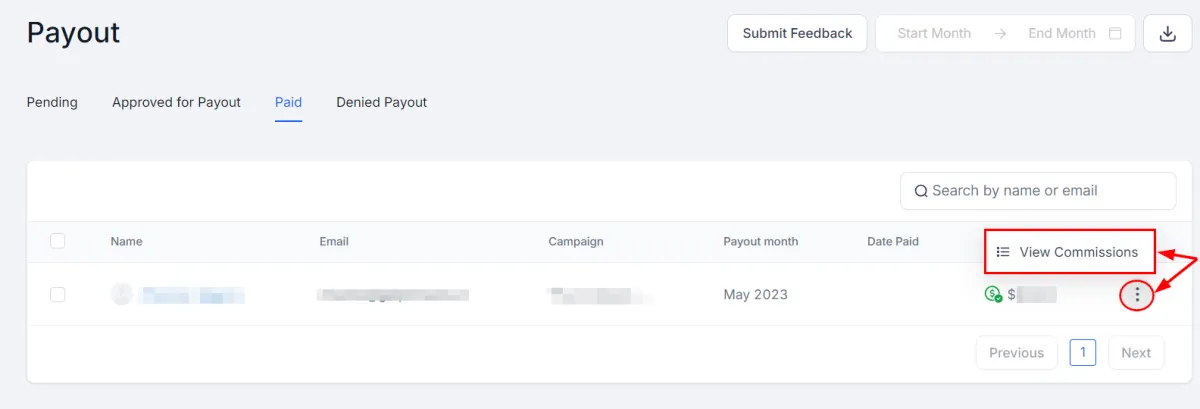
Paid Payouts
The "Paid" tab contains a list of all affiliates who have received their payouts, along with the transaction dates. Once a payout is marked as "Paid," it cannot be reverted to a previous status, as this tab serves as the final stage in the payout process.
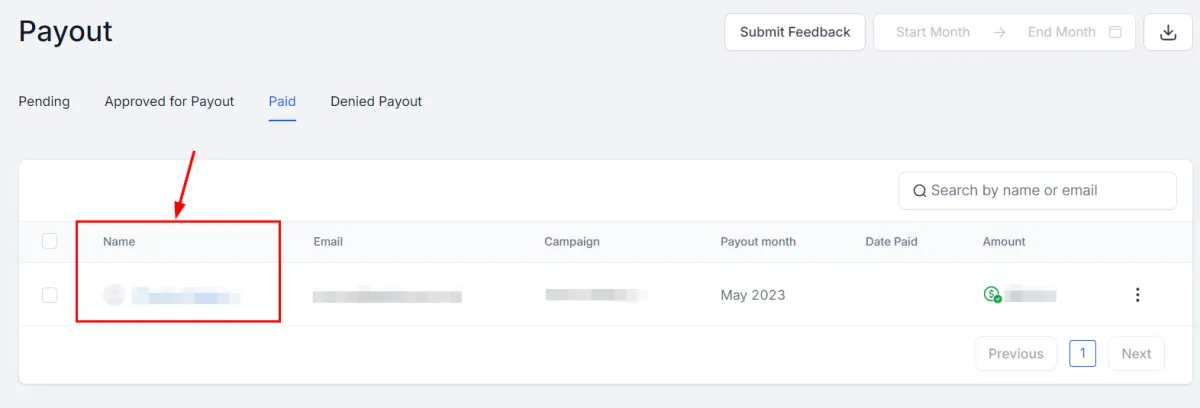
Affiliate Name
This column lists the names of all affiliates who have been paid.
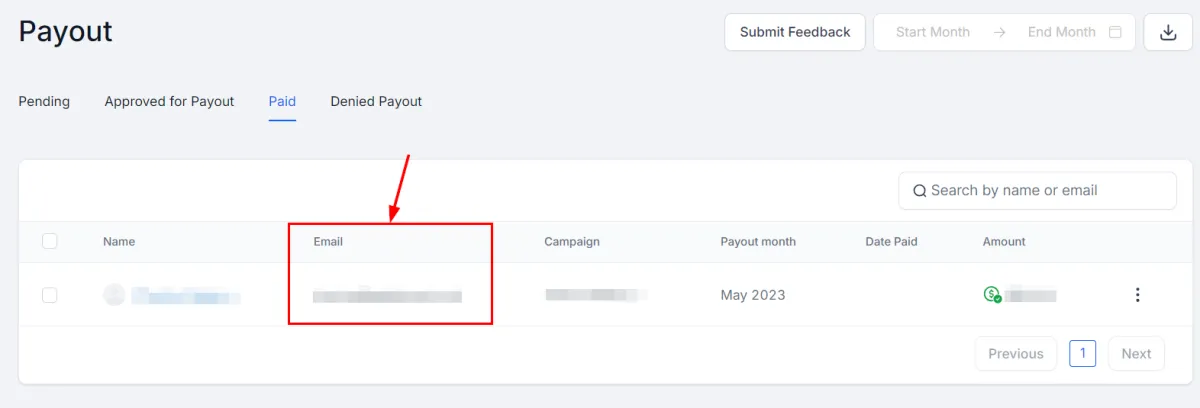
Displays each affiliate’s email, which is used to receive their unique affiliate ID.
Campaign
Shows the campaigns each affiliate is associated with.
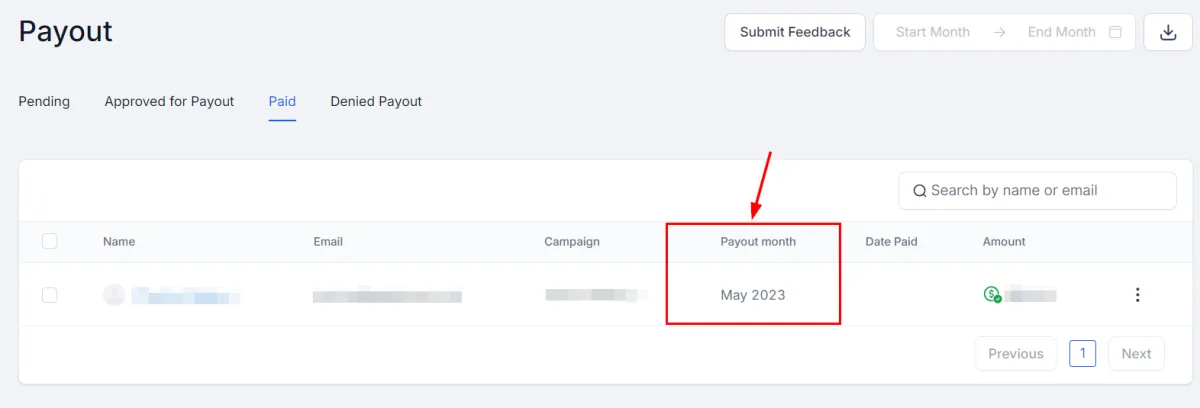
Payout Month
This column indicates the specific month and year to which the payout is attributed.
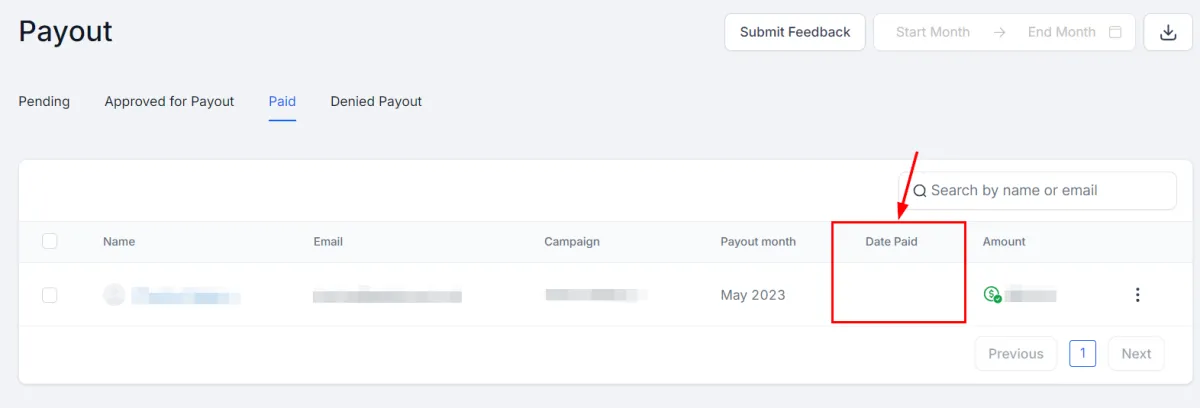
Date Paid
Indicates the date the payment was completed.
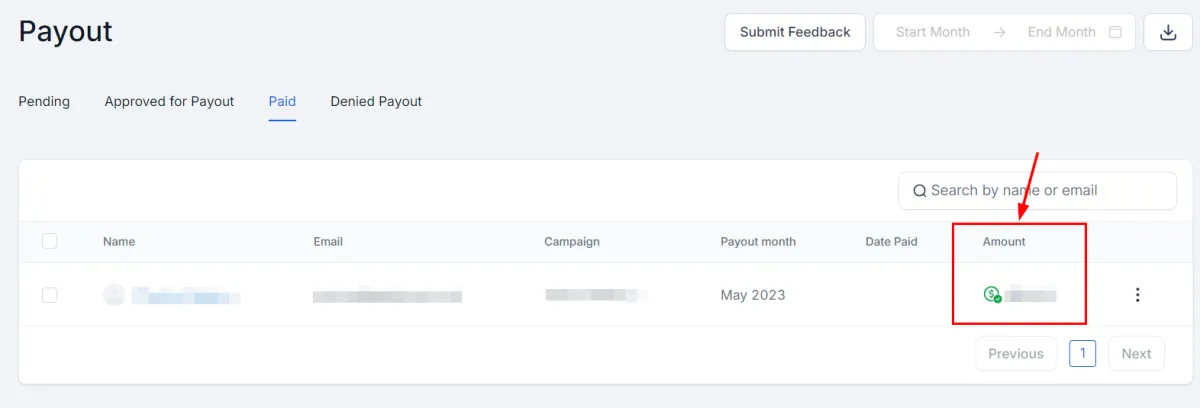
Amount
Displays the commission for each affiliate.
Actions Menu
From the three-dot action menu next to each affiliate, you have the option to view the past commissions of each affiliate.
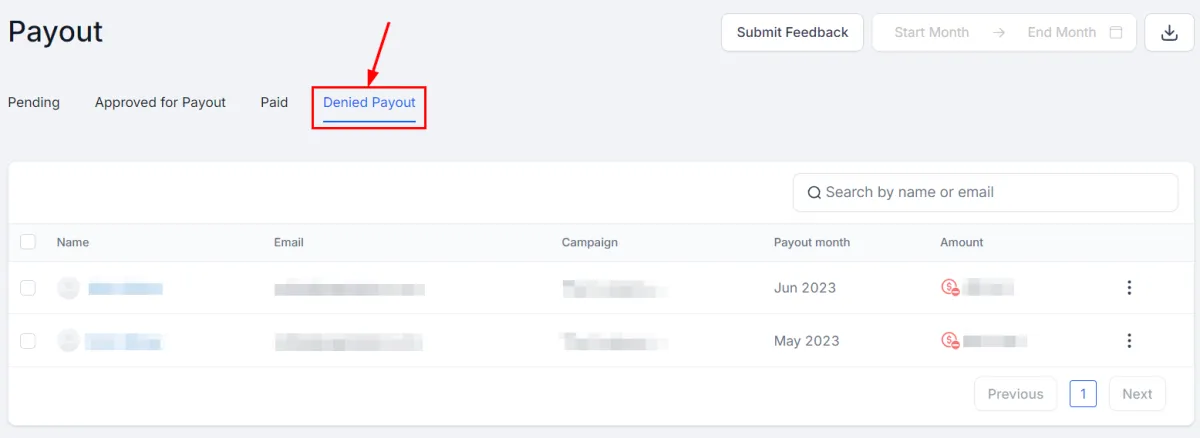
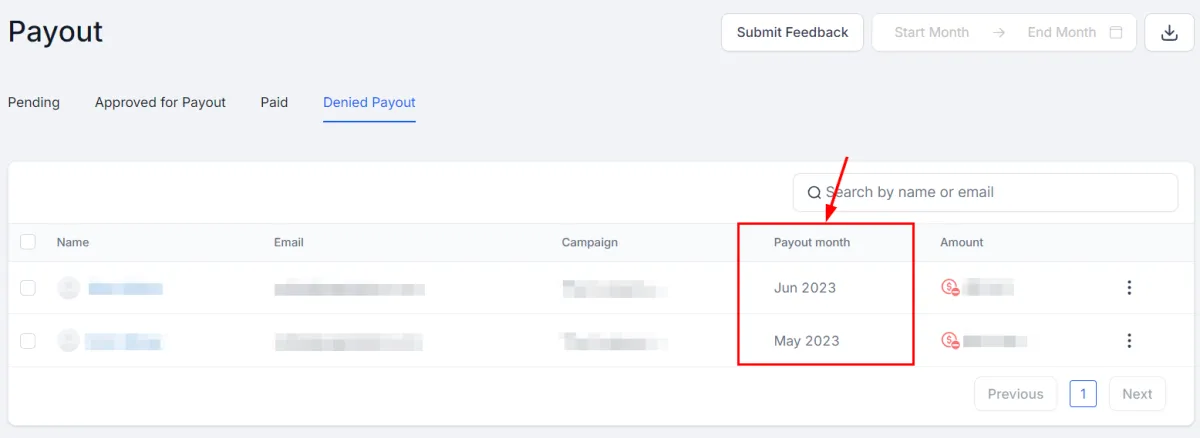
Denied Payouts
In cases where an affiliate’s payout has been denied, the affiliate can view the relevant details under the "Denied Payouts" tab. Payouts can be denied at either the "Pending" or "Approved for Payout" stages. This section provides a detailed breakdown of the affiliate's payout status.
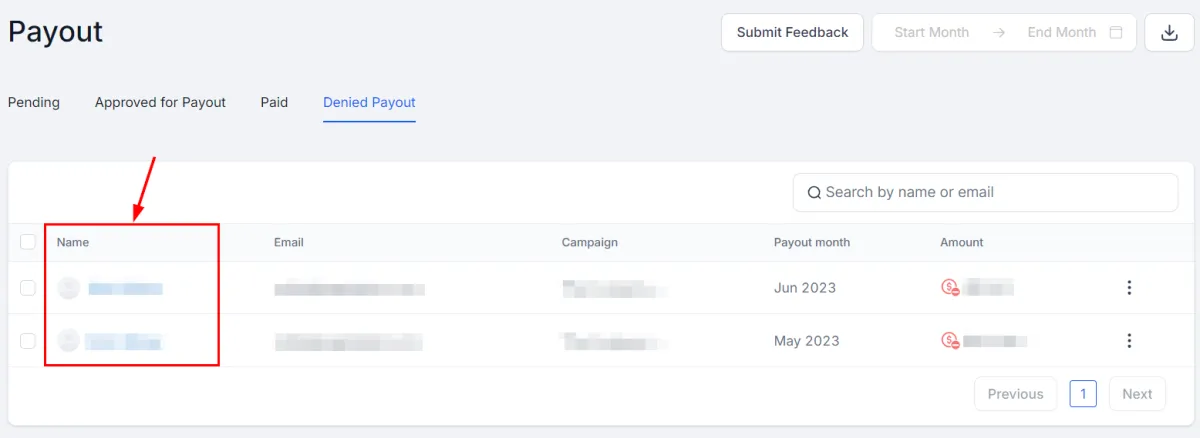
Affiliate Name
This column lists the names of all affiliates whose payouts have been denied.
Displays each affiliate’s email, which is used to receive their unique affiliate ID.
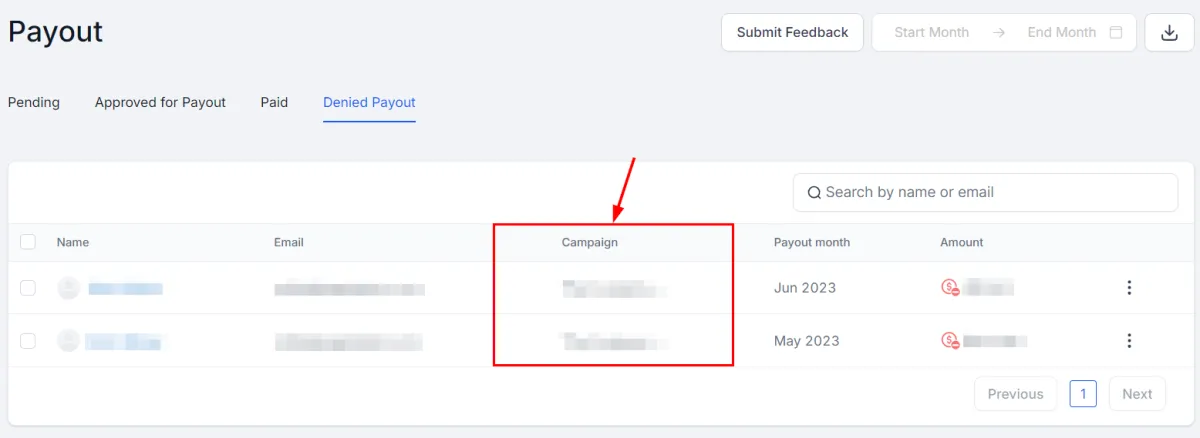
Campaign
Shows the campaigns each affiliate is associated with.
Payout Month
This column indicates the specific month and year to which the payout is attributed.
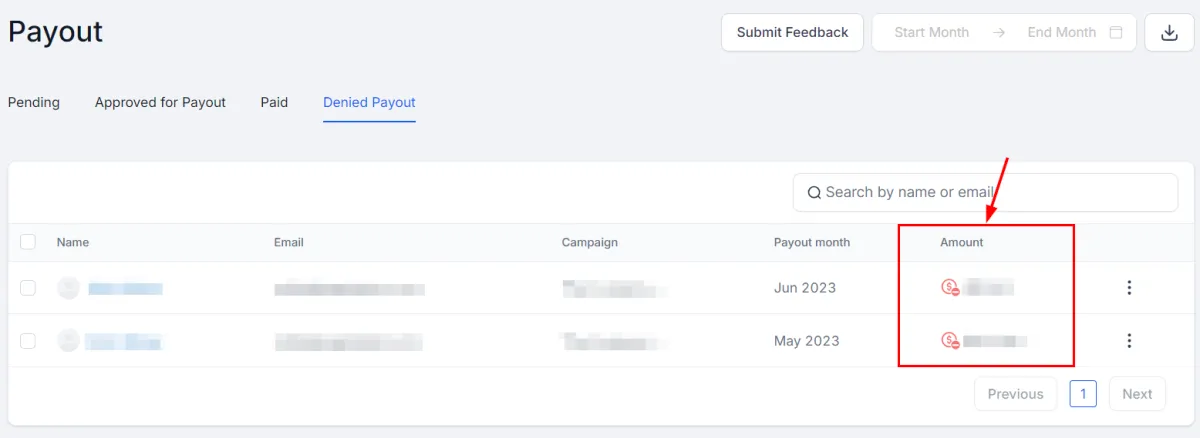
Amount
Displays the commission for each affiliate.
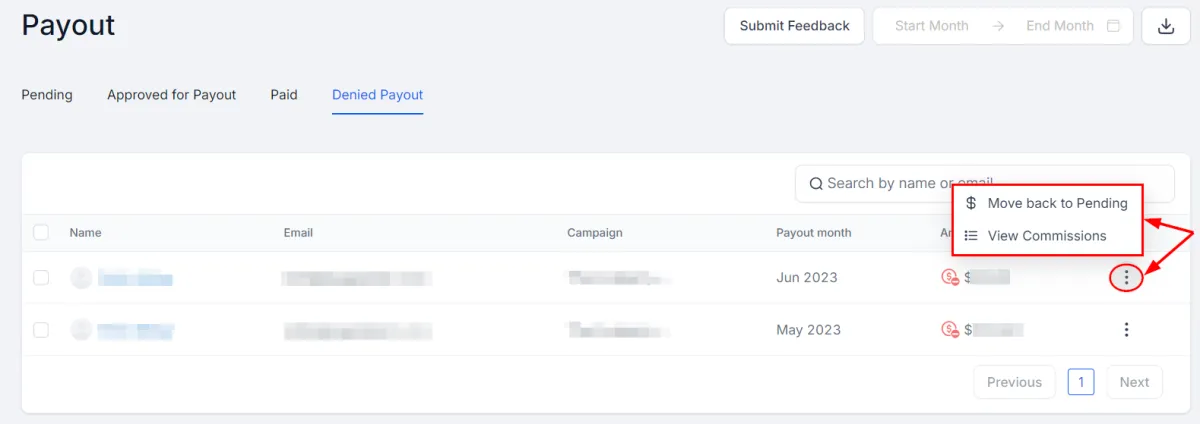
Actions Menu
From the three-dot action menu next to each affiliate, you have the option to view the past commissions of each affiliate or move the payout back to the "Pending" tab for further review.
Effective management of affiliate payouts ensures that the entire process—from reviewing pending payments to approving or denying payouts—is handled smoothly. By keeping track of payouts, utilizing the search and export functions, and staying informed about payment statuses, you can maintain accurate records and provide transparent reporting for each campaign.
✍️Important Note
After approving payouts, you must export the payout data in CSV format and upload it to your payment gateway to process the payment manually. Once the payment has been successfully made, it's important to update the status in the Affiliate Manager to "Paid." This ensures accurate reporting for each affiliate and the overall campaign.
22. Affiliate Manager Settings
The Affiliate Manager Settings section provides control over your affiliate campaigns, allowing you to adjust global settings that apply to all affiliate activities. This includes defining commission structures, setting payout terms, and customizing general preferences related to your affiliate program. Additionally, you can personalize the Affiliate Manager interface by modifying the headers of the tabs, ensuring they align with your specific needs.
Click the Settings option within the Affiliate Manager dropdown to access this section.
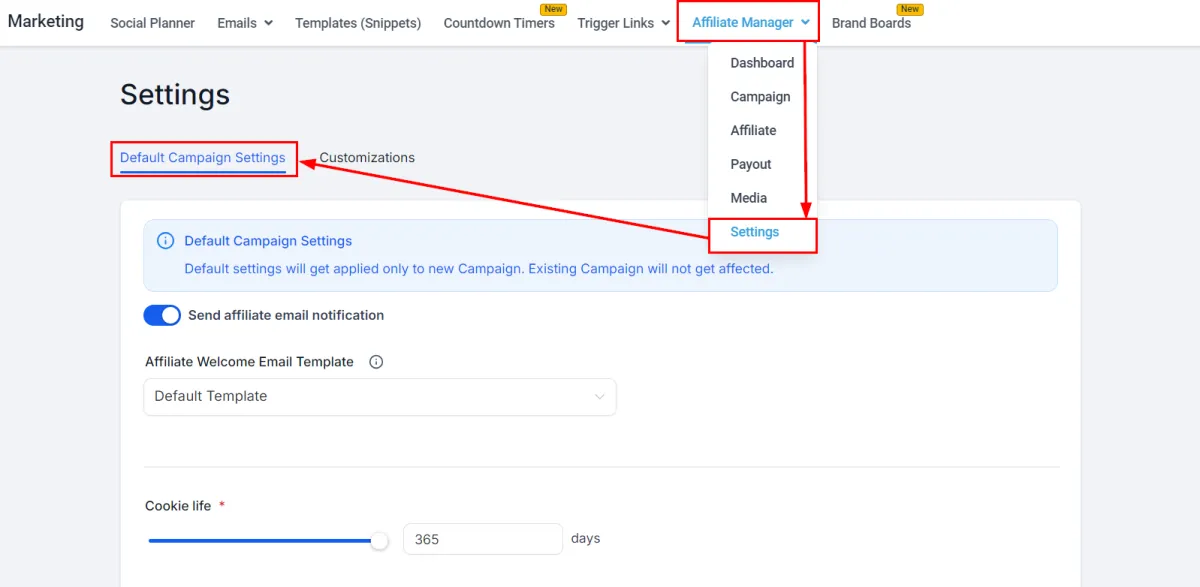
Default Campaign Settings
Default Campaign Settings refer to the configurations that will be automatically applied to all new campaigns you create.
Note: These settings will only be applied to new campaigns and will not impact any existing campaigns.
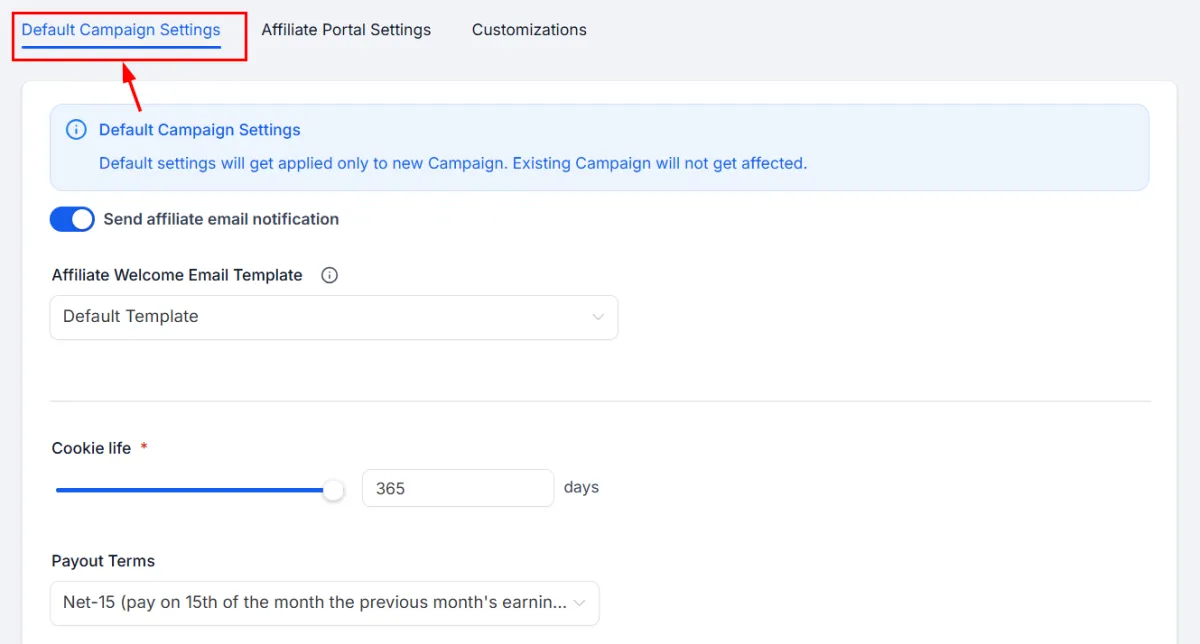
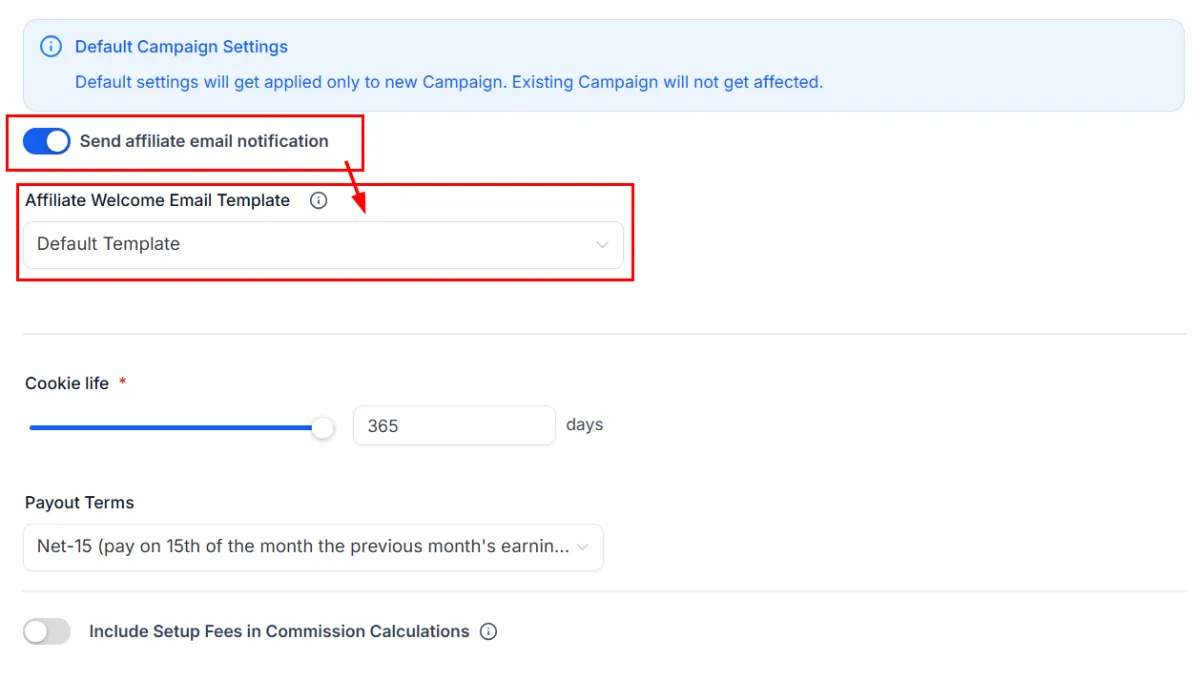
Affiliate Email Notification
Activate the Affiliate email notification to automatically send an email to new affiliates. Once enabled, choose a template from the drop-down menu or opt for the default template.
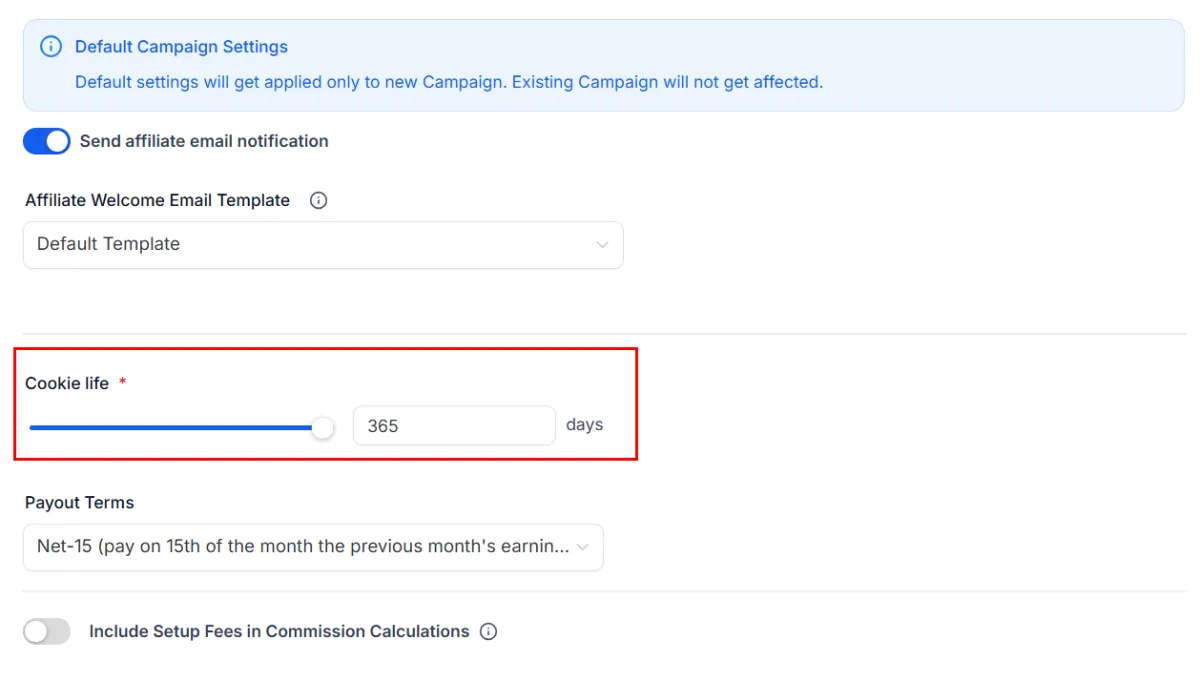
Cookie Life
Set the cookie life for each affiliate, which can range from 2 to 365 days. The cookie life refers to the duration that a tracking cookie will remain active on a user's browser after they click an affiliate link. This cookie tracks the user's actions and ensures that any resulting conversions (such as sign-ups or purchases) are attributed to the correct affiliate.
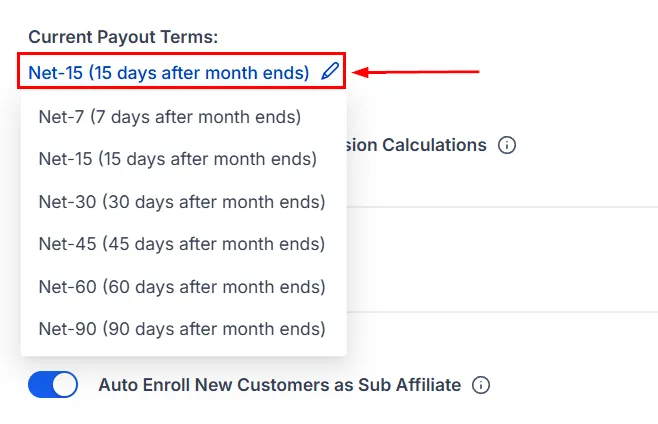
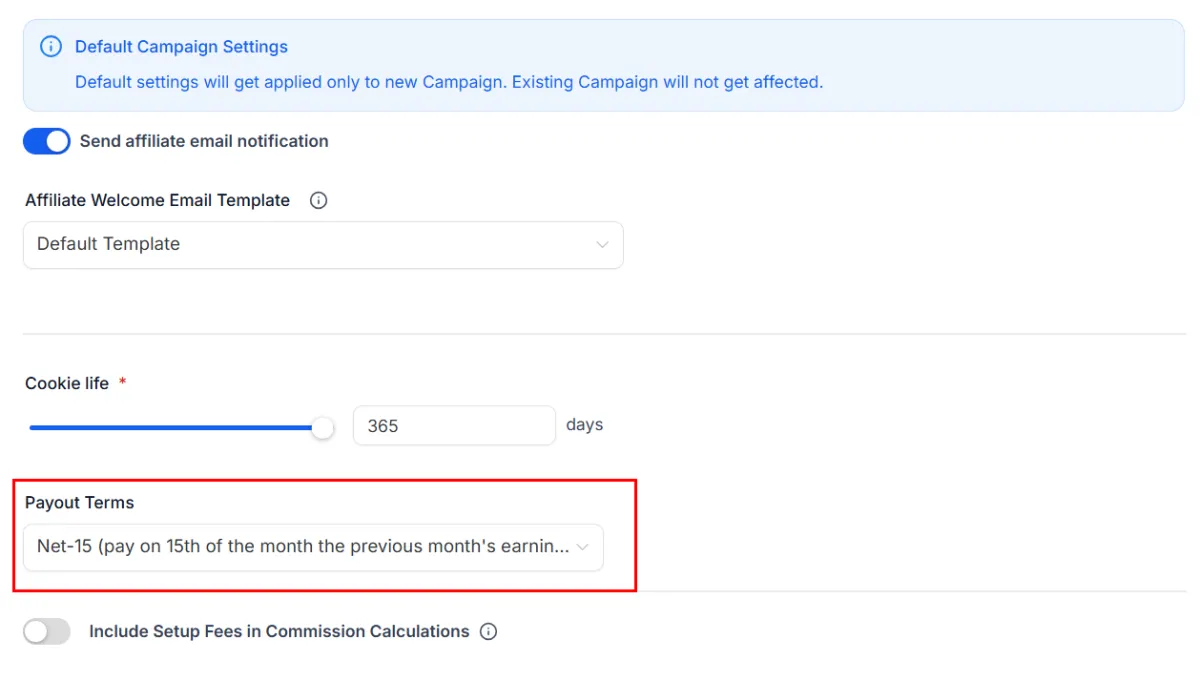
Payout Terms
Choose when Affiliate Payouts are issued, providing flexibility in managing your affiliate program's payment schedule.
Setup Fees
Incorporate setup fees into the total sales amount, ensuring they are included in the commission calculations for affiliates.
Sub Affiliate Signup Page
Enable this toggle to grant affiliates the ability to independently share sign-up forms and recruit sub-affiliates.

Auto Enrolling New Customers as Sub Affiliates
When this feature is enabled, new customers will be automatically enrolled as sub-affiliates under the affiliate who referred them.
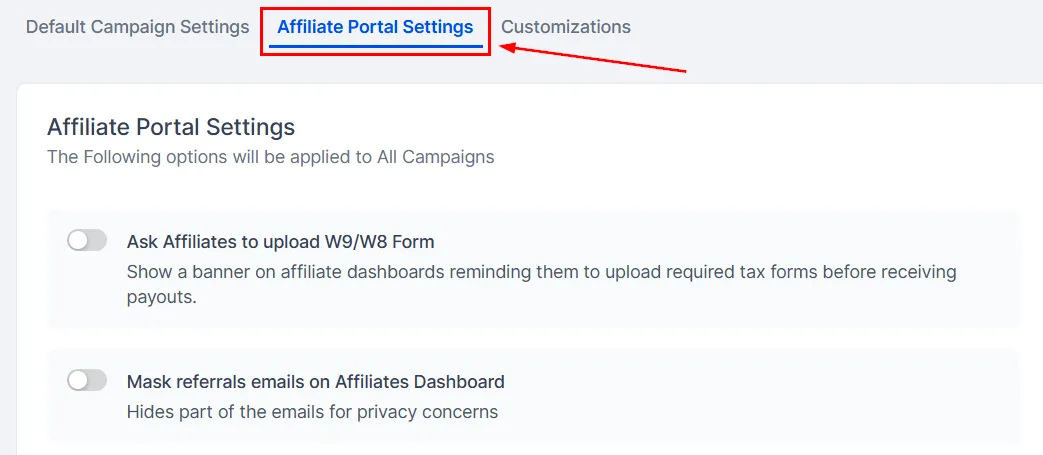
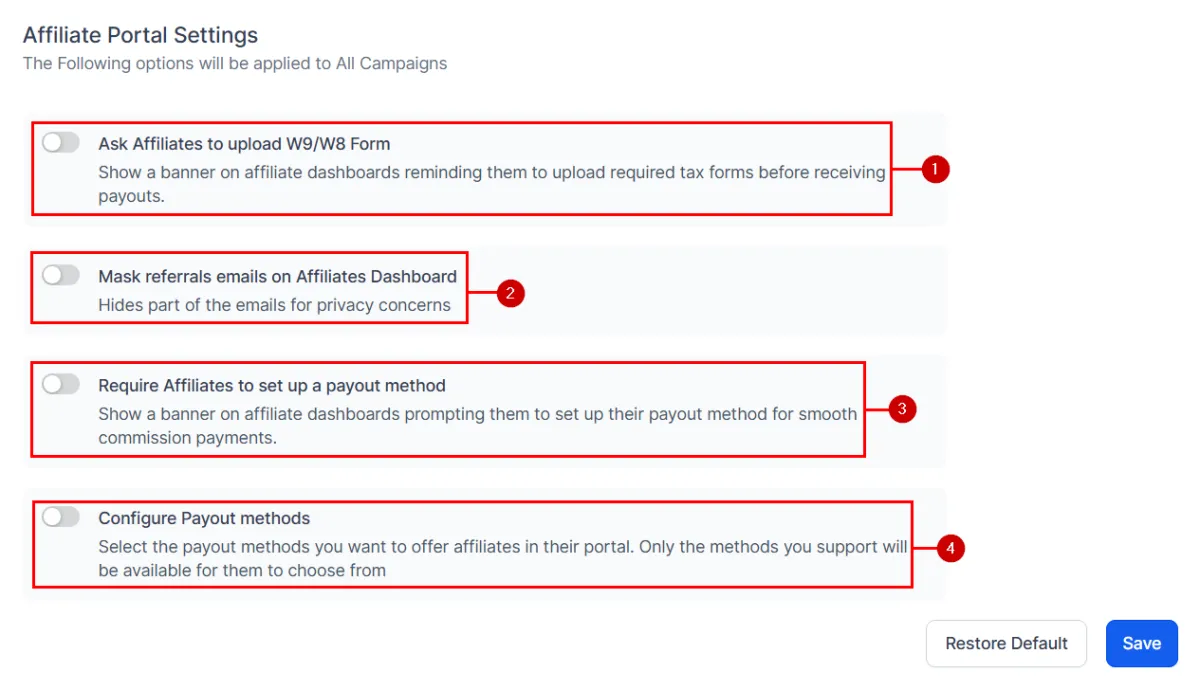
Affiliate Portal Settings
This section lets you control the general settings for your affiliates' requirements and payouts.
1.Enable this option to require tax forms from affiliates prior to payout.
2.For added privacy, enable this option, which removes their information from referral emails.
3.Enable this option to require affiliates to set up their payout method for smooth commission payments.
4.Control the Payout methods available to your affiliates with this setting.
Once enabled, select the payout methods you want to offer affiliates in their portal.
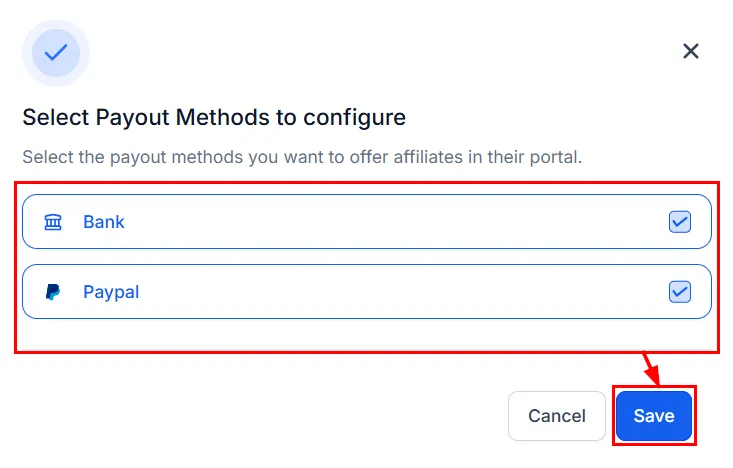
Verify your selections, then click Save. Affiliates will now see only the selected methods in their portal.
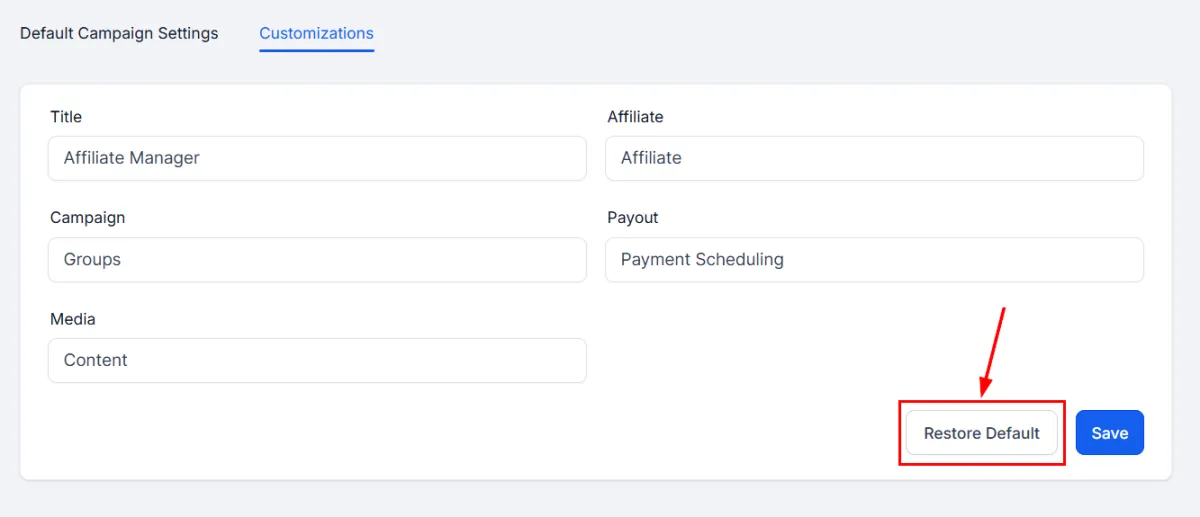
Customizations
In the Customizations section, you can update the headers of the Affiliate Manager tabs to align with your preferences. These changes will be reflected in the Affiliate Manager drop-down.
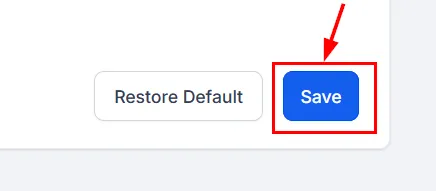
Save
After making any adjustments, click the save button to retain your changes.
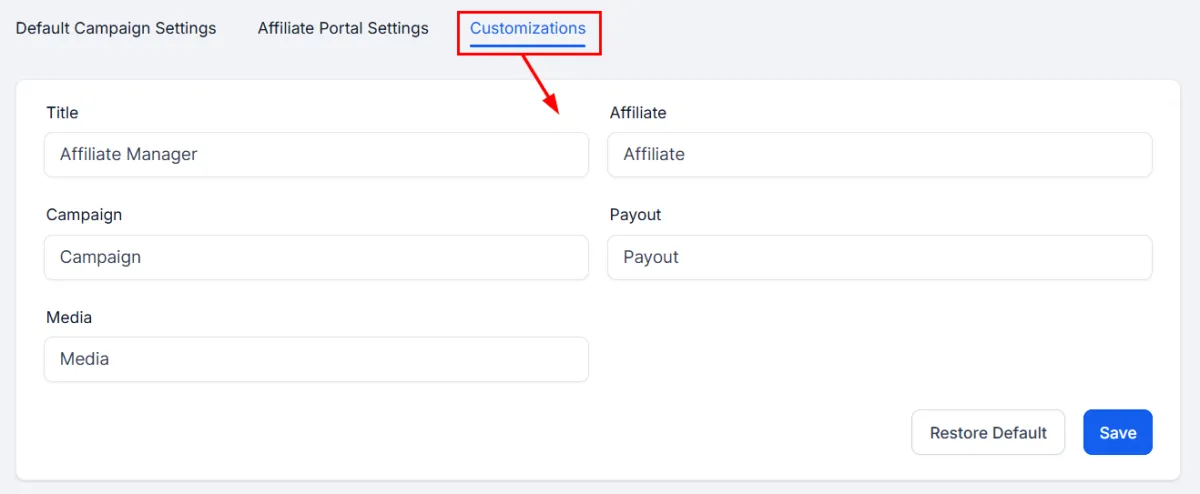
Restore Default
Click this button to revert the changes to the default configurations.
Configure these settings according to your preferences to enhance your affiliate management.
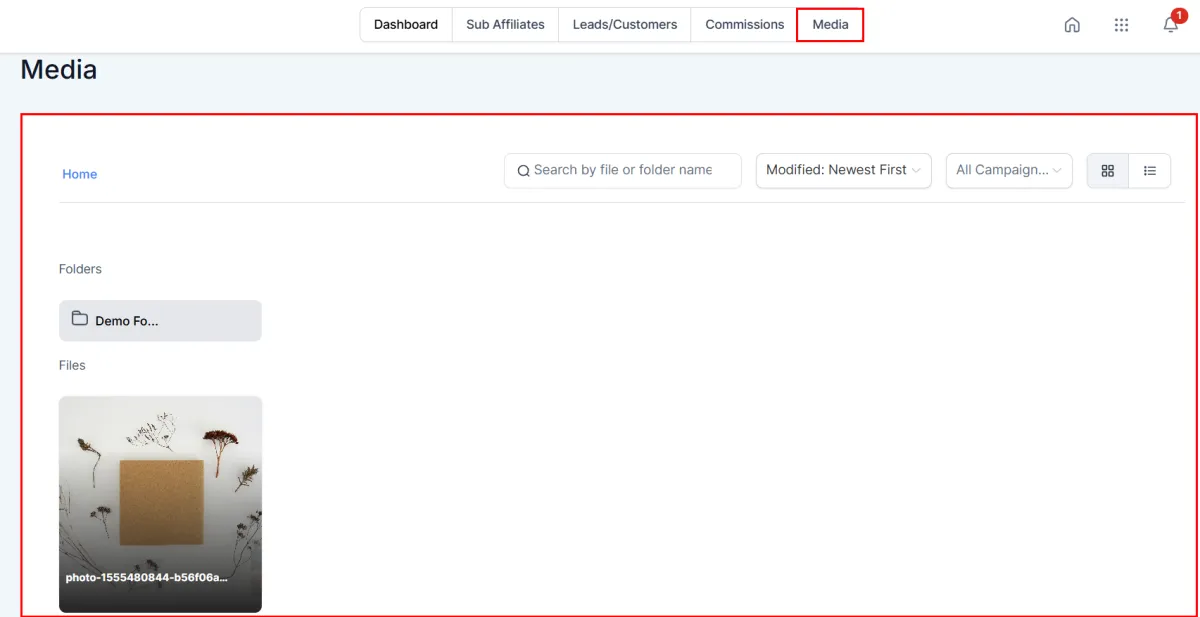
23. Affiliate Manager Media
The Affiliate Media Library allows you to simplify media management, streamline affiliate workflows, and improve overall efficiency. Whether you're assigning campaign-specific assets or making resources universally accessible, these features are designed to enhance the experience for both you and your affiliates. Utilizing this feature will allow your affiliates to effortlessly copy media links or download files directly from the Affiliate Portal, saving time and boosting productivity.
Why It Matters
Enhanced Efficiency: The Affiliate Media Library reduces the time spent managing media assets, allowing you to focus on strategy and growth.
Targeted Media Access: Linking media to specific campaigns ensures affiliates access only the resources they need, minimizing confusion and increasing productivity.
Enhanced Affiliate Experience: Simplified download and sharing options empower affiliates to work more effectively, strengthening collaboration and results.
How It Works
Access the Media Library
Navigate to the Affiliate Manager within Marketing and select Media from the dropdown menu.

Grouping Files Using Folders
Create folders to group media in a centralized location, enhancing your organization and efficiency.

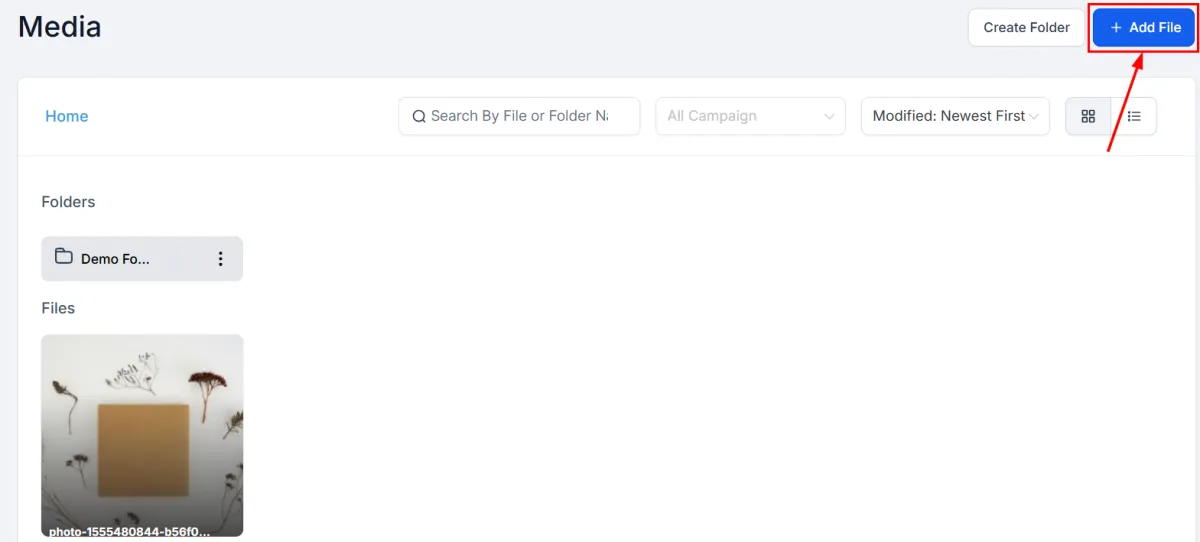
Add Media
Click Add File to upload a new media asset. In this process, you can assign media assets to specific campaigns or make them universally accessible, ensuring affiliates only see the materials relevant to their tasks.
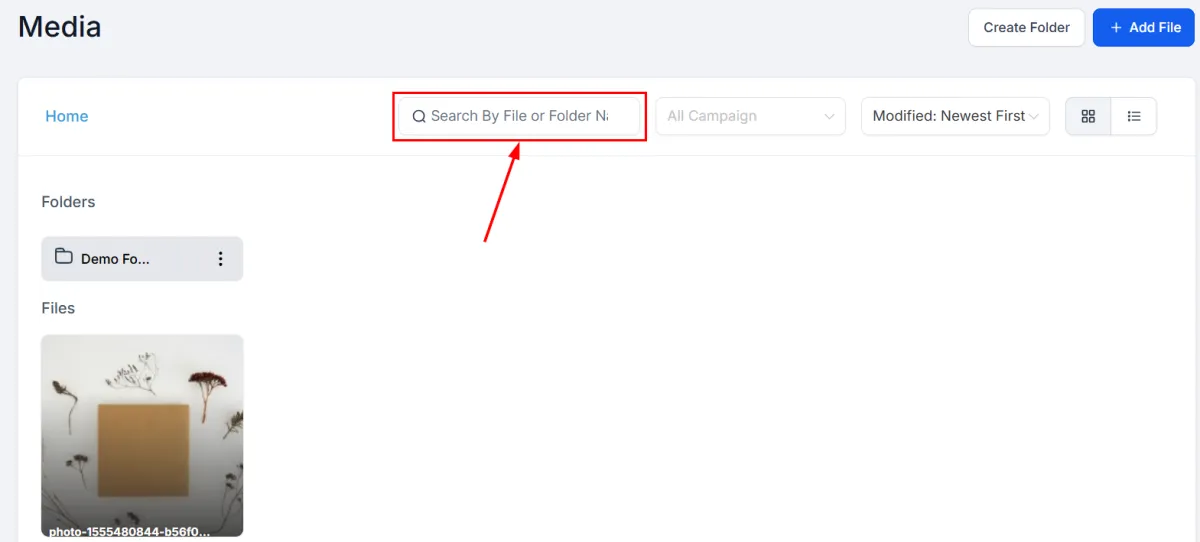
Search
Easily locate files or folders using the search option.
Campaigns
View media associated with a certain campaign by selecting a campaign from the dropdown menu.

Sort
Sort media files and folders alphabetically, or by the date they were uploaded into the system.
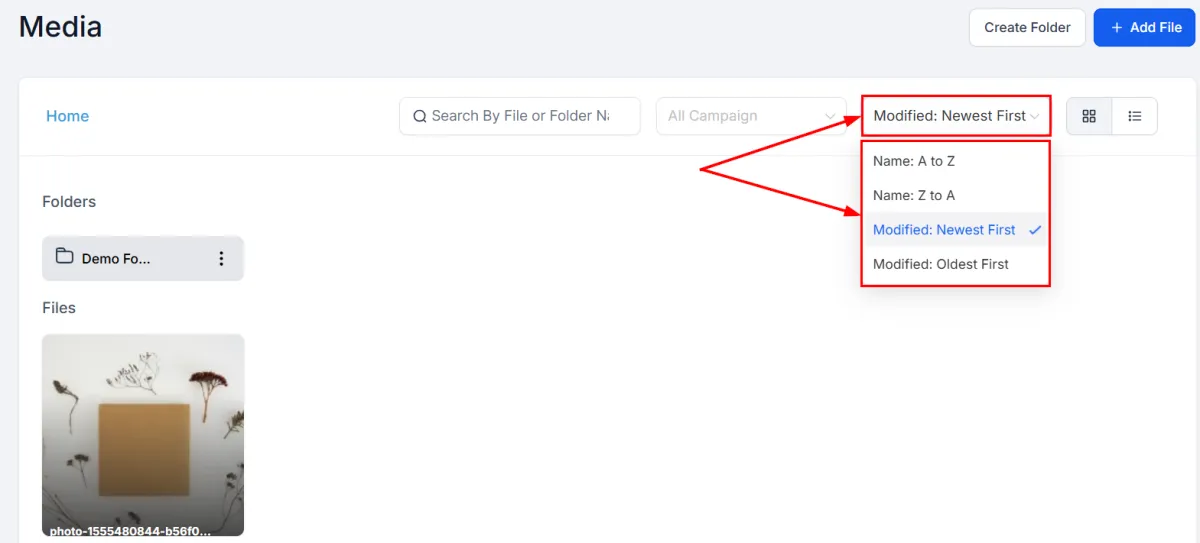
Media Display
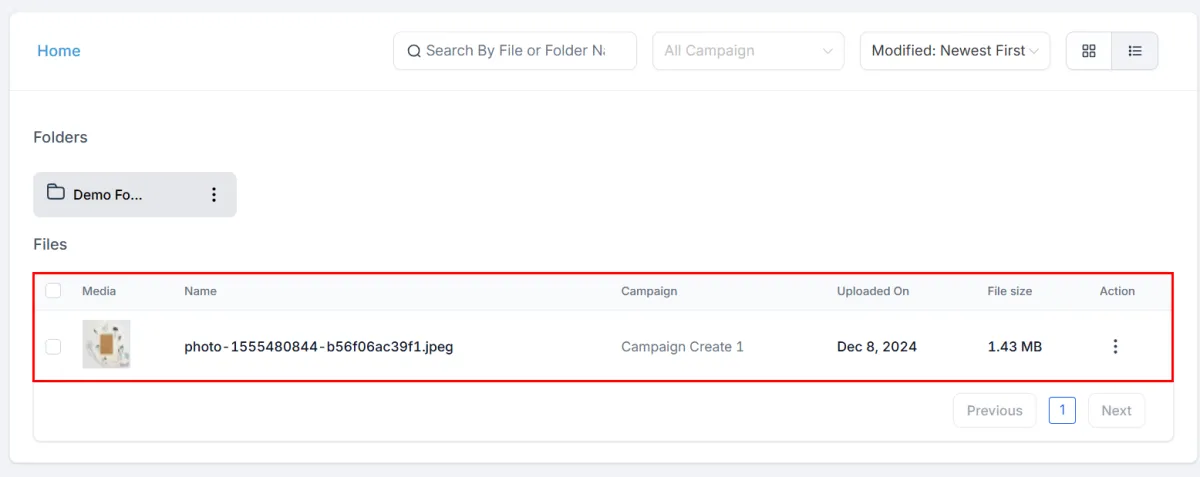
Toggle between viewing your content in the Grid or List views.

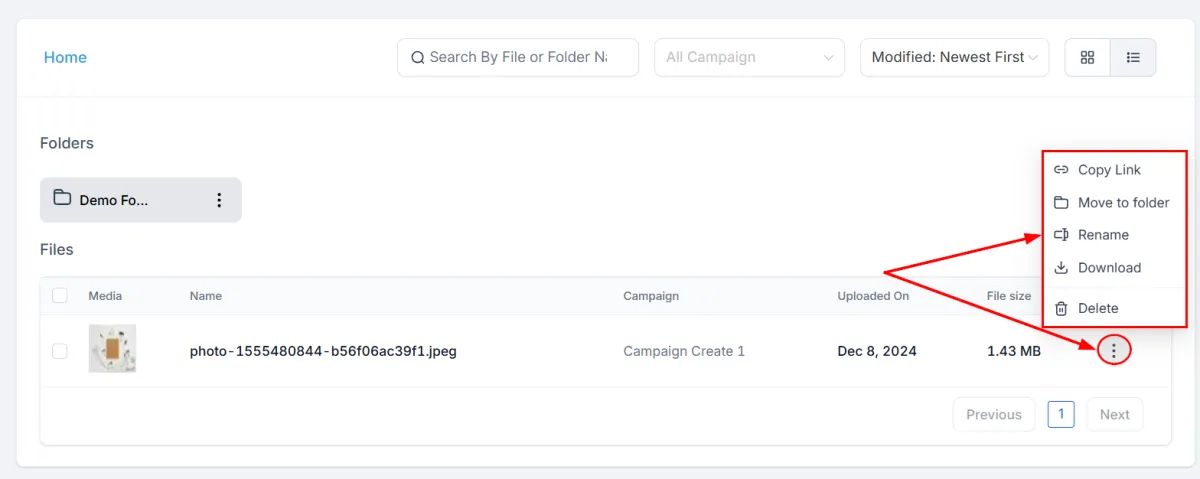
The List View offers detailed insights for each file, including its name, size, associated campaign, and upload date, providing a comprehensive overview of your media assets.
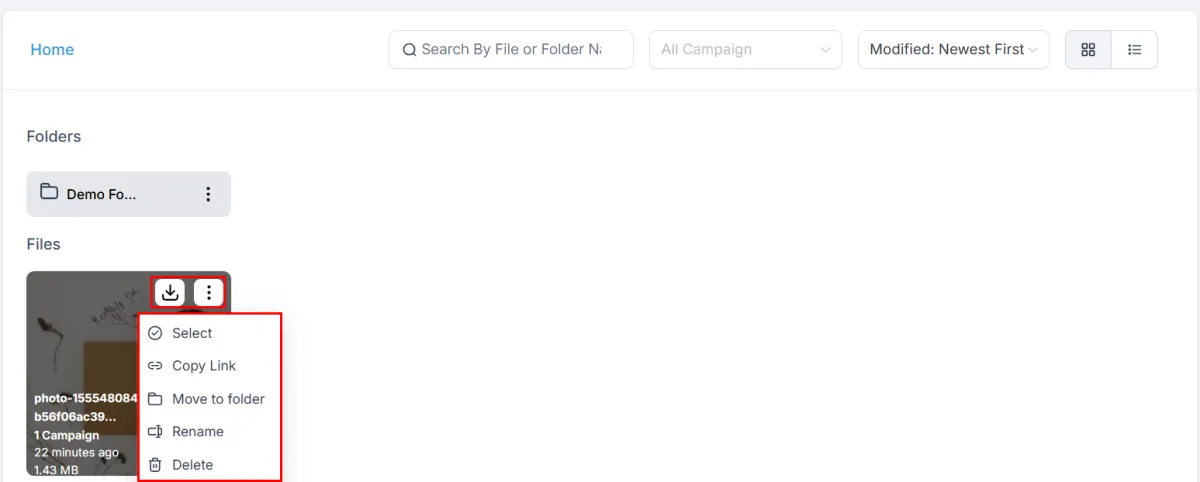
Click the three dots associated with each file to copy the file link, move it to a folder, rename it, download it, or delete it.
You can also hover over the file in Grid View to perform the actions above on the desired file.
Folders
Within the Folders section, you will see all the folders that have been created to efficiently organize your files. Click the actions menu beside each folder to rename or delete it.
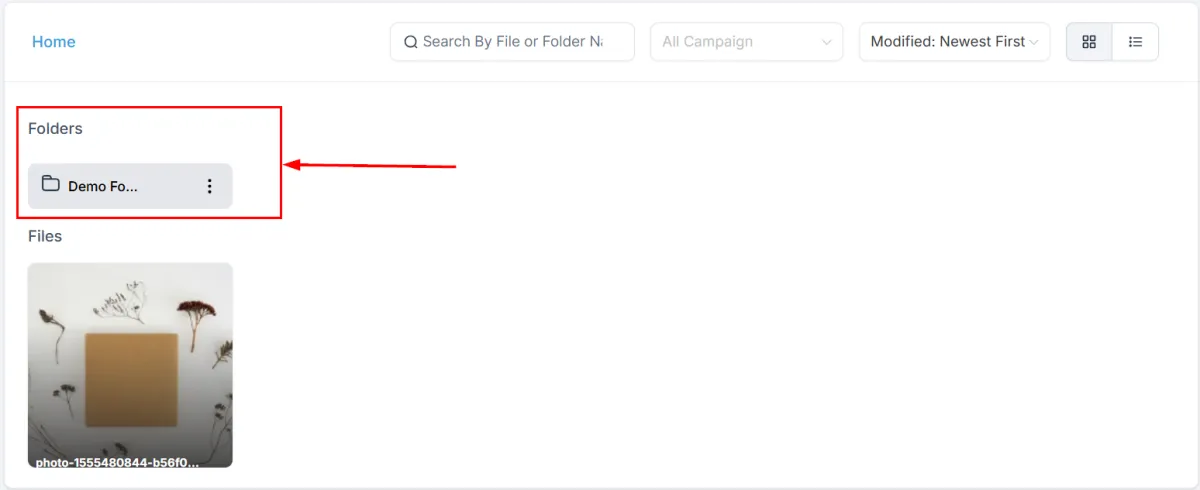
Files
Locate and manage uploaded files within this section.
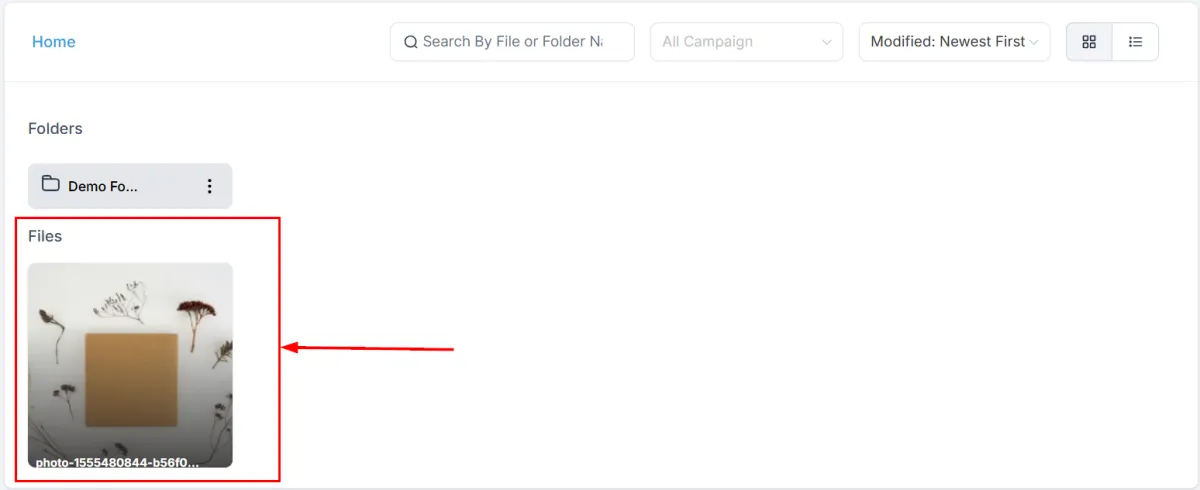
Uploaded media will be instantly accessible to affiliates via the Affiliate Portal enabling affiliates to view the files associated with their corresponding campaign.
How to Use Commission Length & Variable Commissions in Affiliate Manager
The Commission Length and Variable Commissions Over Time features provide greater flexibility in managing affiliate rewards for recurring product sales. These features allow you to define how long commissions are paid and customize rates based on specific charge counts, enabling more strategic and scalable affiliate programs.
Key Features
Commission Length – Set a limit on the number of transactions for which affiliates earn commissions, instead of paying commissions indefinitely.
Variable Commissions – Assign different commission rates based on specific charge counts to create tiered reward structures.
How to Configure Commission Length and Variable Commissions
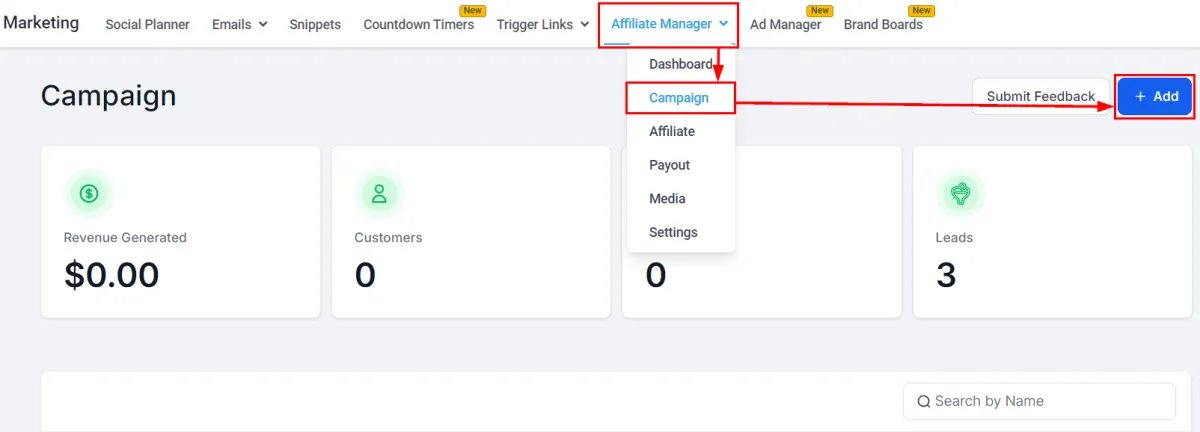
Create or Edit an Affiliate Campaign
Navigate to the Marketing section of your account, then click Campaign from the Affiliate Manager dropdown.
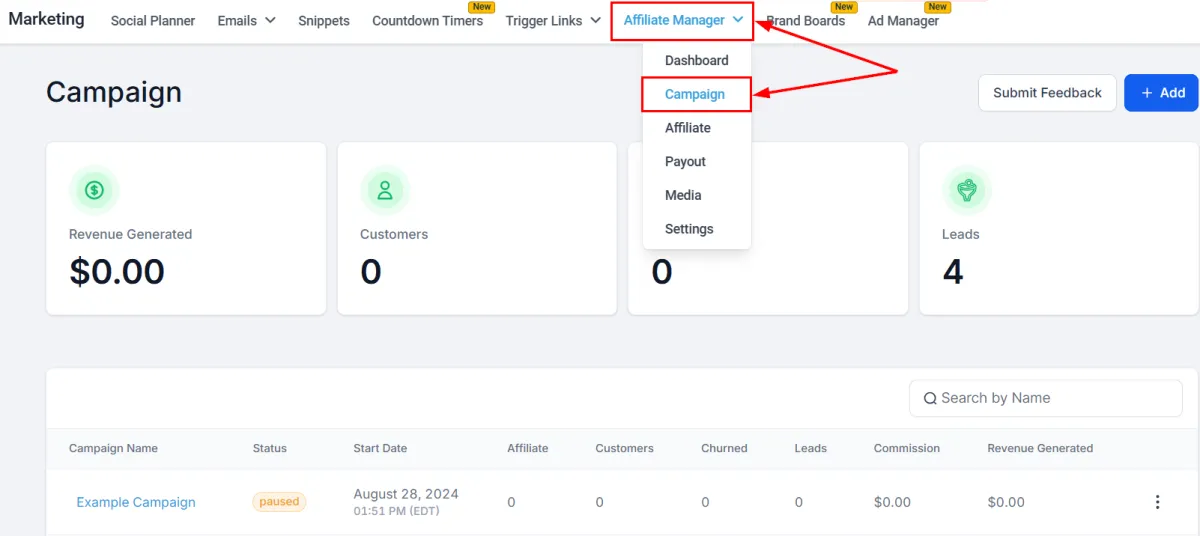
Start by creating a new affiliate campaign or editing an existing one.
📌Note: The affiliate campaign must be connected to a funnel, website, or store with at least one product attached to it.
If you're new to affiliate campaigns, refer to the Setting Up an Affiliate Campaign article for detailed instructions!
Set the Default Commission
In Step 2 of the campaign setup, define the default commission rate affiliates will earn by default.
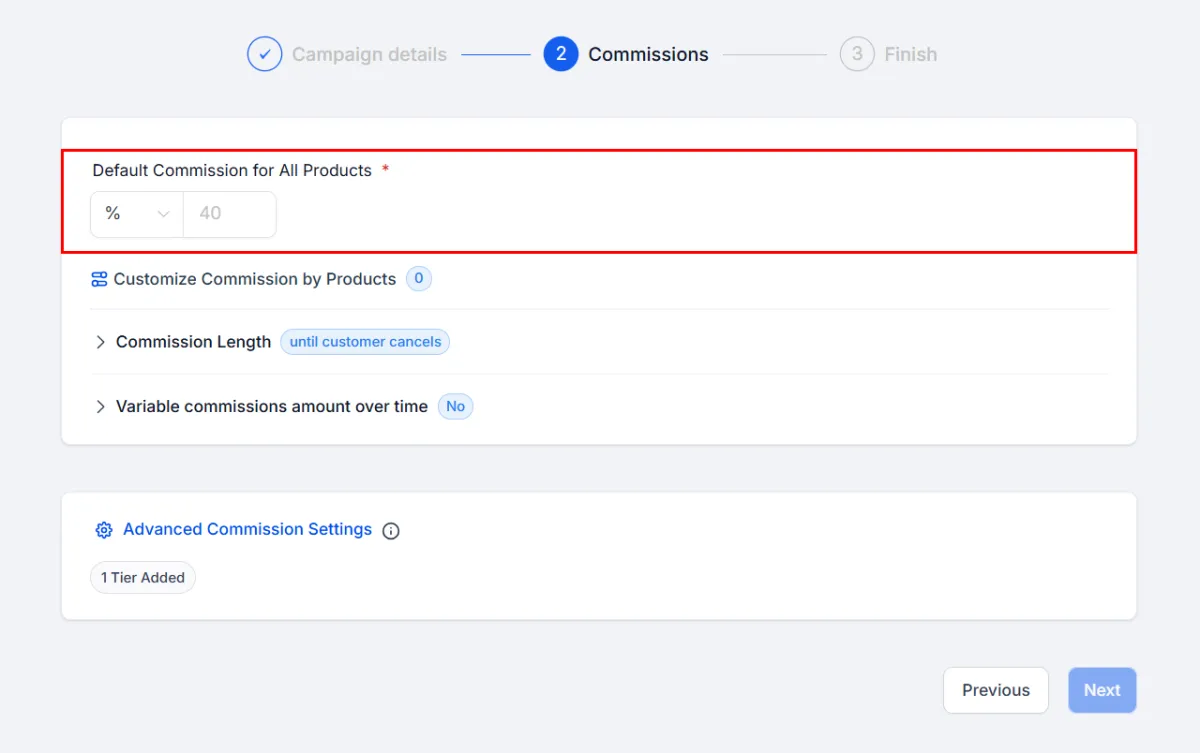
Enable Commission Length
Click Commission Length to configure this setting. By default, commissions are paid until the customer cancels. To limit commissions, select By Count and set the maximum number of charges eligible for commission payments. For example, if the limit is set to 5, the affiliate earns a commission only for the first 5 charges, regardless of whether the subscription is monthly or yearly.
📌Note: The limit is based on the number of successful charges, not time intervals.
Set Variable Commissions Over Time
Next, toggle Variable Commissions to enable this feature, then select Two Levels to configure different commission rates for specific charge counts. For example: For the first 2 charges, you can set a 10% commission, followed by a 20% commission for subsequent charges.
Add additional tiers if needed for more granular control.

Save or Publish Your Campaign
Save your campaign as a draft, or publish the campaign to apply the updated commission settings.
✍️Important Notes
Commission Priority Order:
1. Product-Based Commissions – Applied first for specific products.
2. Variable Commissions – Overrides the default rate if configured.
3. Default Commissions – Applied when no other rules are defined.
This hierarchy ensures that specific commission settings take precedence over general ones, offering flexibility and control.
By tailoring commission structures based on transaction limits and tiered rates, you can better incentivize performance and reward affiliates effectively.
24. How to Manage Customers under Affiliates
Effectively managing customers within your affiliate program is crucial to ensuring accurate commission tracking and the overall success of your affiliate initiatives. Whether you need to remove inactive customers, or control their commission eligibility, having the right tools at your disposal is key to making the process smooth and efficient. Below, we outline the steps for disabling, enabling, and deleting customers, as well as managing commissions, to help you maintain a seamless affiliate program.
Let's start by accessing the Affiliates section of the Affiliate Manager.
Next, locate the affiliate whose customer you wish to modify, and access their Affiliate page by clicking on their name.
Disabling/Enabling a Customer
To ensure that customers are appropriately tracked within your affiliate program, you may need to disable or enable their status. This can be particularly useful for handling situations where customers are no longer eligible for commissions or need to be reactivated at a later stage.
In the Customers tab, find the customer you wish to disable or enable. Utilize the search bar or filters for quick access.
Next, click the three dots next to the customer's name and select either "Disable Customer" or "Enable Customer" as needed, and confirm your action when prompted.

After disabling, the customer's status will change to "Disabled," and no further commissions will be tracked. You can re-enable the customer by following the same steps and selecting "Enable Customer."
Removing a Customer from an Affiliate
Occasionally, it may be necessary to completely remove a customer from an affiliate's profile, especially when they are no longer relevant to your affiliate program or have been incorrectly associated.
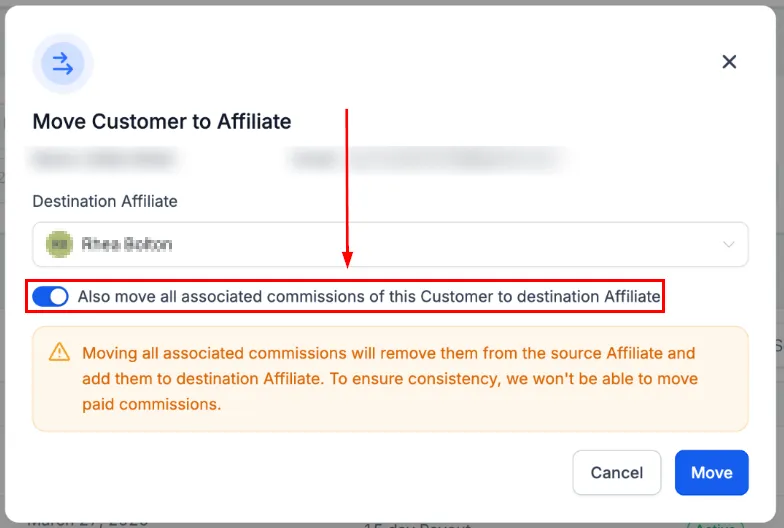
Click Move Customer to re-assign them to a different affiliate.
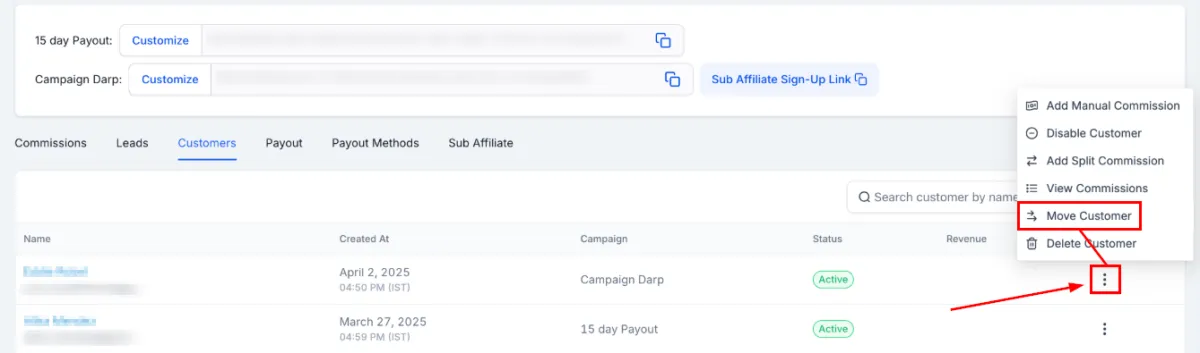
Select the affiliate then click move.
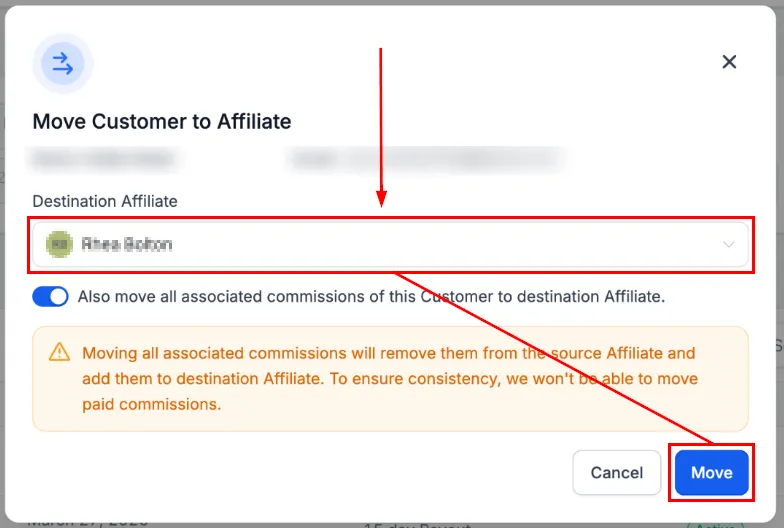
Toggle this option to transfer the associated commissions as well.
Click the "Delete" button within the customer's actions menu, and confirm your action when prompted.
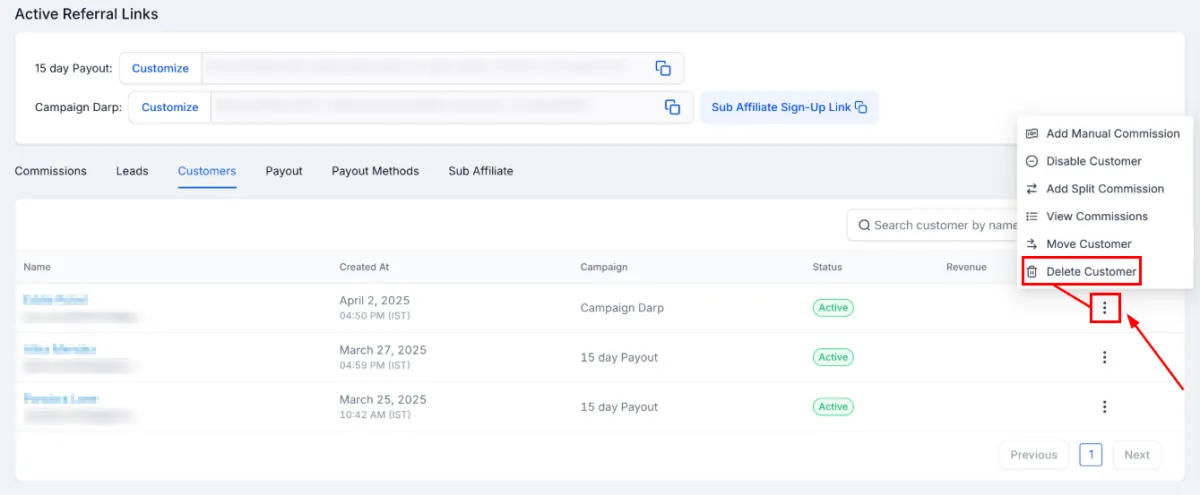
The customer will no longer be linked to the affiliate, and future commissions from this customer will no longer be generated.
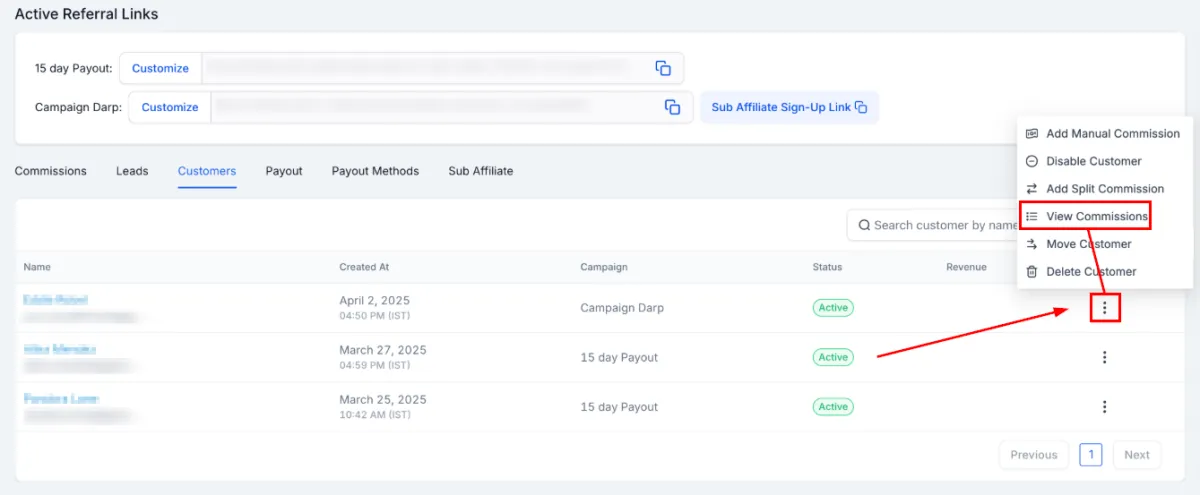
Deleting Commissions
You may also need to delete commissions, such as in cases where a commission requires correction. To do so, first view the commissions associated with the customer.
Next, head to the Commissions tab, where you can locate the specific commission you wish to delete.
📌Note: Only denied commissions can be deleted, so if necessary, deny the commission first.

After denying the commission, click the three dots next to it and select “Delete.” Confirm your action when prompted.

By utilizing the tools to disable, enable, and delete customers, as well as manage commissions, you ensure that your affiliate program runs smoothly and remains well-organized. This flexibility allows you to keep your program efficient, transparent, and responsive to changes. Whether you are handling inactive customers, correcting commission issues, or making necessary adjustments, these features help you maintain accurate and effective affiliate management.
25. How to Pay Your Affiliates
In today’s fast-paced business environment, managing affiliate payments efficiently is crucial for maintaining strong relationships with your partners. Whether you prefer to use automated methods for speed or manual options for control, the platform provides various payout solutions to suit your needs. Read on to learn how you can pay your affiliates through your CRM account.
Affiliate Payout Options
You can pay your affiliates using any provider or method of your choice as long as you mark the payouts as completed. However, you can use the platform to streamline this process, ensuring both accuracy and timeliness.
📌Note: The Payout methods available to your affiliates can be controlled by navigating to Affiliate Manager > Settings > Affiliate Portal Settings. Once configured, affiliates will only see the available payout options, reducing confusion and streamlining the payout process.
How Affiliate Payouts Work
Payouts are generated automatically based on the campaign commissions you’ve configured.
After generating the payouts, you have two options: automate the process through PayPal or manually process payments through bank transfers.
-Auto Payouts via PayPal (Fastest Option): Automate affiliate payments directly from the Affiliate Manager using the PayPal Payouts API. This method eliminates the need to log into PayPal or manually mark payouts as paid, offering the quickest and most efficient solution for bulk payments.
-Bank Payments: For affiliates who prefer traditional bank transfers, you can manually process payouts through your bank or other payment methods. Once payments are completed, simply mark the payouts as paid to keep everything updated.
Auto Payouts via PayPal
The PayPal Payouts API offers the fastest and most cost-effective way to pay multiple affiliates at once. After a one-time setup, you can securely distribute payments without ever leaving the platform.

To learn more about this method, visit the Automate Affiliate Payouts with PayPal article!
Manual Payments via Bank Transfers
If you prefer to make bank payments, follow these steps:
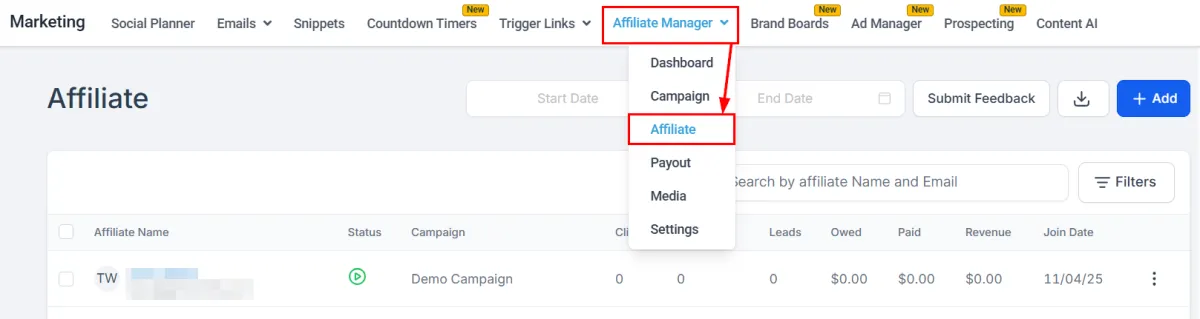
Navigate to the Affiliate payouts section in your account.
In the "Pending" tab, approve the payouts you want to process.
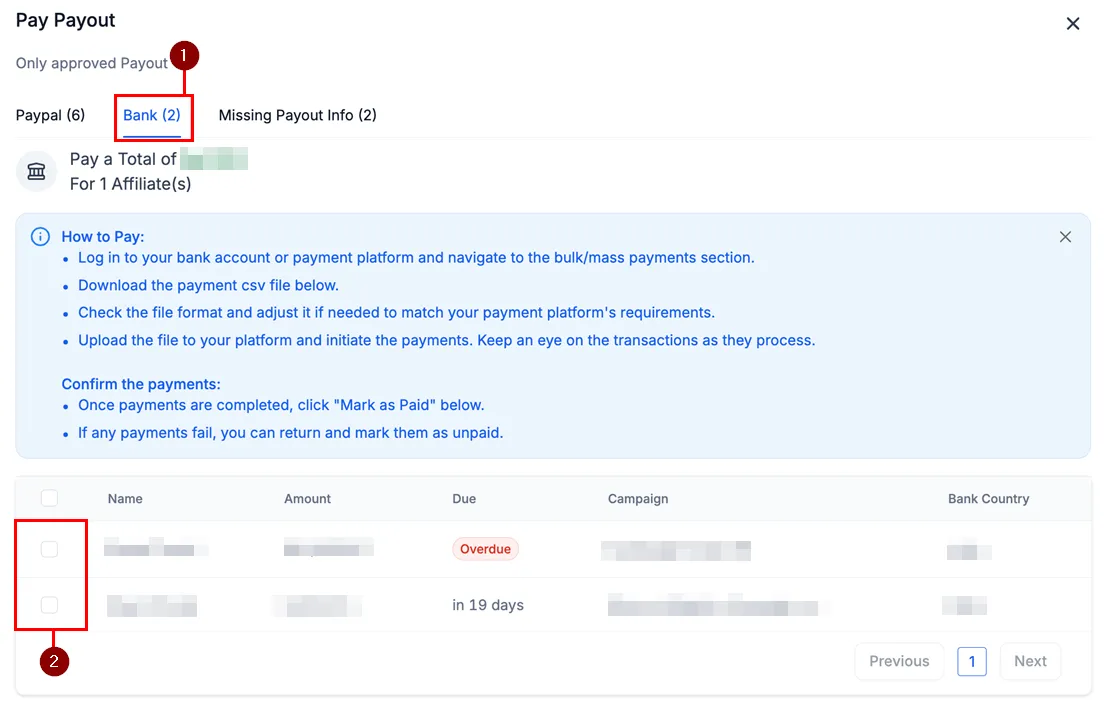
Next, navigate to the Approved for Payout tab, where all approved payouts are listed. From this view, select the payouts you wish to process.
After selecting the payouts, click “Pay.”
This will open a window allowing you to select the preferred payment method. Navigate to the Bank tab, then verify the affiliates you wish to pay.
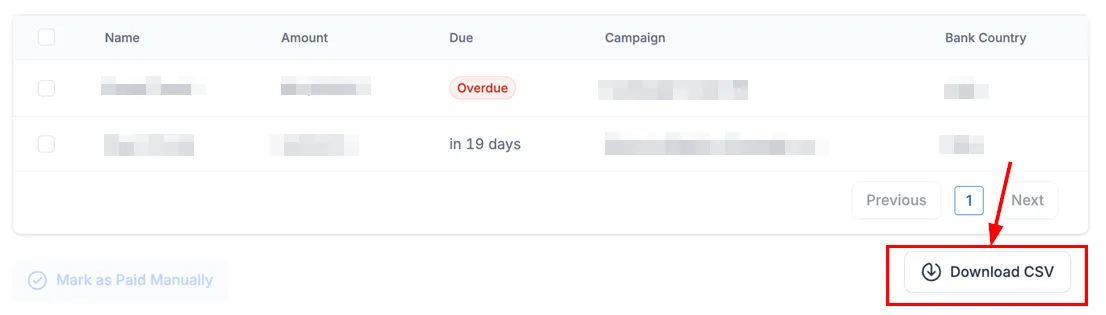
After confirming your selections, download the CSV file and follow the provided instructions to complete the payment through your chosen banking platform.
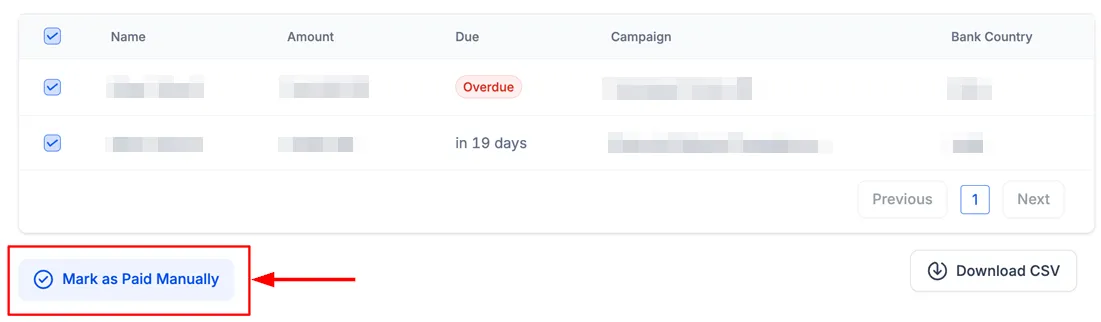
Once payments are completed, don’t forget to click "Mark as Paid" to update the status!
By following these steps, you can ensure that affiliate payments are processed quickly and efficiently, whether you opt for automated PayPal payouts or manual bank transfers. The flexible payout system helps you maintain timely payments, keeping your affiliates satisfied and your operations running smoothly.
26. Managing Affiliates with Quick Campaign Actions
Managing affiliate participation across multiple campaigns can be time-consuming, especially when dealing with large affiliate lists. The Quick Campaign Actions feature is designed to simplify this process by allowing you to add or remove affiliates from campaigns directly from the Affiliate List Page. This streamlined approach reduces manual effort and enhances your ability to make real-time adjustments to campaign participation.
Adding an Affiliate to a Campaign
To quickly assign an affiliate to a campaign, follow these steps:
Navigate to the Affiliate Manager, then open the Affiliate List Page.
Locate the desired affiliate, click the three-dot menu next to their name, and select Campaign Actions.
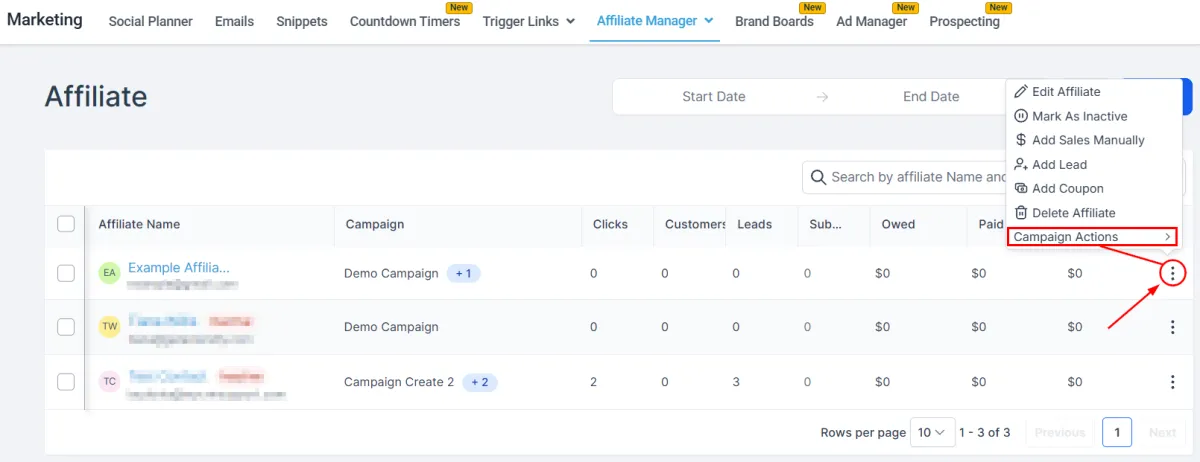
Click Add to Campaign from the Actions menu.
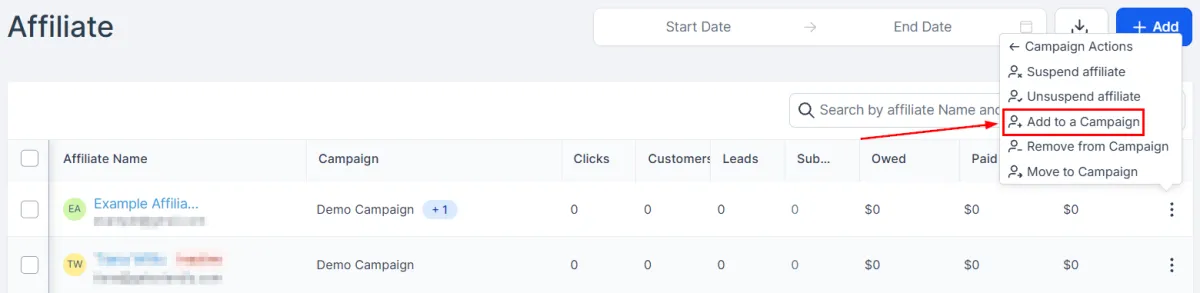
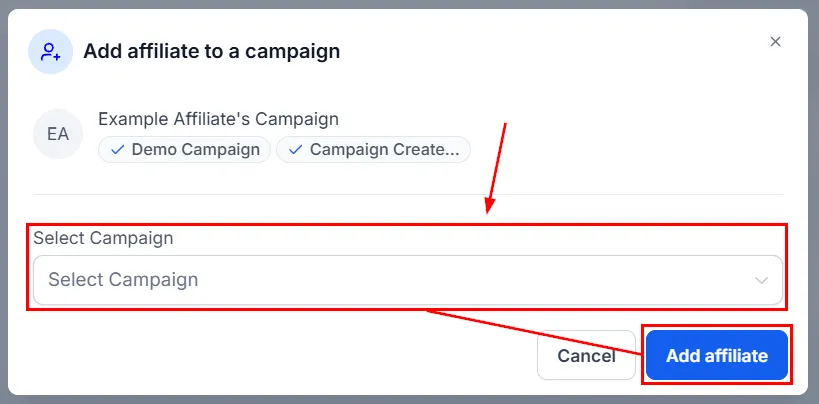
In the pop-up window, choose the campaign you want to assign the affiliate to, then click “Add Affiliate” to apply the changes.
Removing an Affiliate from a Campaign
To remove an affiliate from a campaign, on the Affiliate List Page, click the three-dot menu next to the affiliate’s name.

Select Remove from Campaign from the Action options.

Choose the campaign from which you wish to remove the affiliate, then click “Remove Affiliate” to finalize the removal.

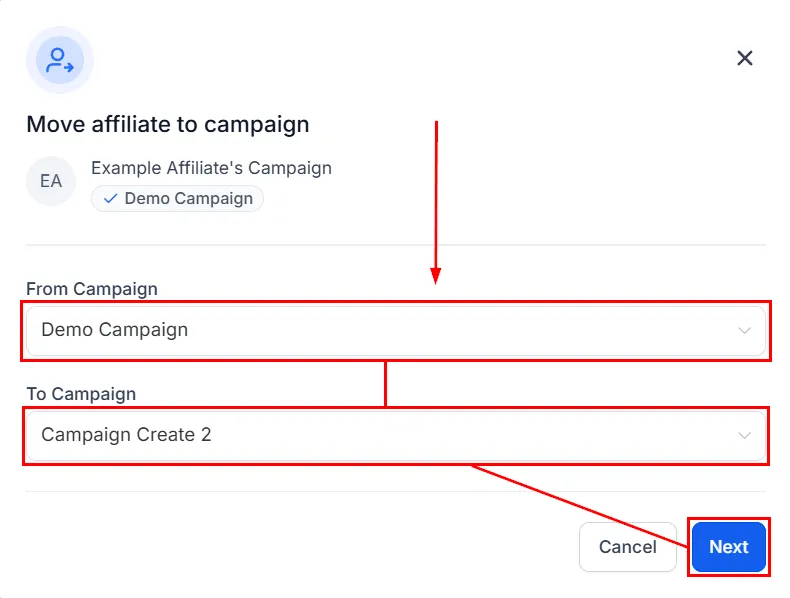
Moving an Affiliate from a Campaign
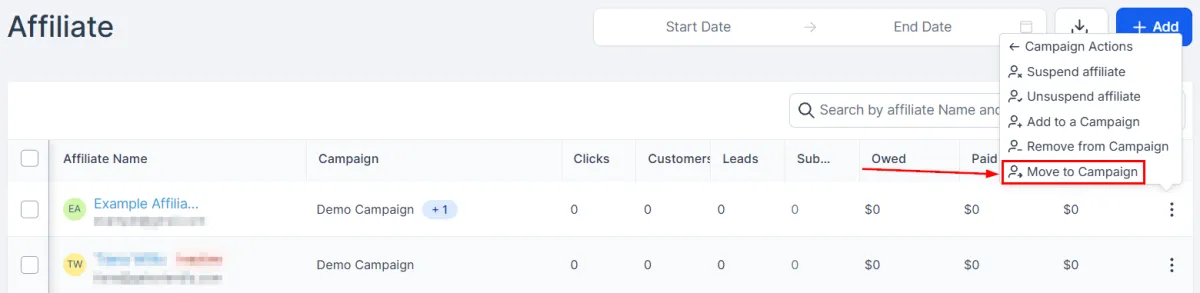
To change an affiliate's campaign, click the three-dot menu next to the affiliate’s name and select Campaign Actions.

Select Move to Campaign from the dropdown options.
First, select the campaign the contact is currently in, then select the campaign you want them to be added to, and lastly click Next to continue.
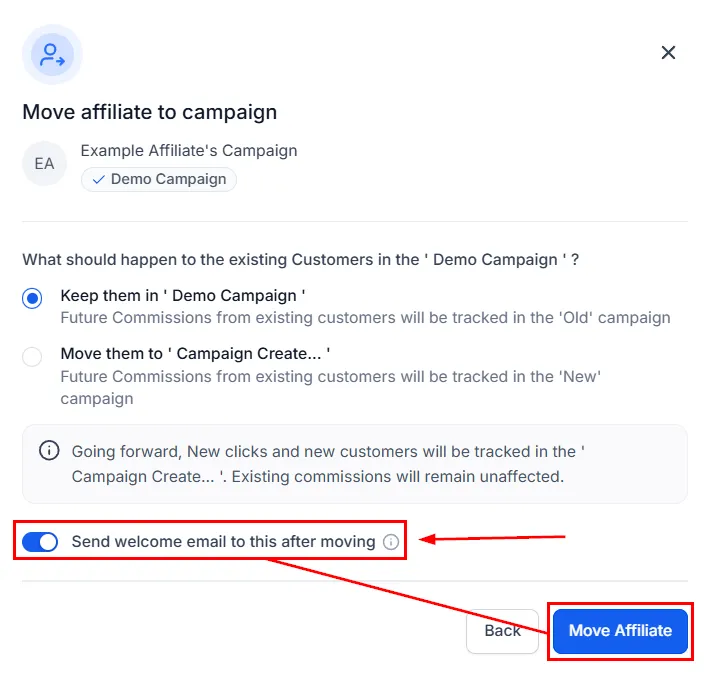
Select whether you want to keep the future commissions from the referred customers to remain in the original campaign, or to be attributed to the campaign the affiliate is moved to.
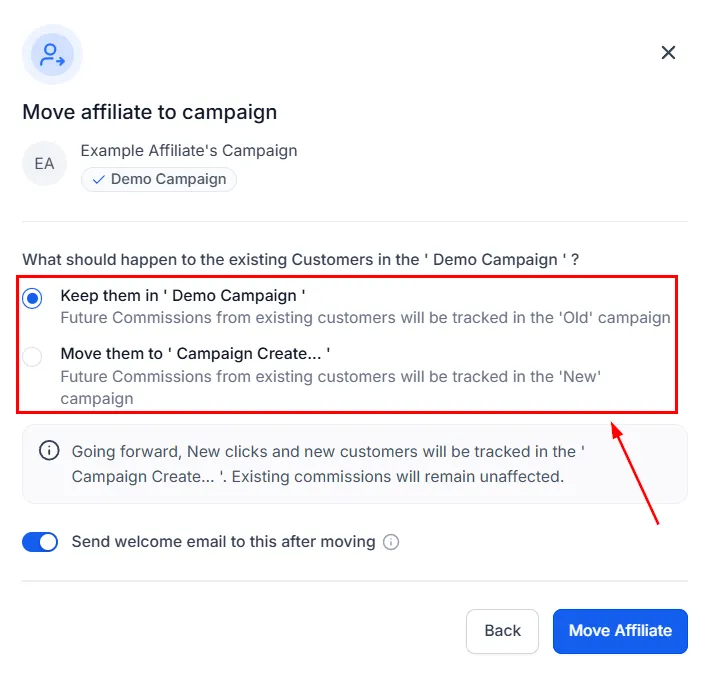
Toggle the welcome email option as per your preference, then click Move Affiliate.
The Quick Campaign Actions feature offers a fast, intuitive way to manage affiliate participation across campaigns without navigating through multiple menus. Whether you're onboarding new affiliates or updating campaign rosters, these actions help you stay agile and efficient in your campaign management efforts.
27. How to Use the Affiliate Portal
The Quick Campaign Actions feature offers a fast, intuitive way to manage affiliate participation across campaigns without navigating through multiple menus. Whether you're onboarding new affiliates or updating campaign rosters, these actions help you stay agile and efficient in your campaign management efforts.
Configuring the Affiliate Portal
Enabling the App
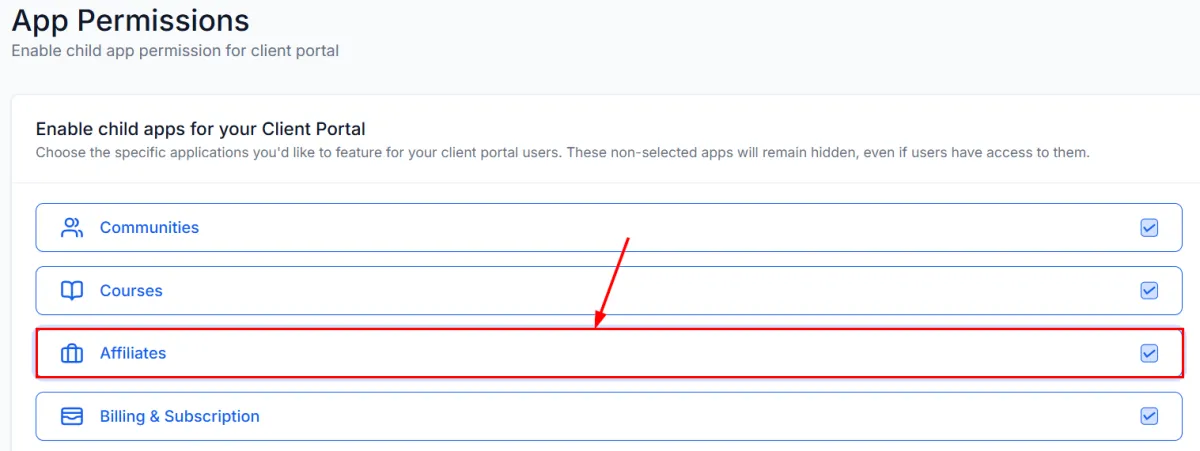
Before your customers can use the Affiliate Portal, you must enable it as a Client Portal app. To do so, navigate to the App Permissions section in the Client Portal Settings.
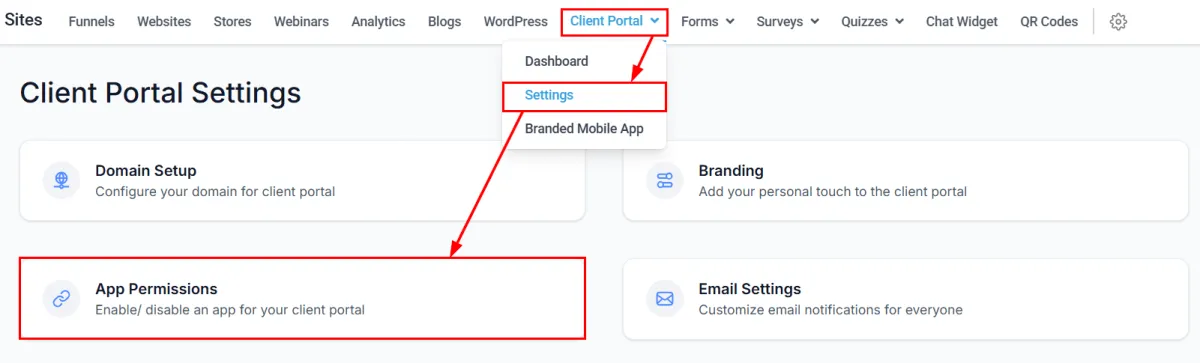
Then, select the Affiliates option from the available child apps. Be sure to click save afterwards!
Now that you have enabled it, you can tailor the affiliate experience by enabling or disabling features to match your operational requirements in the Affiliate Manager Settings.
Customizing Available Features
Navigate to Affiliate Manager from the left-hand menu of your sub-account, then click the Settings tab at the top and select the Affiliate Portal Settings.
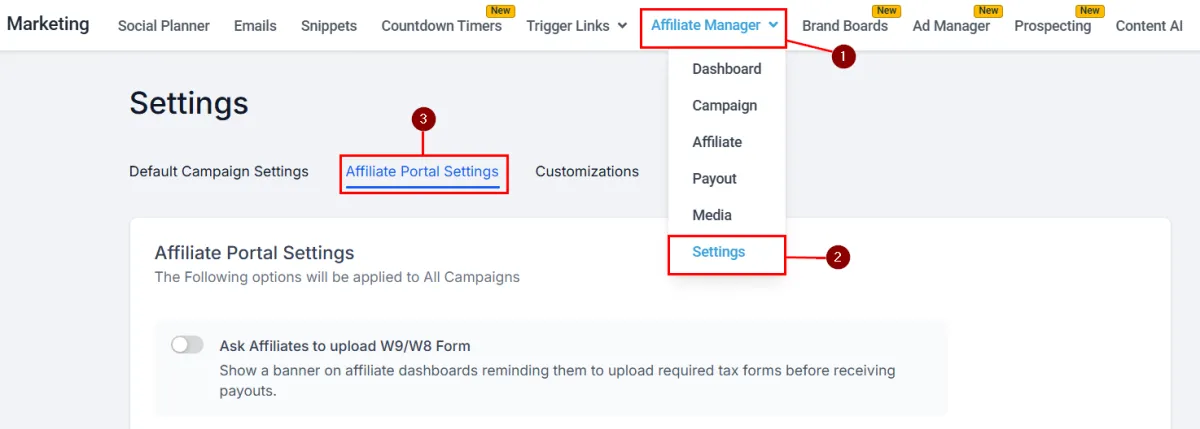
Here, you can use the toggle switch to enable (green) or disable (gray) each setting.
1. Require W9/W8 Form Uploads: Prompts affiliates to upload necessary tax forms, ensuring tax compliance and preventing payout delays.
2. Mask Referral Emails: Obscures portions of customer email addresses (e.g., john****@gmail.com), enhancing data privacy and protecting sensitive lead information.
3. Require Payout Method Setup: Prompts affiliates to configure a valid payout method (e.g., PayPal or bank account), reducing manual follow-ups and facilitating timely payments.
4. Configure Payout Methods: Allows you to select which payout methods are visible to affiliates, providing control over how commissions are distributed.
Finally, click Save (5) to apply your changes.
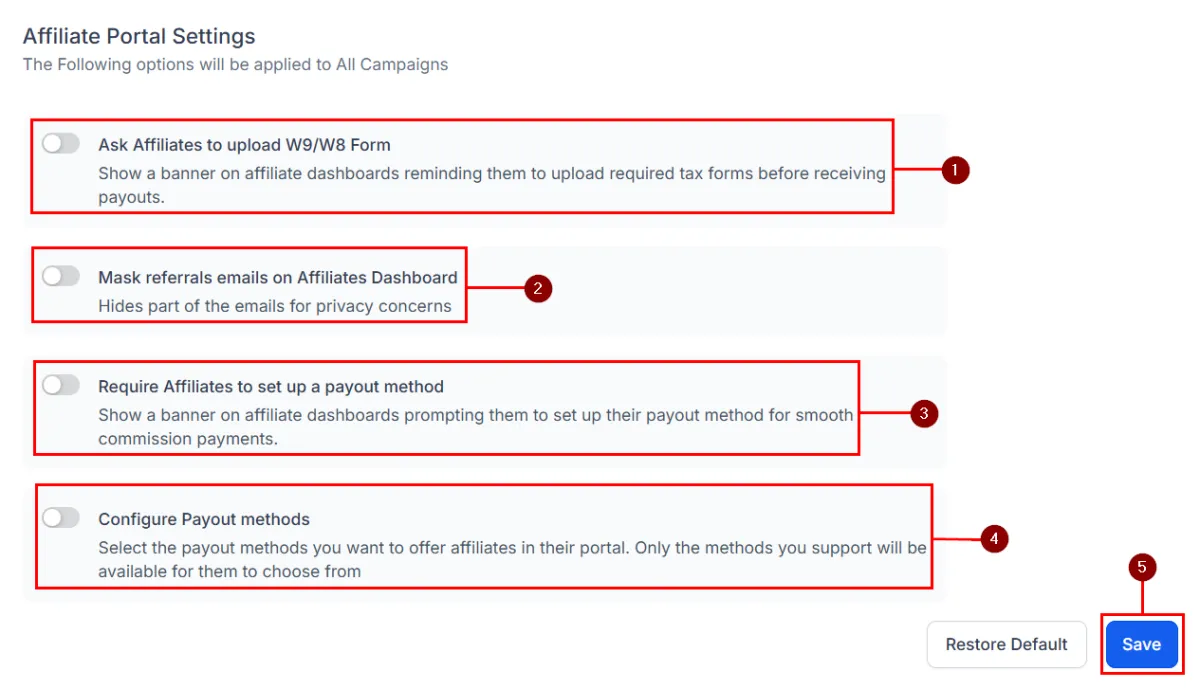
Best Practices
Always enable at least one payout method to avoid confusion for new affiliates.
Use referral email masking for sensitive campaigns or to limit exposure to customer data.
How Does an Affiliate Gain Access to the Portal?
Affiliates are granted access to the portal via an invitation email, which is sent automatically once they’re added to an active campaign. To ensure the invite is sent, ensure that the "Invite Email" option is enabled in the campaign settings. You can also automate welcome emails or SMS messages containing onboarding instructions.
Affiliates use the credentials from the invitation email to log in. Upon login, they are taken to their Affiliate Dashboard, where they can view campaign data and access key tools such as referral links.
If they are not automatically redirected, they can open the app switcher and select “Affiliates” from the available options.
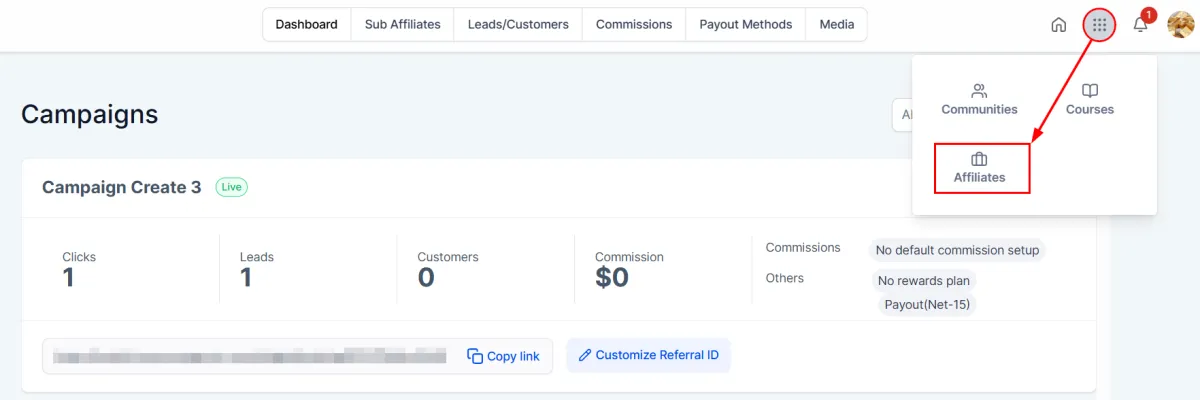
Affiliate Portal Features
Dashboard
Affiliates can view all active campaigns and key performance indicators, including leads, customers, clicks, and commissions. Referral links are easily accessible from this screen.
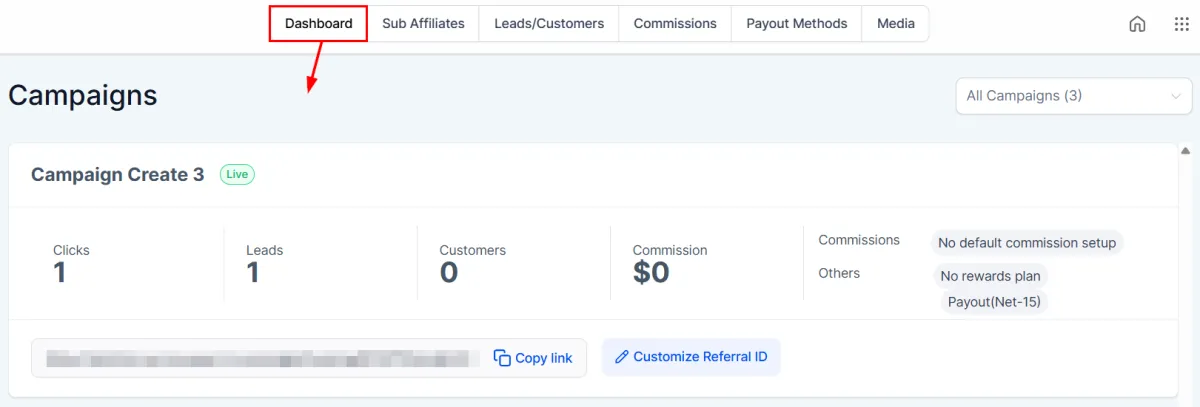
Sub-Affiliates
If the program supports sub-affiliate tiers, affiliates can manage and view their sub-affiliates here. They can also access a shareable sign-up URL to recruit new sub-affiliates.
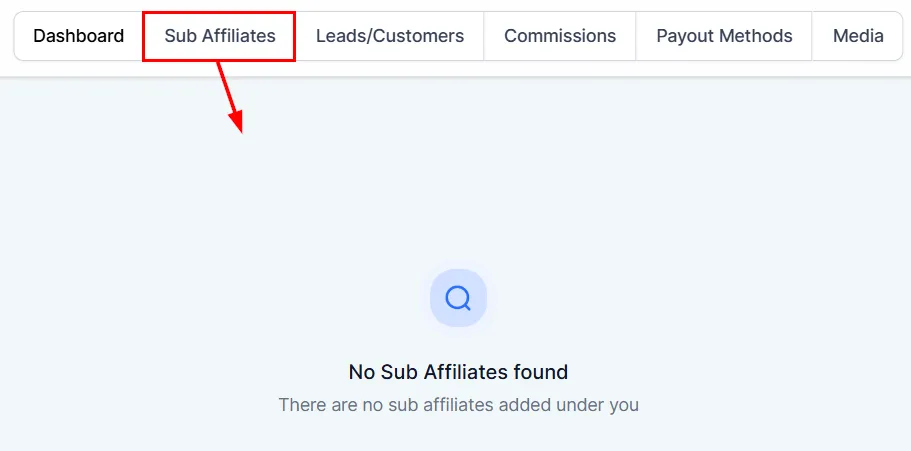
Leads/Customers
This section provides detailed insight into customer activity generated via the affiliate's links, allowing them to assess the impact of their efforts.
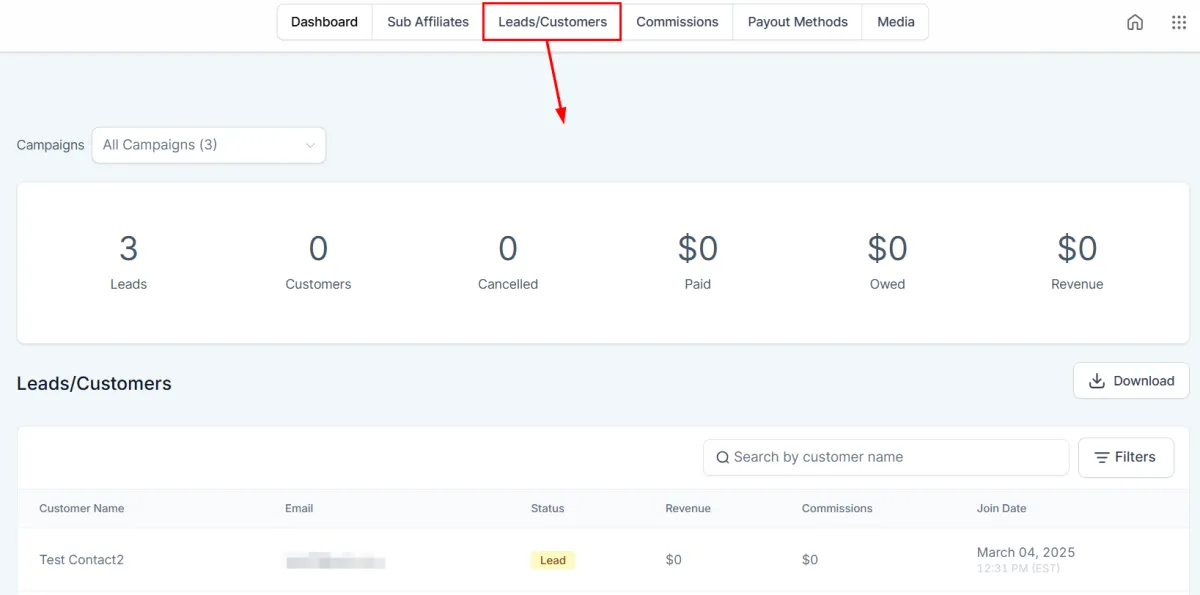
Commissions
Affiliates can view earned commissions, revenue generated, and the current status of payouts here.
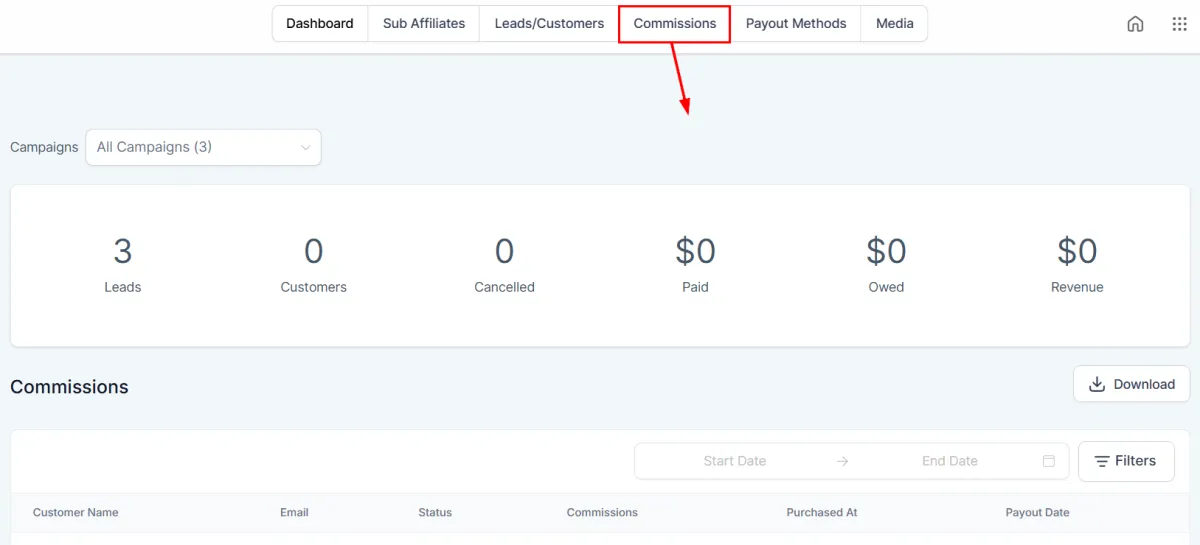
Payout Methods
In this section, affiliates can add and manage their payout methods and tax forms.
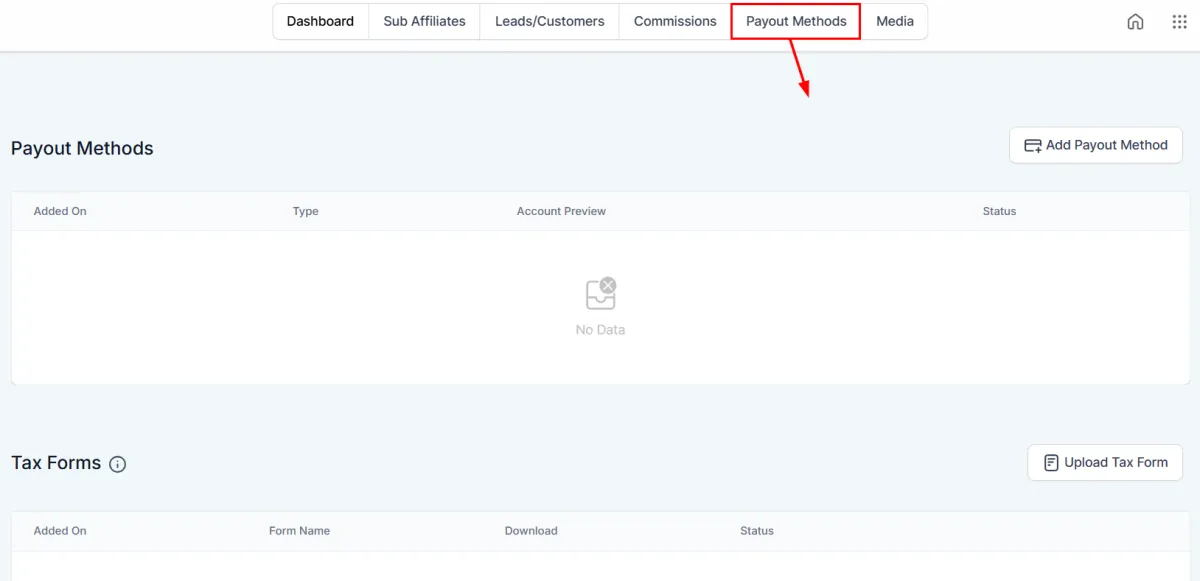
Media
The Media section displays files shared with the affiliate by the campaign owner, allowing them to copy media links or download assets.
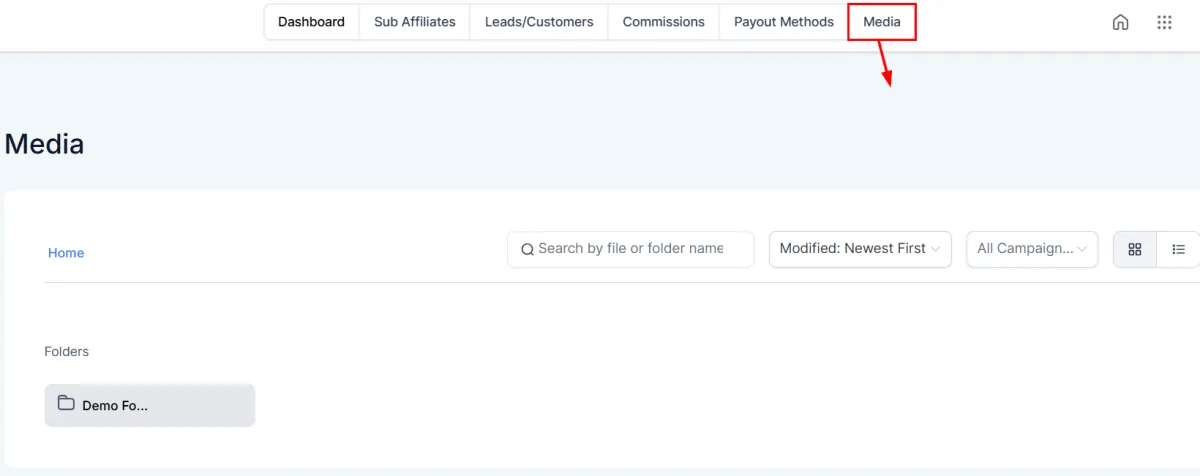
By leveraging the portal’s capabilities, both you and your affiliates can drive performance, maintain transparency, and foster lasting partnerships.
28. Affiliate Highlights
Affiliate Highlights offers an easy way to monitor an affiliate’s performance, whether across all active campaigns or within a specific one. This feature helps you gain quick insights into individual contributions, allowing for more informed decisions and strategic adjustments.
To access affiliate highlights, navigate to the Affiliate section of your account then select an affiliate from the list.
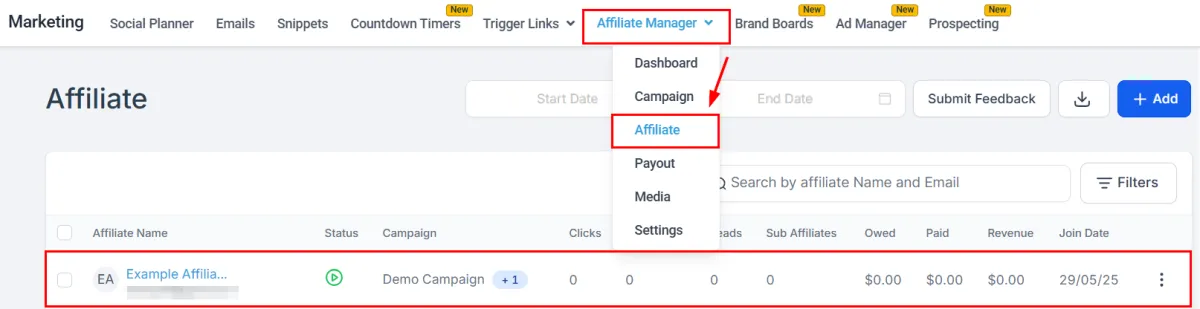
Edit Affiliate
You will be provided with an overview of the affiliate, including their name and email address as well as the date they were first enrolled in an affiliate campaign.
Click the Login Details icon (1) to generate the affiliate's magic link to share it via email or another social platform. Additionally, you can update their affiliate profile by clicking on the "Edit Affiliate details" button or perform other actions by clicking the three vertical dots (2).
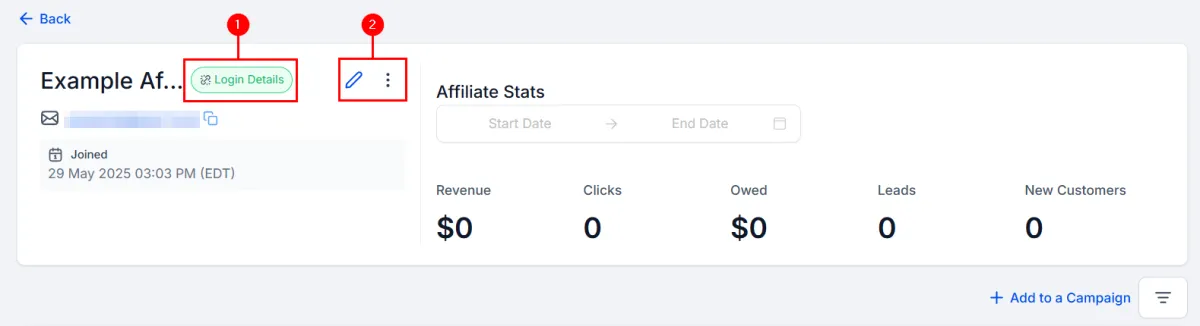
Affiliate Stats
On the Statistics dashboard, you can easily access data about your affiliates.
Filter by Date Range: This can be useful when you want to access data for a particular period. Choose a start and end date range you want.
Revenue: This shows the total revenue generated by this affiliate.
Clicks: Displays the number of leads that clicked a referral link.
Owned: You can see the amount of payout owed to the affiliate in this area.
Leads: The number of leads the affiliate brought in.
New Customers: You can see the number of customers who came in using the Affiliate's Unique ID.
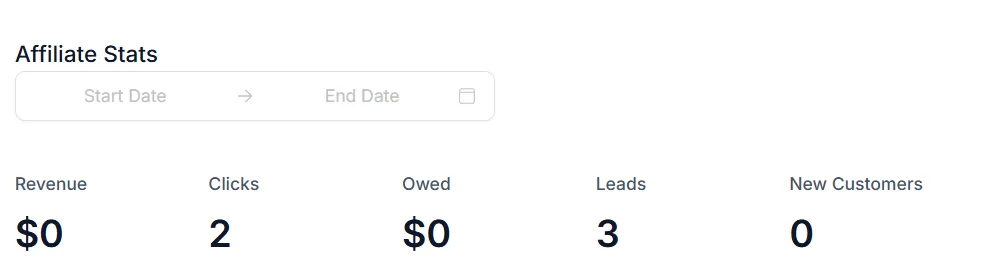
All Campaign
This shows the summary of all the campaigns the affiliate is enrolled in.
Commission Summary: This shows the number of commissions that are Pending, Denied, or Approved, and the Total amount unpaid for all commissions.
Payouts Summary: The Payout summary shows the number of Payouts that are Pending, Approved, or completed, and the Total payments made.
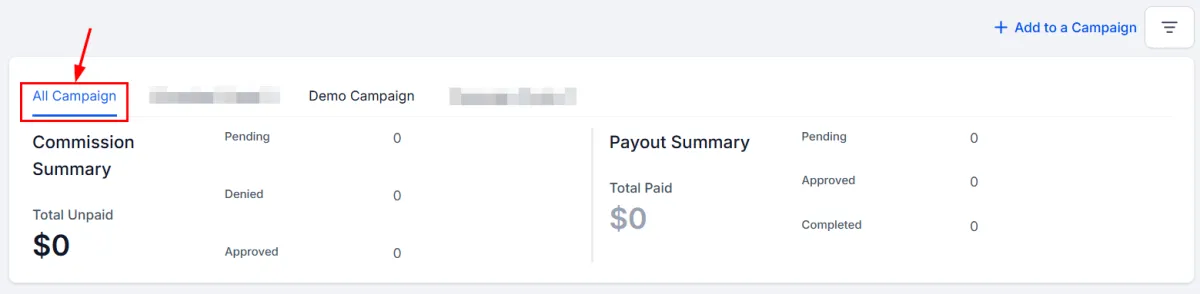
Individual Campaign View
By switching to the tabs next to all campaigns, you can see the summary of individual campaigns. There will be a tab for every campaign the affiliate is added to.
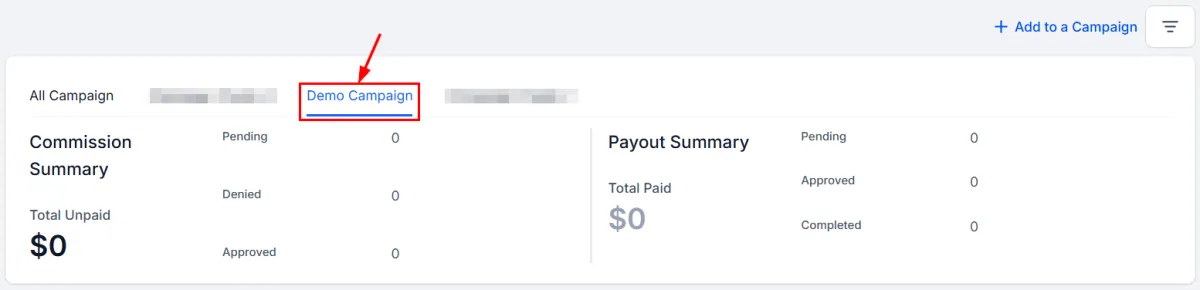
Add to a Campaign
Click on the “Add to a Campaign" button to add an affiliate to a campaign.
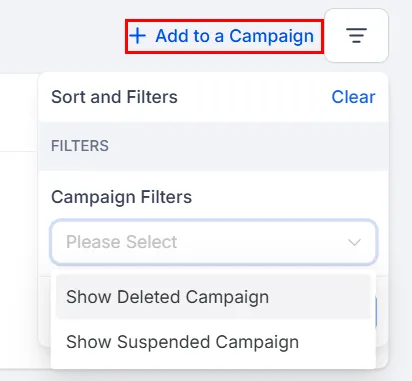
Campaign Filters
Choose whether to show deleted and suspended campaigns in the view by applying the filters relevant to your analysis.
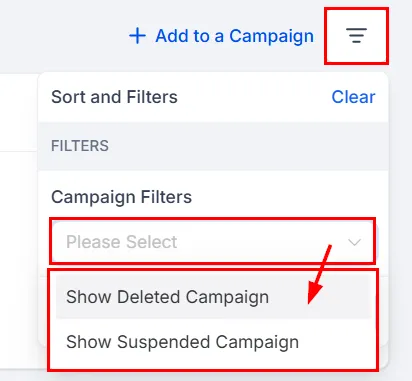
Active Referral Link
When in the All Campaigns window, you will see the lists of all active referral links below. Press the Customize button to update the referral ID or add a coupon code, or copy the link for sharing.

Commissions
If you have selected a campaign, a preview of its commission structure will be displayed instead. You can also copy their referral link within this section.
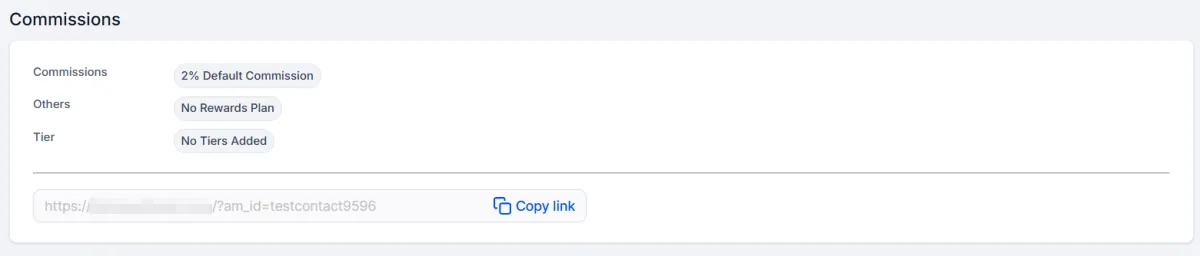
Affiliate Table
In the Affiliate Table, you can access all activities associated with each affiliate. Note that activities will only be displayed when campaigns linked to the affiliate are live.
Commission
You will see the commission that all affiliates earned from customers in each campaign.
1."All, Pending, Approved, and Denied" - You can filter all your commission details. This filter will enable you to narrow down the commission search using the status, to either All, Pending, Approved, or Denied.
2.Search Bar: With the search bar in the Commission table, you can easily and quickly search using any affiliate's customer name or email.
3.Add Sales Manually: Commission a reward manually by clicking this button
4.Amount: This column shows the amount for each customer.
5.Revenue: You will see the revenue that has been generated from each customer.
6.Created At: You can see where the commission was created.
7.Customer: You will see the names of all Affiliate Customers.
8.Product: You can see the product added to the campaign here.
9.Campaign: The campaign each customer came in through will be displayed here as well.
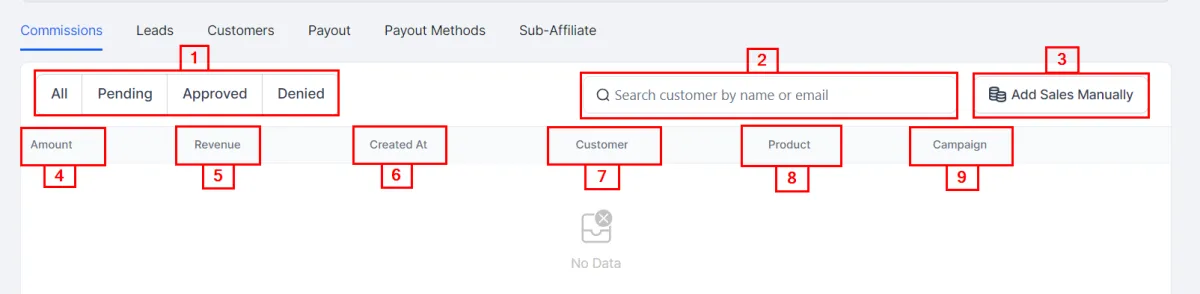
You can also select commissions from the list to approve, deny, or delete them in bulk. You may choose them manually or select all at once by using the checkbox at the top of the list.
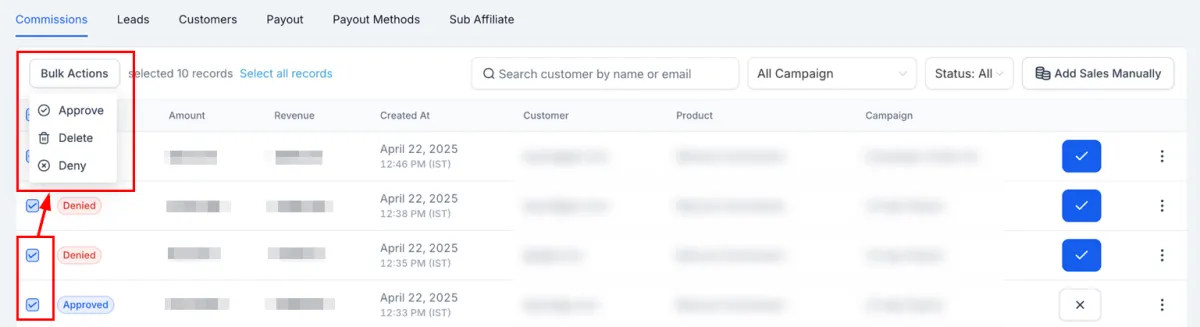
Leads
You can see the number of leads here
1.Search Bar: With the search bar, you can easily and quickly search for any lead name or email.
2.Add Lead: Click here to add new leads manually or import from contacts.
3.Customer Name: You will see the names of all Customers assigned to this affiliate.
4.Email: The customer's email will be displayed here.
5.Created At: You can see where the commission is been created.
6.Source: Shows where the lead comes from, such as specific website.
7.Campaign: The campaign each customer came in through will be displayed here.

If you want to remove a lead from an affiliate, click on the three dots next to the campaign and then click Delete Lead.
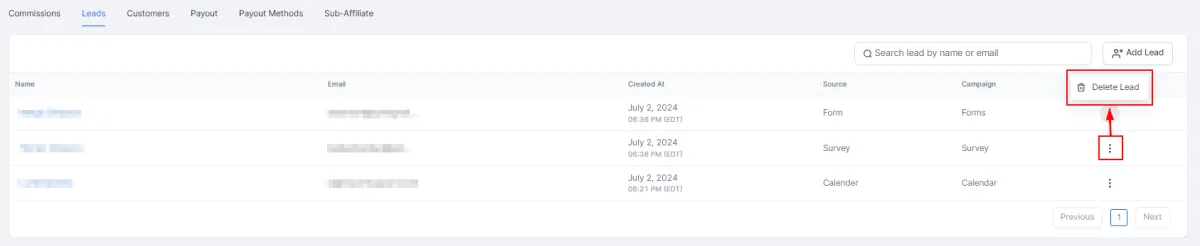
Customers
1. Search Bar: With the search bar, you can easily and quickly search for any lead name or email.
2. Name: You will see the names of all Customers assigned to this affiliate.
3. Email: The customer's email will be displayed here.
4. Created At: You can see where the commission was created.
5. Campaign: The campaign each customer came in through will be displayed here as well.
6. Status: Provides details such as whether the customer is new, active, pending, or inactive.
7. Revenue: You will see the revenue that has been generated from each customer.
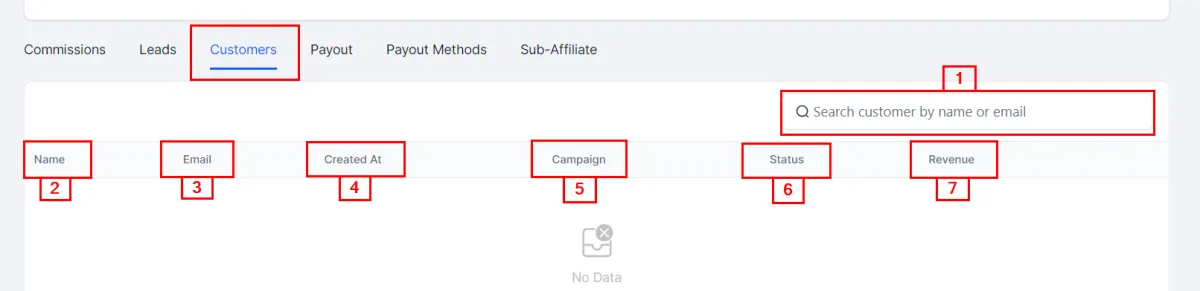
Click the three dots next to a customer to manually add commissions, view previous commissions, or delete/disable the customer.
Note:
- Setting a customer as "Disabled" ensures that no further sales are tracked, and they will no longer generate commissions. This option is useful for managing fraudulent sign-ups or preventing commission assignments in specific situations.
-Deleting a customer removes their association with the affiliate, and no future commissions will be generated from that customer.

Payout
1. "All, Pending, Approved, and Denied”: You can filter all your commission details This filter will enable you to narrow down the commission search using the status; to either All, Pending, Approved, or Denied.
2. Status: Shows if the payout is pending or completed.
3. Due: Indicates the due dates for each payout.
Amount: This column shows the amount to be paid for each campaign.
4. Payout Month: This shows the default Monthly date for each payout.
5. Campaign: The campaign each customer came in through will be displayed here.
6. Pay Payout: Seamlessly issue commissions to the affiliate by clicking this button.
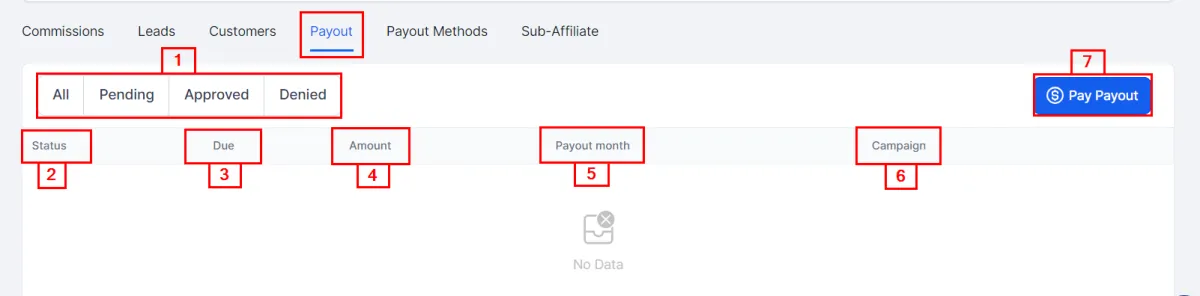
Payout Methods
1. Added On: You can see the date the payout method was added to the system.
2. Type: Displays the Payment provider associated with the payout method (currently limited to PayPal).
3. Account Preview: The email address associated with the payout method will be displayed here.
4. Status: A check mark indicating if the payment method is live.
5. Add Payout Method: Enables you to add the PayPal account associated with the affiliate directly to the system.
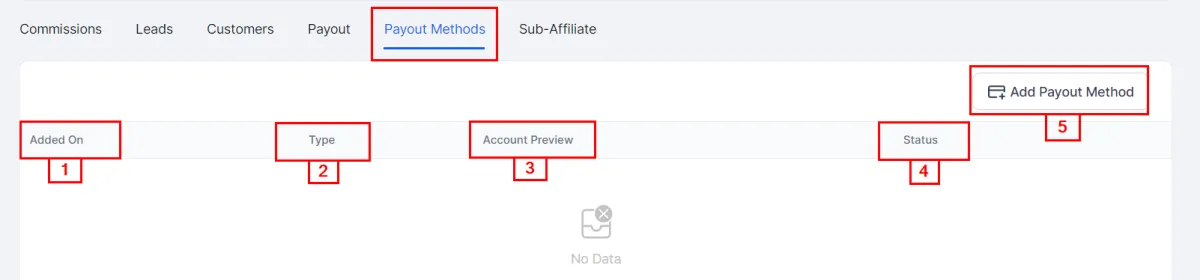
Sub-Affiliate
1. Search Bar: With the search bar, you can easily and quickly search for any lead or sub-affiliate name or email.
2. Add Sub-Affiliate: Seamlessly add a new sub-affiliate to an existing affiliate for campaigns with a multi-tiered structure.
3. Affiliate Name: You will see the names of all sub-affiliates.
4. Email: The sub-affiliate's email will be displayed here.
Status: You can also see the status of the sub-affiliate.
5. Campaigns: The campaign each sub-affiliate came in through will be displayed here.
6. Customer Name: You will see the names of all Customers assigned to each sub-affiliate.
7. Leads: You can see the number of leads assigned to each sub-affiliate.
8. Owed: The payout owed to each sub-affiliate will be displayed here.
9. Paid: This tab displays the amount of funds that have been successfully issued to the sub-affiliate.
10. Revenue: The revenue that has been generated from the sub-affiliate to date.
Join Date: The date the sub-affiliate joined the campaign.
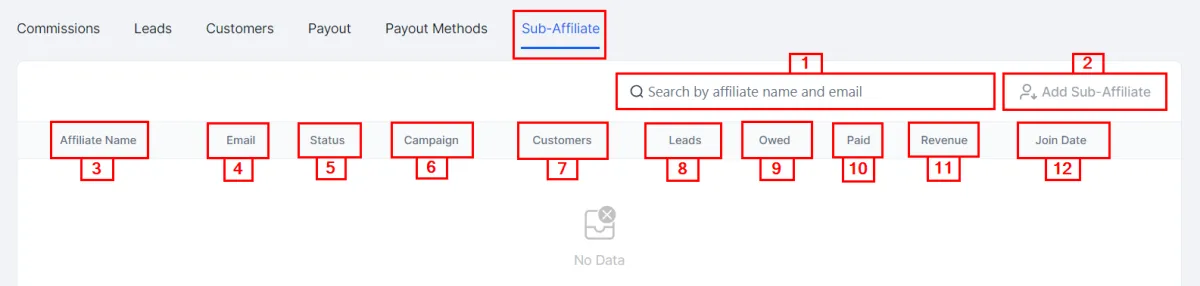
Now you have the basics of how to manage your affiliates' profiles! Start rocking that affiliate marketing world, or if you'd like to learn more, visit the other articles available in the Affiliate section.
©Tekmatix. All Rights Reserved
Privacy Policy & Website Terms of Use | Terms of Use & Refunds Policy